If would you like to experience Windows XP on Windows 11 OS, then the best way to install XP on VirtualBox using the steps given in this tutorial.
Windows XP which was an iconic operating system released by Microsoft in 2001 is history now. However, there was a time when it was a dominant operating system in the computer world.
Generally, because of its interface and stability as compared to its predecessor Windows 98. But everything has a time, and so does this OS, with the advancements in technology better and faster Windows versions developed.
Right now while writing this article the latest version of Microsoft OS is Windows 11. But still, the users who were born much later and didn’t get a chance to experience XP or anyone who still has an attachment to Windows XP due to its familiarity and ease of use would definitely like to try Windows XP on their newer operating systems. Despite knowing it is not officially supported anymore. If you are one of them then virtualization is the best method to do that without touching your current Windows 11 OS.
Furthermore, as we know Windows XP is not maintained anymore by Microsoft, therefore, security risks are there. Using XP in VirtualBox gives us an isolated environment to not only experience the OS but also to install applications that are not meant to use on Windows 11.
Windows XP on Windows 11 VirtualBox virtual machine
The steps given here to use VirtualBox to install Windows XP ISO image are not just limited to Windows 11. Users can follow them for Linux such as Ubuntu, macOS, Windows 10, 7, or other OS they are using and have Virtualbox.
Download Windows XP ISO
The Windows XP has been archived by Microsoft and its ISO is officially made available by them on Archive.org along with the Product key. It is the ‘Windows XP Professional SP3 x86’ version of this Old OS. So, before moving forward, visit the link and download the ISO file.

Install the latest VirtualBox on Windows 11
Here we are using the latest version of the available VirtuaBox. So visit the website of VBox and download it as per your operating system. Once you have it go to the next step.

Create a new virtual machine
Run the VirtualBox and click on the ‘New‘ button available on the application’s interface.

After that, a new window will open, where a wizard to create a VM will ask you to give some name to your virtual machine – let’s say Windows XP or whatever you want.
And then click on the Arrow icon given at front of the ISO image option. Select “Other…” and then navigate to your downloaded Windows XP ISO image from Archive.org.
After that simply click on the Next button.

Unattended Guest OS Install Setup
The good thing is Windows XP supports the “Unattended Guest OS Install Setup“. So, change the default username (vboxuser) and password (chnageme) with whatever you would like to set for your user account on Windows XP.
Also, copy-paste the product key available on the same page from where you have downloaded the Win XP ISO image. Furthermore, Change the hostname to whatever you would like to use. Once done click on the Next button.

Set RAM and CPU
Windows XP can run perfectly fine at 512MB, for better performance use 1GB where the CPU core can be one or two.

Create a Virtual Hard Disk
Let’s the default 10GB select because it is enough if you are not planning for something big on Windows XP whereas those who want to increase the storage space can simply use the slider given there.

Start Windows XP installation on Windows 11 VM
Soon the setup will start copying the files, wait for it, this will not take much time.

Later, a further interactive window will appear showing the installation progress.

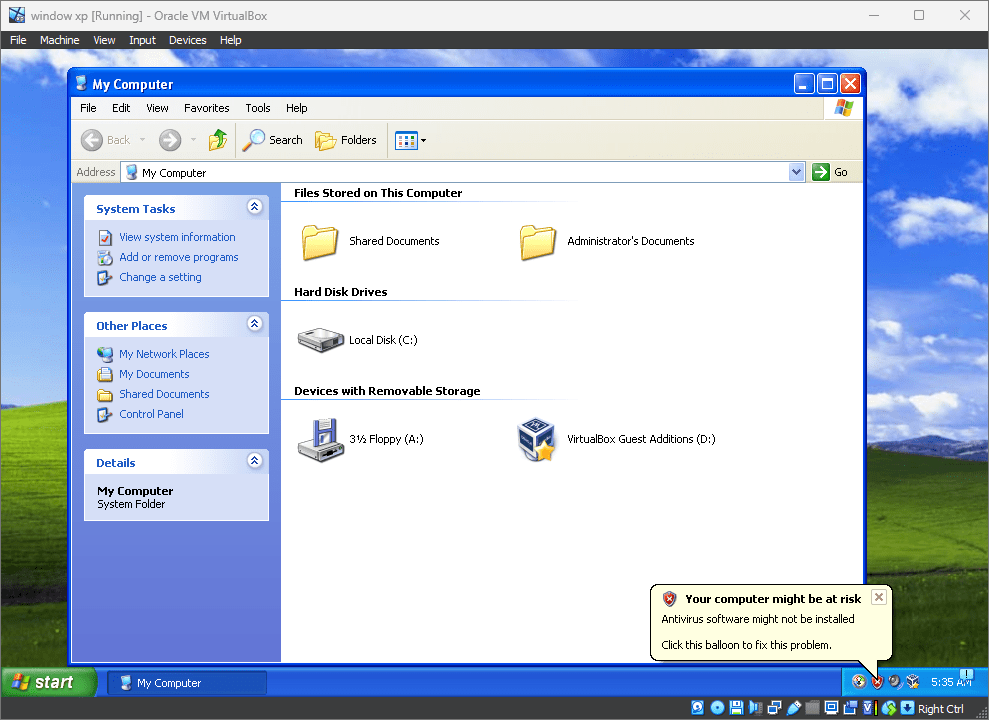
Virtualbox Guest Additions installation on Windows XP
After completing and finalizing the setup process of Windows XP on VirtualBox you will have the familiar Desktop interface of it. But by default, it will not adapt your host Display size as you try to expand VM’s screen. Also, no drag-and-drop support between host and guest will be there.
For that, we have to install VirtualBox Guest Additions in Windows XP. Go VirtualBox menu and click on Devices -> optical drive and select the VBoxGuestAdditions.ISO file.

After that open My Computer inside Windows XP and double-click on the Virtual Box Guest Additions drive. This will start the installation.

Once the installation is done, just reboot your system.

Finally, here is the fully working Windows XP on your Windows 11 running on Virtualbox to experience and use it.
Ending Note:
So, using VirtualBox to install Windows XP on Windows 11 is a perfect and secure way to experience some nostalgia and access legacy software. I have tried to outline the installation steps in this article as simply as they could be, you’ll be able to seamlessly run Windows XP on your modern-day computer. So what are you waiting for go ahead and give it a try – you never know what programs or memories you might uncover using the old Windows XP on your PC or laptop!


Initial XP install worked great. Once I installed the vboxguestsadditions.iso in order to get full screen, I get a black screen after the XP screen finishes running. Any help would be much appreciated!