In this tutorial, we learn the commands that we can use to install PHP, APACHE, and MYSQL on Windows 11 or 10 using the Command prompt or Powershell.
Are you a Windows 11 or 10 user who wants to create and test a PHP website on a LAMP server but without using Linux OS, WSL, XAMPP, or WAMP applications?
If so then you definitely would like to know the easy steps for installing Apache, PHP, and MYSQL using the command prompt or Powershell.
LAMP stack stands for Linux (any distro), Apache, MySQL, and PHP – a combination of open-source software commonly used in web development. But as we are not using Linux here, in short, we can say, we are setting up an AMP natively but on Windows.
The good thing is that installing the AMP server on Windows 11 or 10 is relatively simple if you use the command prompt. By following a series of straightforward instructions given in this tutorial at the end of it you’ll have your own Apache web server up and running in a few minutes. No need to use a Virtual machine or WSL to get LAMP stack server benefits on Windows.
Natively setup Apache, MySQL, and PHP on Windows 11 or 10
Most of the time users on Windows 10 or 11 use some third-party applications to create an Apache web server environment to run applications like WordPress. But we actually don’t need them just like Linux we can use the command prompt or PowerShell and a package manager to install them. And in this article, we are going to learn how to do that.
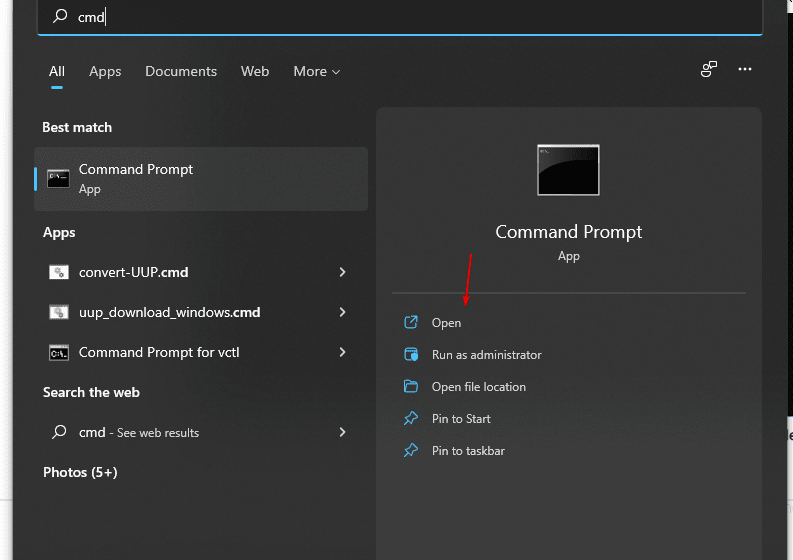
Run Command prompt (administrator user)
We are going to use the Command prompt to install the server applications such as Apache, PHP, and MySQL, so we need to run it with Administrator user rights. For that, in your Windows 10 or 11 search box type CMD, and as its icon appears click the Run as Administrator option. In Windows 11, this will start the Terminal application.
Install the Chocolatey Choco Package manager
I tried Windows default package manager Winget but PHP and Apache are unavailable to install through it. Therefore, the other best option left is to use the popular Chocolatey package manager.
But unlike Winget, Choco is not present on our Windows system by default, hence we need to install it manually on our system.
Copy-paste the given command into your Prompt to install the Chocolatey package manager.
@"%SystemRoot%\System32\WindowsPowerShell\v1.0\powershell.exe" -NoProfile -InputFormat None -ExecutionPolicy Bypass -Command "iex ((New-Object System.Net.WebClient).DownloadString('https://chocolatey.org/install.ps1'))" && SET "PATH=%PATH%;%ALLUSERSPROFILE%\chocolatey\bin"Restart your system to let the package manager integrate properly.
Install PHP on Windows 10/11
We have the package manager, the next task is to use it to download and install the current version of PHP on Windows using the Choco command. Here is the command to type:
As we are planning to use PHP with Apache, therefore here we are installing the latest ThreadSafe version.
choco install php --package-parameters='"/ThreadSafe ""/InstallDir:C:\PHP"""'.Press A and hit the Enter key to allow Choco to install all the packages needed to set up PHP.
Extra information:
The above command will install the latest version of PHP and PHP Extensions on Windows, however, those who are interested in some previous version can use the given syntax:
For example to get php7.4
choco install php --version=7.4 --package-parameters='"/ThreadSafe ""/InstallDir:C:\PHP"""'.For more version history check out the Choco official page.
Once done, either restart the command prompt/PowerShell or use the given command to refresh the environment variables on Windows:
refreshenvTo check versions and list PHP Extensions you can use:
php -vphp -mTo install multiple versions of PHP side-by-side (optional):
If you don’t want to remove the current latest version from your PC but want to have some older version installed as well, then use the --side-by-side parameter.
Example:
choco install php --version=7.4 --package-parameters='"/ThreadSafe --side-by-side
Setup Apache using CMD on Windows
Well, just like PHP apache is also present in the repository of the Chocolatey package manager to install and run as a background service on Windows systems. So, what are you waiting for, on your command terminal or PowerShell, execute the following command.
choco install apache-httpd --params '"/installLocation:C:\HTTPD /port:8080"'
Note: You can change the port to 80 or 443 if they are not already used by any other application on your system.
To check its service is running – type:
service Apache
Whereas to confirm further, open your browser and type:
http://localhost:8080
Note: If you are using some other port than 8080 then use that in the above command.
You will have the default Apache info page. This will confirm our web server is running in the background perfectly.

Download MySQL using Choco
The last thing we need is the MySQL server to complete the stack of AMP on our Windows system. The great thing is choco can also be used to install the latest version of MySQL server using the command prompt. Therefore, again in your CMD run:
choco install mysql
To check MySQL is working, refresh the Environment variables or manually close & reopen the prompt or PowerShell:
refreshenv
After that type:
mysql -u root -p
When the MySQL server asks for the root password, simply press the Enter key. To exit, type exit;

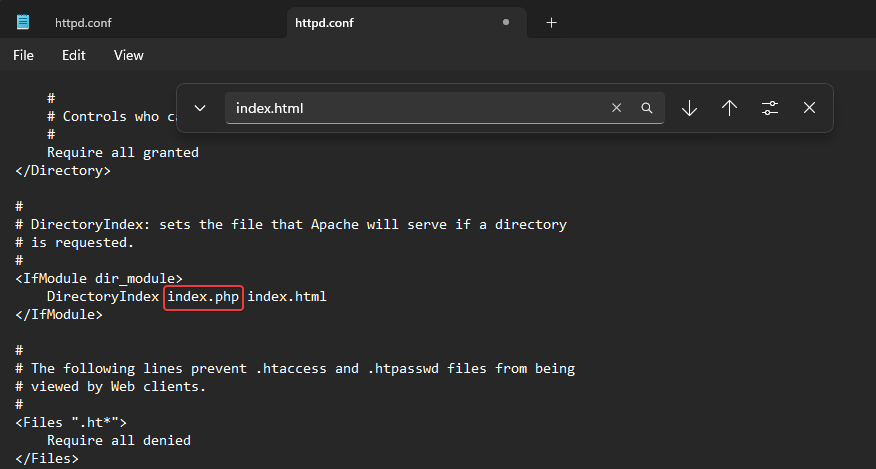
Add PHP module location in the Apache Config file
By default, the Apache Web server will not recognize the PHP in Windows. To make sure the PHP applications, websites, or any web app using the PHP code and running using the Apache web server work accurately, we need to tell the web server where the PHP-Apache module is located. For that, we will use the httpd.conf file.
On your command prompt type the following to edit the httpd.conf file:
notepad c:/HTTPD/Apache24/conf/httpd.conf
Scroll to the end of the file and copy-paste to add the following code.
# PHP8 module
PHPIniDir "C:/tools/php82"
LoadModule php_module "C:/tools/php82/php8apache2_4.dll"
AddType application/x-httpd-php .php
Note: Here we are using PHP8.2, so we are adding its path in the above code. If you have a different version of PHP then go to your C Drive and under tools check it to replace the two paths given in the code, which are: C:/tools/php82 and C:/tools/php82/php8apache2_4.dll
Also, after adding the PHP module, press Ctrl+F and find index.html and just before that add index.php. After that save the file.
Restart the Apache service in Windows:
Finally, let’s restart the Apache service on Windows to ensure it can integrate and recognize the changes we have done to its configuration file.
- Go to Windows 10 or 11 search box and type – services as its icon appear click to open it.
- Find Apache service
- Right-click it and select the Restart option.
- Wait, once done, and close the service window.

Alternatively, we can use the Command prompt to stop and start the Apache service, if you want here are the commands to follow:
net stop apache
net start apache

Let’s check the web server
You can add any website or app you want to run on Windows using Apache, PHP, and Mysql. However, before that let’s check our web server is reading and executing the PHP files properly. For that, we can check the PHP version using a single code – phpinfo(); this will not only publish all information related to PHP and its extensions but also let’s sure that it is working correctly.
For that, on your command prompt or terminal type:
Switch to the www directory of Web server:
cd c:/HTTPD/Apache24/htdocs
notepad info.php
After that paste the following code, and save and close the file.
<?php
phpinfo();
?>
Restart Apache web server service:
net stop apache
net start apache
Open the web browser and point to your localhost along with the port number used for Apache:
http://localhost:8080/info.php

Uninstallation
In case, due to any misconfiguration, you want to uninstall Apache, PHP, or MySQL from Windows installed using the choco, the commands are here:
choco uninstall php
choco uninstall apache
choco uninstall mysql
Ending Note:
We have tried to cover all the basic steps required to set up the APM stack on Windows using the command prompt or Powershell. You can now start installing further web applications such as WordPress to test your website locally just like Linux. Learn: Which is better Cloud hosting or WordPress hosting?
Related Posts
How to create email groups in Gmail? Send one email to multiple recipients in a matter of seconds.
Getting the right dashcam for your needs. All that you need to know
How to Install 7-Zip on Windows 11 or 10 with Single Command
Install Google Earth on Windows 11 or 10 Using a Single Command
How to install Gaming Services on Windows 11
How to Install Telnet Client on Windows 11 Using PowerShell