In Windows 10 operating system if your default printer always changes, this may be due to the new feature called “Let Windows Manage my Default printer”. This features automatically selects the last used printer as the default printer which may be annoying to someone. However, we can change the default printer and set it permanently so that it will never change automatically, for that just follow this tutorial.
The steps given here are applicable for both Windows 10 and Windows 8, moreover, we have also given the way to set the default printer for Windows 7 at the end of this tutorial. Have a look…
Change or Set the default printer in Windows 10
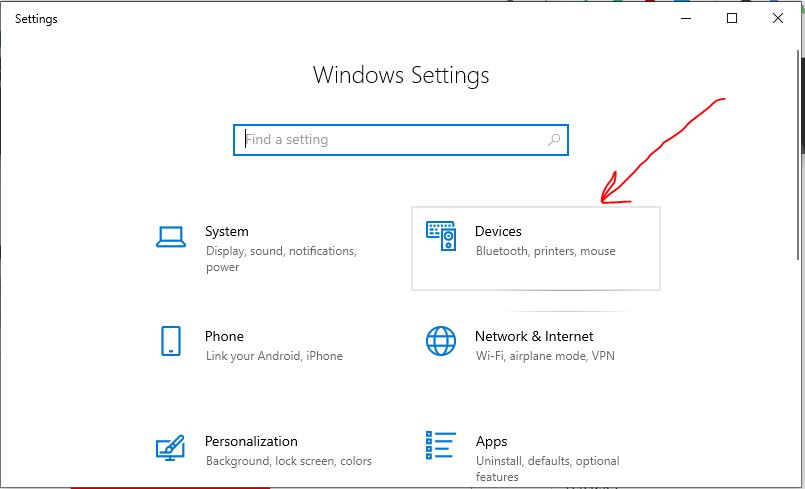
- Open Windows 10 Settings for that keyboard shortcut is [ Windows key ] + [ i ]. Or Just click on the Gear icon given but above the Power icon in Windows 10 startup menu.
- From Windows, Settings click on the ” Devices ” button.
- Now from the left side panel or menu select “Printer & Scanner “.
- On the right side, you can see the available printers.
- Scroll down in the right-side panel and uncheck “Let Windows manages default printer“.

- Again scroll back to the top to see the list of all the printers available on your computer. You can also add the new one by clicking on Add Printer or Scanner button (optional).
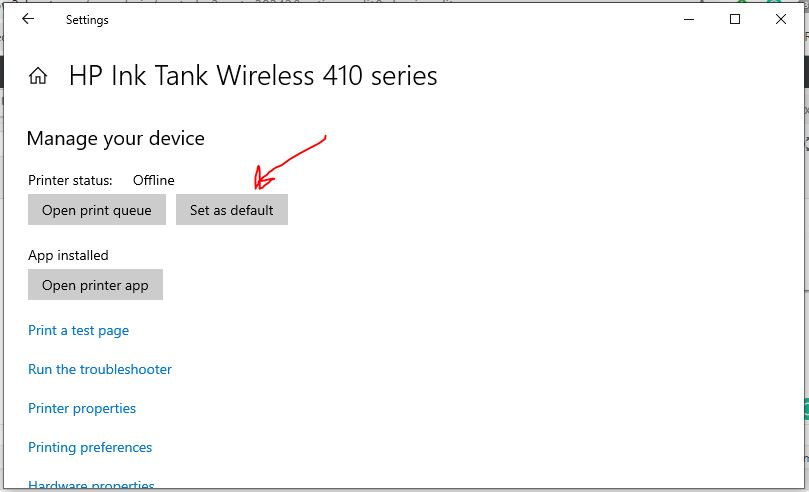
- Now, click on the printer from the list that you would like to make the default printer, and then click on the “Manage” button.

- Click on the “Set as Default” button to set the default printer.
- In the same way, if you want to change and set some other Printer as default on Windows 10 then, again: Click on the Printer from the Printers list, select Manage, and click “Set as default.”
Set Default Printer in Windows 10/7 using Control Panel
We can also set the default printer in Window 10 using an alternative or traditional method which is via Control Panel. This is also applicable for Windows 10 systems. Thus, follow the below steps for both.
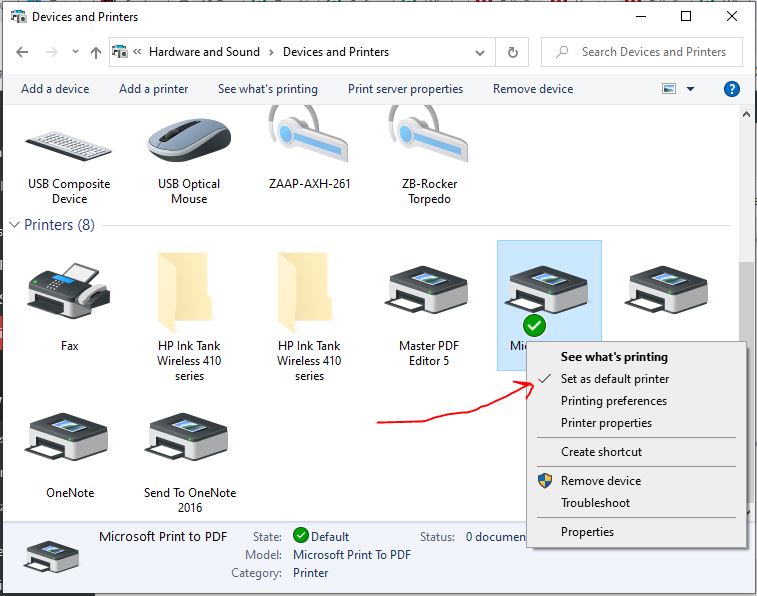
- Opens the conventional Windows Control Panel. For that either simply search for that in Window 10/7 search box or press Windows+R, type Control Panel and hit the Enter button.
- Click on the link ” View devices and printers ” given under the Hardware and Sound Option.

- Scroll to Printer list, right-click on a printer and select “Set as Default Printer“.
In this way, we can change our default printers on Windows 10, 8 or 7.
Other Tutorials:
Related Posts
How to create email groups in Gmail? Send one email to multiple recipients in a matter of seconds.
Getting the right dashcam for your needs. All that you need to know
How to Install 7-Zip on Windows 11 or 10 with Single Command
Install Google Earth on Windows 11 or 10 Using a Single Command
How to install Gaming Services on Windows 11
How to Install Telnet Client on Windows 11 Using PowerShell