Installing CentOS 8 Linux on some virtualization platform such as VirtualBox, Vmware or Hyper-V is not rocket science, we already have done a tutorial on CentOS 7 virtual machine creation, however, it is a latest server operating system, we thought why not one for it.
CentOS 8 is the latest operating system from the CentOS Linux developer community based on REHL 8. There are a handful of improvements and changes which are the same as its upstream OS. If you want to know them you can see this article: CentOS 8 features and changes. The paramount development this time is the advent of a rolling-release CentOS Linux distro known as CentOS Stream. The link which aforementioned will also help you to know what is the difference between CentOS 8 and Stream.
Here we will give a tutorial on how to install the CentOS 8 Linux or CentOS stream VirtualMachine on VirtualBox to test & learn their new features and commands.
Step 1: Download CentOS 8 Linux
Indeed, the very first step is to get the operating system ISO DVD file. For that either you can directly visit the CentOS.org and download the one or use these links: Direct ISO Link and Torrent Link.
Step 2: Get the Oracle VirtualBox on your PC
The second software we need to create a CentOS 8 Linux Virtual Machine is the open-source Oracle VirtualBox. Here is the link to download it. As per your host operating system you can get the installation file.
Step 3: Run the Virtualbox and Create a VirtualMachine for CentOS 8
It doesn’t matter what operating are you on? The steps to install the CentOS 8 on VirtualBox will be the same for windows 10/8/7, Linux (Ubuntu, Debian, Fedora, Linux Mint etc), FreeBSD and macOS.
So, open the VirtualBox and click on the New Button given in the top menu.

Step 4: Name the operating system
It will ask you to give some name to the virtual machine, we are about to create. Here we are giving, CentOS 8 Linux and its corresponding values will automatically set the by the VirtualBox.

Step 5: Assign Memory CentOS 8
Now, assign an amount of virtual RAM to the operating system. The minimum RAM required by the CentOS 8 is 2GB, however, 4GB is recommended for smoother operations. Here we are specifying the recommended one.

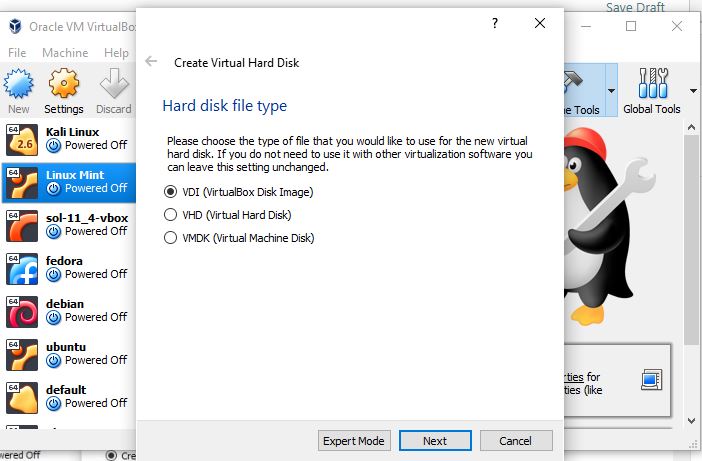
Step 6: Create Virtual hard drive
The next step is to create a virtual storage space where we can install CentOS 8 Linux. Leave the default option and click on the Next button.

Again, leave the default option i.e VDI (Virtual Disk Image) hard disk file type and click on the Next button to see the further options.
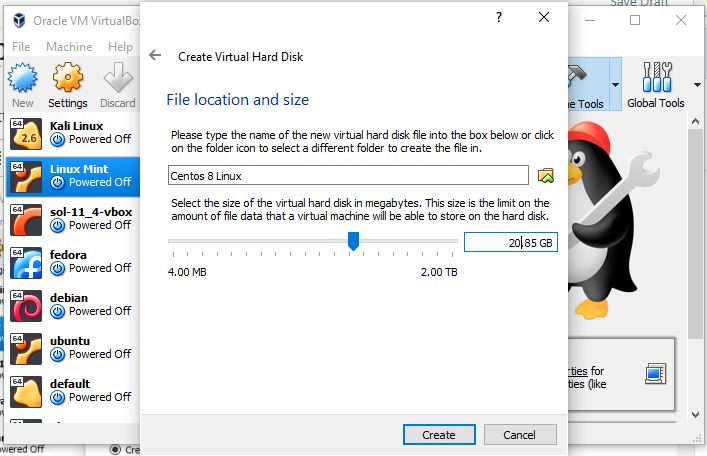
Again leave the Dynamically allocated scheme for Virtual storage on the physical hard disk as it is.

The minimum storage size for CentOS 8 Linux is 10GB and recommended one 20GB. You can set more if you want to install a bunch of software on it for testing.
Finally, click on the Create button to set up a Virtual Machine instance for the CentOS 8 Linux.
Step 6: Insert CentOS 8 ISO file in VirtualBox Virtual machine
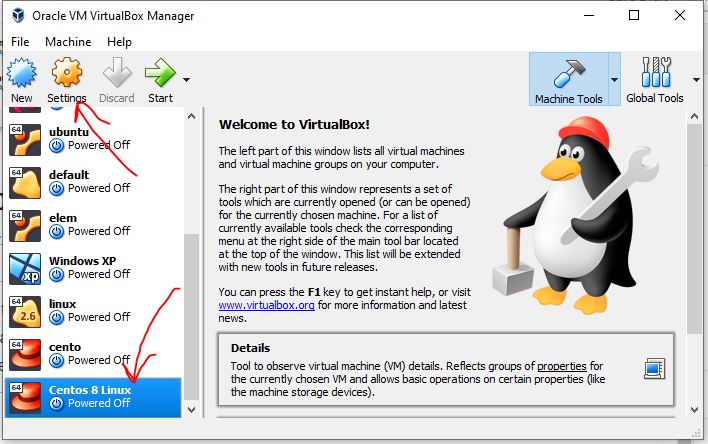
To boot the created machine, first, we need to set the downloaded CentOS 8 ISO file as its booting medium.
To do that, select the created virtual machine from the left side panel and click on the Settings button given in the Menu.
To set ISO file as boot Medium:
1. Click on the Storage option.
2. Select Empty CD icon given under Storage Device Controller: IDE.
3. Again click on on the CD/DVD icon available at the front of Optical Drive.
4. Select Choose Virtual Optical Disk file.
5. An explorer will get opened, select the downloaded DVD ISO file of CentOS 8.
6. Finally, click on the OK button to save the settings.

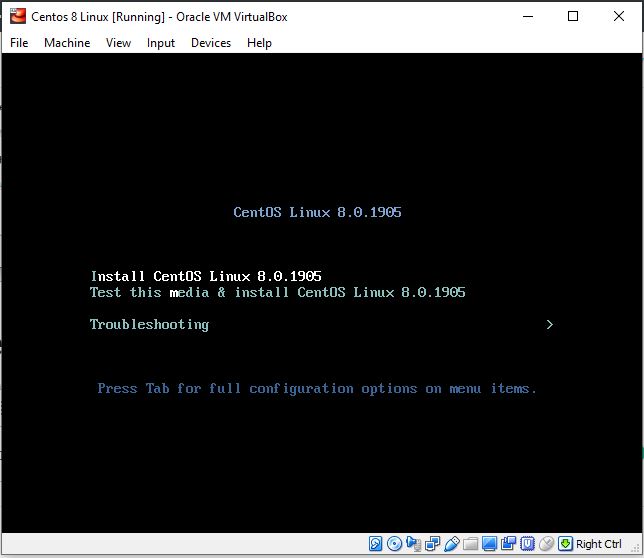
Step 7: Boot CentOS 8 Linux Virtual Machine
To begin the booting, click on the Start button given in the VirtualBox menu.
When the boot menu appears, use the keyboard arrow keys and select “Install CentOS Linux 8.0.1905“.
Step 8: Install CentOS 8 on VirtualBox
From here onwards, we will follow the main steps to install this os on Virtual machine, however, these steps will be the same for PC or laptop’s physical installation of CentOS 8.
1. Select the language
The first step towards the setting up this OS for usage is to select the language which you want for the system.

2. Installation Destination
Click on the Installation Destination option to set the hard drive storage space to set up the CentOS 8.
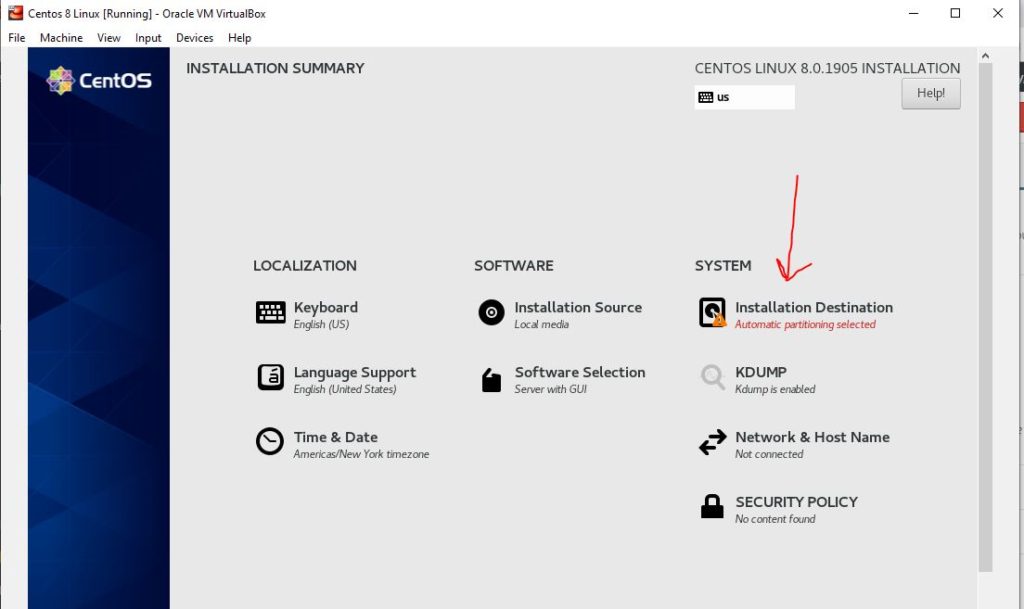
As we are installing it on a Virtualbox, thus, we can use the whole virtual drive storage since there is no data in it. Thus, select the Virtual Drive and then click on the Done button.

3. Select Software Selection
Simply click on the SOftware Selection to perform an important step otherwise the CentOS 8 will not work on VirtualBox.

4. Don’t install Server with GUI
For the Base environment, available options are:
1. Server with GUI
2. Server
3. Minimal Install
4. Workstation
5. Custom Operating System
6. Virtualization Host
According to the Redhat, on Virtualbox installation, the user should not select the default server with GUI option otherwise it will not work at all because of some known issues.
Thus, under the Software selection uncheck the default Server with GUI option and select Workstation. And from the opposite side Windows check ro choose Container Management, Development Tools, and Graphical Admin Tools.
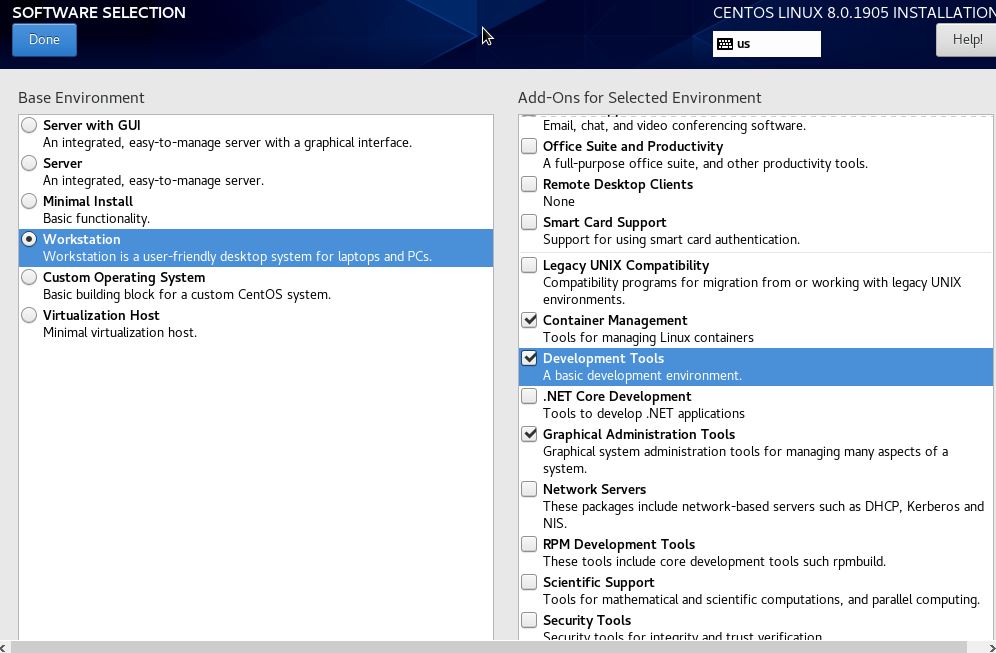
However, in this area, we can also pre-configure the CentOS 8 Linux to install difference servers and environments such as FTP server, File and Storage Server, Main server, Network File system Client; Performance tools, Network servers, Remote Management for Linux, remote servers, Windows file Server and more.
4. Disable kdump to save memory
To save Virtual memory and burden on your system disable the kdump memory in the CentOS 8. For that simply click on the KDUMP option available on the Installation Summary screen and uncheck the Enable option to Disable the KDUMP.
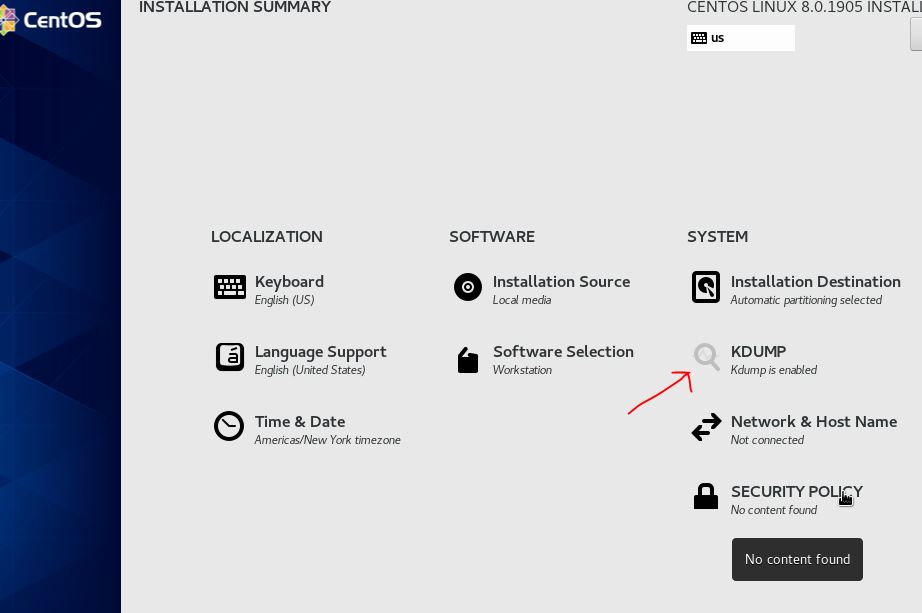

5. Enable the network connection
Again on the Installation Summary screen select Network & Host Name configuration option. Then select and enable the network using the toggle button.

6. Begin the installation
Finally, click the Begin the installation button for further proceedings.
7. Set Root password
While the setup is configuring the files, let’s set the root password for the system.
Click on the Root Password and type the password two times, you want to set for it.
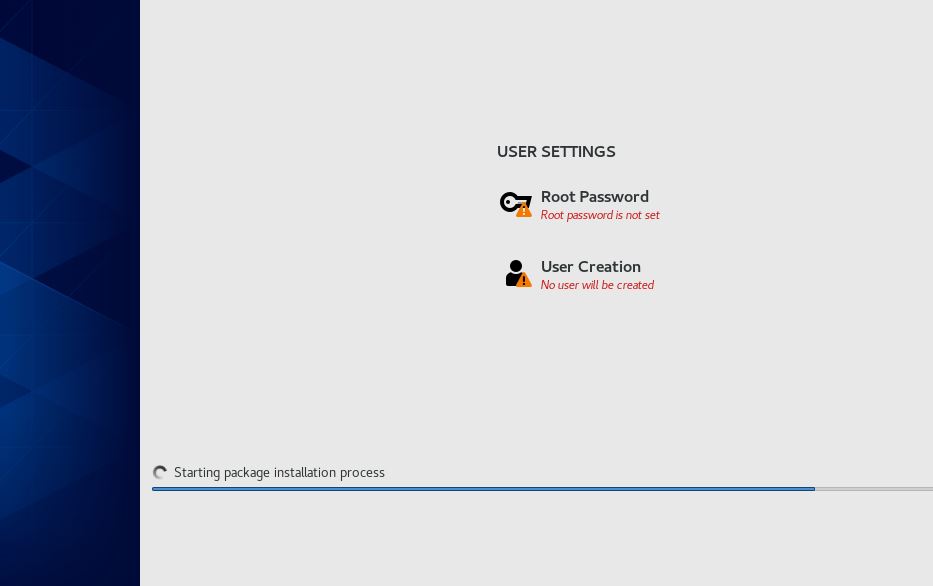

To create a standard user, select the second option that is User creation. And type some username you want to set and its corresponding password to access it.
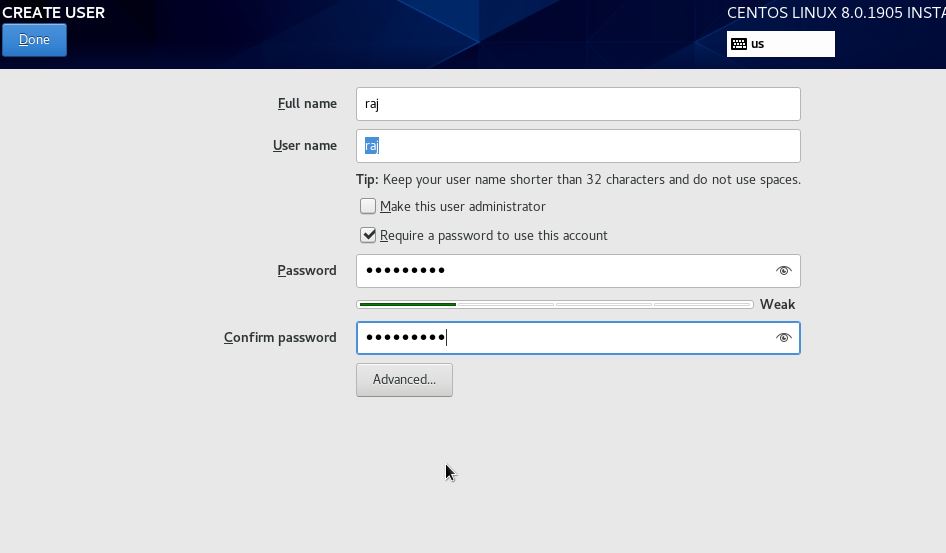
In a few minutes, the installation process will be over and then perform the next step.
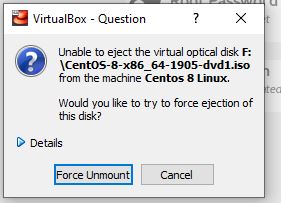
8. Unmount ISO boot medium
Once the installation is done, go to the Devices option in the menu select Optical Devices and click on the inserted CenOS 8 Linux ISO file.
A pop-up will appear, select the Force Mount and then Restart the VirtualBox.
9. Login CetnOS 8
When the Login screen appears use the user and password you created above and login into it. That’s it.


CENTOS Release Notes
If you are planning to install CentOS-8 in a VirtualBox guest, you should not select “Server with a GUI” (default) during the installation. See this Red Hat article for details.
Excellent simply superb
Thank you for this excellent step-by-step tutorial, however it did not work for me.
I’m using a Windows 7 laptop and this is the response I get:
CentOS Linux 8 (Core)
Kernel 4.18.0-193.e18.x86_64 on an x86_64
CentOS8 login: [72.559159] IPv6: ADDRCONF(NETDEV_UP): enp0s3: link is not ready
[72.580612] IP6v: ADDRCONF(NETDEV_UP): enp0s3: link is not ready
Can you help me with this problem? Thank you.
May I know at what step are you getting this error.