
Django is a high-level Python web framework that is not only free for use but also open source. It helps developers to create web applications faster and better by coding less. We can install it on any platform where Python can be configured. Also, Django offers active community support and well-maintained documentation. It’s robust, scalable, and versatile, and used by many businesses to power their websites. Furthermore, even newcomers can quickly start with Djano because of its “batteries-included” philosophy, meaning it includes all the necessary features by default, unlike other frameworks that require separate libraries.
Installing Django on Windows 11/10
Prerequisites
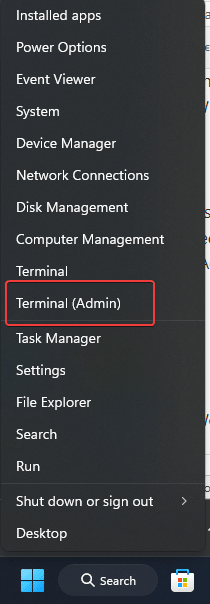
Well, the key requirement to install Django on Windows or any other OS is Python because Django is a Python framework. So, before moving further right click on the Windows 11 or 10 start button and click Terminal (Admin) or Windows PowerShell (Admin) whatever is available.
So, before installing Django, you must confirm that Python is installed on your Windows 10 or 11 OS, for that you run the following command:
python --versionIf Python isn’t installed you will see the following warning.
Python was not found; run without arguments to install from the Microsoft Store, or disable this shortcut from Settings > Manage App Execution Aliases.Step 1: Install Python on Windows
So, if you don’t have Python already installed on your Windows system then first we need to have that on our system. We can install Python either by downloading its setup file from its official website or can using the “Winget” Windows package manager via Terminal. So, let’s use the Winget, a straightforward method to install Python’s latest version using the command line:
On PowerShell or Terminal as Admin execute the given command. We are installing version 3.13, you can install any other if you want by just replacing the version number in the given command.
To learn what are the other available versions we can use –
wignet search Python.Python
For installation:
winget install Python.Python.3.13After completing the installation close the Terminal and open it again to check the version of Python using:
python --version
Step 2: Set up a Virtual Environment
To isolate our projects, it is a good practice to create a virtual environment, and the same we are doing here as well for our Django project. The Python environment is a self-contained directory that contains all the necessary executables to use the packages that a Python project would need.
So, on your command prompt or terminal, navigate to the project directory. If you don’t have any, then can create one by using:
mkdir my_projectYou can rename “my_project” to whatever name you want to give your project. After that, switch to the created directory or one you have already.
cd my_projectAfter that run the following command to create a virtual environment:
python -m venv myh2sReplace myh2s with whatever you want to name your environment. The above command will create a directory – myh2s with the necessary files.
Step 3: Activate your Virtual Environment
Now, we need to activate the environment we have created. For that use the given command. However, don’t forget to change the environment name with the one you have created, our is myh2s.
myh2s\Scripts\activateYour command prompt should now reflect the virtual environment’s name.
Note: if you get an error:
File C:\Users\h2s\my_project\myh2s\Scripts\Activate.ps1 cannot be loaded because running
scripts is disabled on this system. For more information, see about_Execution_Policies at
https:/go.microsoft.com/fwlink/?LinkID=135170
Then run this command to enable the running of scripts in PowerShell or CMD:
Set-ExecutionPolicy -ExecutionPolicy RemoteSigned -Scope CurrentUserNow you will be able to activate your created Python environment. Once it is activated, you will see the path of the project folder at the prompt as shown in the below screenshot:

Step 4: Installing Django on Windows 11 or 10
Let’s use the Python package manager which is PIP on Windows to install the Django. The package manager will be configured automatically when you install Python on your system.
pip install django
(Optional) By default the latest version of Django will be installed on our system, however, if you want some older version for your project then mention that in the above command. For example, if you want to install version 4.2 of Django then the command will be like this:
pip install django==4.2Step 5: Check the current version
Once you have Django installed we can confirm it by checking its version using the given command:
django-admin --versionExample to create a Project and App in Django
Creating a Django Project
Using this command we can create any new project with the basic structure of a Django project.
django-admin startproject firstprojectYou can rename “firstproject” in the above command with whatever you want, after that switch to the created project folder:
cd firstprojectStart the Development Server
Within the directory of the created project folder, it will have all the necessary files to run the built-in development server of Django, so, use the given command and start it.
python manage.py runserver

The above command will start the development server on your local machine, to check it in your browser type- http://127.0.0.01:8000
You will have the default page of Django as shown in the given screenshot. Now, get back to the command terminal and stop the server by pressing Ctrl+C keys.

Create a Django App
For further process, you can check out the official documentation page where the developers have shown a good example of how to create a first Django App, here is the link to that.
Other Tutorials:
Related Posts
How to create email groups in Gmail? Send one email to multiple recipients in a matter of seconds.
Getting the right dashcam for your needs. All that you need to know
How to Install 7-Zip on Windows 11 or 10 with Single Command
Install Google Earth on Windows 11 or 10 Using a Single Command
How to install Gaming Services on Windows 11
How to Install Telnet Client on Windows 11 Using PowerShell