
Java is required by many applications that are built over it to run properly. Apart from that developers who are working on some projects that require Java also need to install JDK on their system. Hence in this article, we talk about how we can use the command prompt or Powershell to install a particular Java 11 version on Windows 11 or 10. Using the command line method to install some software is quite straightforward as compared to manually visiting its website to download and install it.
Why Java 11?
The reason for using particularly the Java 11 version is basically either due to the demand of an application to run or a developer needs that for a project. Otherwise, there are the latest LTS (Long Term Support) versions of Java available to use.
Prerequisites
- Windows 11 or 10 running system
- Command line access with Administrator rights
- An active Internet connection
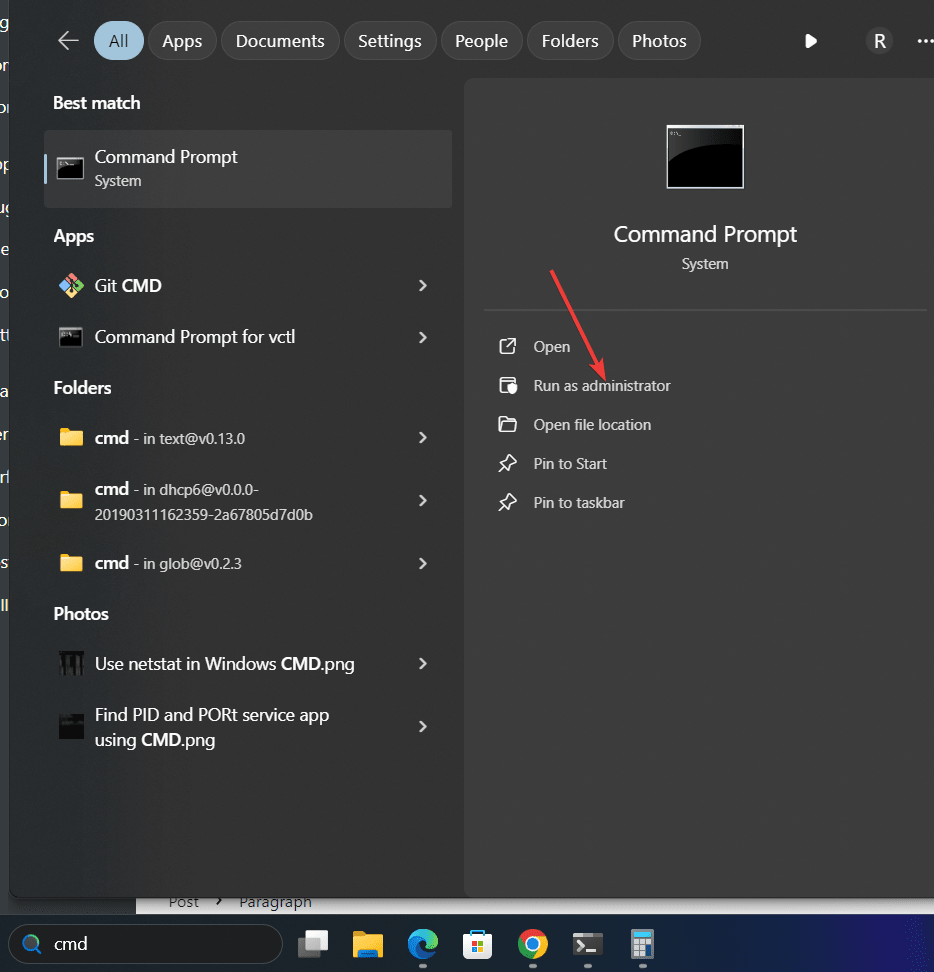
1. Open Command Prompt or PowerShell
This article especially uses the command line to guide how to install applications or programming languages such as JAVA. Therefore, click on your Windows Start button, and in the search box type – Command Prompt, as it appears select the “Run as Administrator” option.
2. Update Winget Source
Winget is the default package manager in Microsoft Windows 10 and 11 operating systems. It allows users to install various popular applications and packages using the command just like we do in the Linux system. Some of the packages are installed through the Winget repository while others are from MSstore.
Before using it let’s update its package source:
winget source update3. Command to Install JAVA 11 on Windows 11 or 10
Next, we run the Winget command to install the OpenJDK 11 on Windows. The given syntax can also be used to get the other versions of OpenJDK, just change the version number:
winget install ojdkbuild.openjdk.11.jdkWhereas to get only the JRE 11, you can use:
winget install ojdkbuild.openjdk.11.jre
To search for other versions you can use the:
wignet search openjdk
4. Check Version
To confirm we have OpenJDK 11 successfully on our system, we can use the given command, It will fetch the details of the installed Java version.
java --version
5. Java 11 Uninstallation
Winget command on Windows is not just to install the applications, we can use it to remove them as well. Therefore, in the future, if you want to uninstall the Java 11 version from your Windows 10 or 11 system, then here is the command to follow:
winget remove ojdkbuild.openjdk.11.jdkConclusion
You have now successfully installed Java 11 on Windows 11 using the command line. Using this tutorial, Windows users can install other popular software applications such as Chrome browser, FireFox, CCleaner, etc.
Other Articles:
Related Posts
How to create email groups in Gmail? Send one email to multiple recipients in a matter of seconds.
Getting the right dashcam for your needs. All that you need to know
How to Install 7-Zip on Windows 11 or 10 with Single Command
Install Google Earth on Windows 11 or 10 Using a Single Command
How to install Gaming Services on Windows 11
How to Install Telnet Client on Windows 11 Using PowerShell