There are a couple of methods to install Windows XP Virtual machine on Windows 10 using different platforms such as Oracle VirtualBox, Vmware, and Hyper-V.
Windows XP is an old but dominant operating system of the world during its heydays. However, this Windows XP is not supported officially but is available in bootable ISO image form for free to download and use. Yes, we don’t need to pay anything for Windows XP Service Pack 3 Licenses and ISO, both are available on an internet archive website.
Here we will show how to install Windows XP on Oracle VirtualBox as an emulator on Windows 10 step by step using its ISO file. This will allow you to continue to use Windows XP on Emulator without having to install it on your PC.
Windows XP virtual machine on VirtualBox
Here is a glance at the steps we are going to follow for the installation of Windows XP Virtual Machine using ISO file on VirtualBox running on Windows 10. However, the steps will be the same for Windows 8, Windows 7, and Windows Vista.
- Download the Windows XP ISO file and copy the license key as well and save it on a notepad. For links see the main step 1 of this article.
- Install Oracle VirtualBox on your Windows 10/8/7 PC
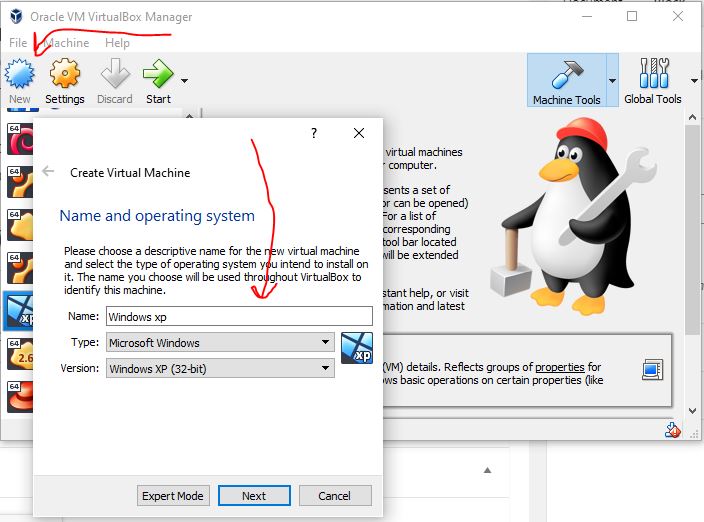
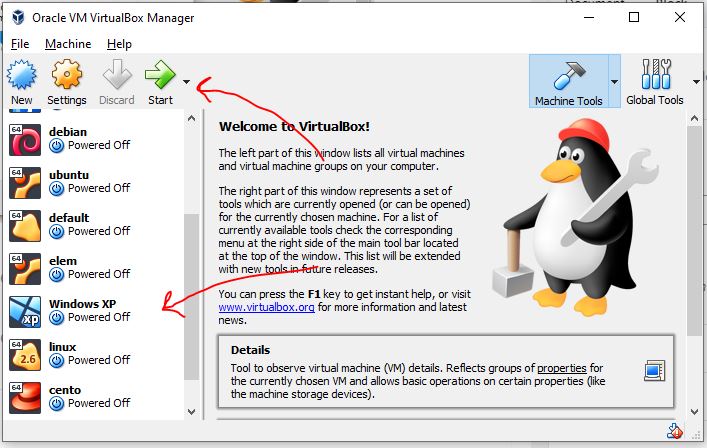
- Run the VirtualBox and click on the NEW button to create a new Virtual Machine.
- Type the name of the OS -Windows XP and the rest will be set by default.
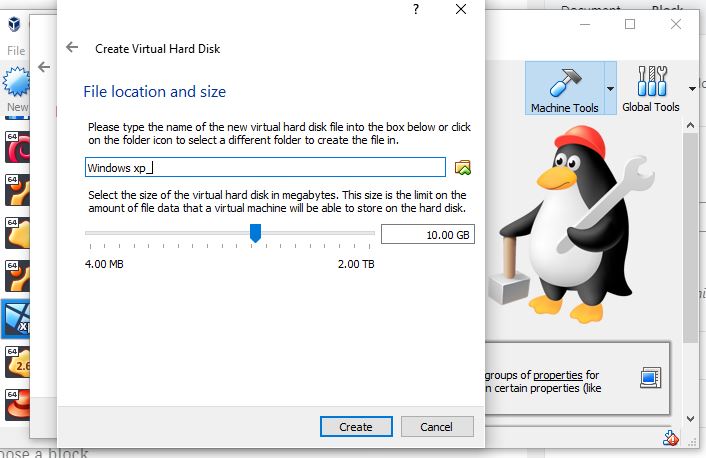
- Create a Virtual Hard disk (VHD) and set RAM.
- Select the created Windows XP virtual Machine appearing on the left side of the VirtualBox main screen.
- Click on the Settings option from the menu.
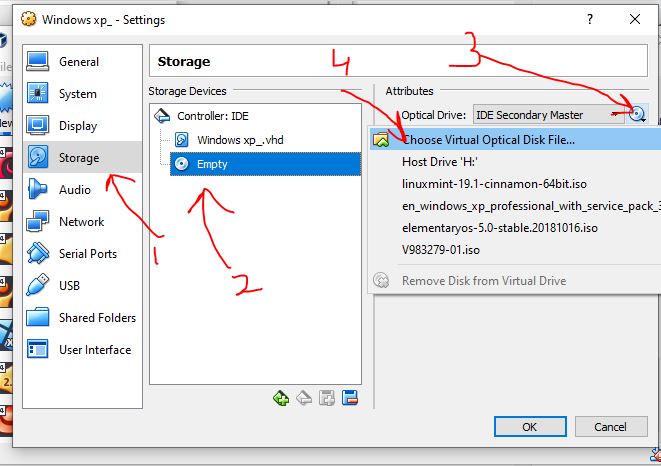
- Select the Storage Settings
- Click on the empty CD icon and then again from the attributes select the CD icon.
- Navigate and select the downloaded windows XP ISO file.
- Save it and Start the Virtual Machine and the Windows XP boot menu will appear.
- Follow the installation wizard and it will be on your Oracle Virtualbox to experience.
—New VirtualBox version allows unattended installation of Windows XP—-
Here are the steps to follow:
Name your virtual machine – Windows XP or whatever you want. And then click on the Arrow icon given at front of the ISO image option. Select “Other…” and then navigate to your downloaded Windows XP ISO image from Archive.org.
After that simply click on the Next button.

Under Unattended Guest OS Install Setup, the default username (vboxuser) and password (chnageme) will be given. Change them with whatever you want to set for your user account on Windows XP.

Also, paste the product key available on the same page from where you have downloaded the Win XP ISO image. Also, Change the hostname to whatever you would like to use. Once done click on the Next button.

Windows XP can run perfectly fine at 512MB, for better performance use 1GB where the CPU core can be one or two.

Let’s the default 10GB select because it is enough.

Soon the setup will start copying the files.


Once the installation is done, click on the Devices -> optical and select VBoxGuestAdditions.ISO file.

Open My Computer and double-click on the Virtual Box Guest Additions drive. This will start the installation.

Once the installation is done, just reboot your system.

——old VirtualBox versions method—-
Step 1: Download Windows XP ISO and License
The first step towards the Virtual installation is to get an ISO image of this old operating system. As I mentioned above that it is free and avail by Microsoft itself officially along with the License key. Thus, use this link which will open the page of Archive.org, where click on the ISO image link given on the right side under the Download section, this will allow you to download the Windows XP Professional SP3 x86 ISO image. Just on the same page, the free but official professional key for the same will have been given. Copy that and jot down somewhere like NotePad.
Step 2: Install VirtualBox on Windows 10/8/7
So, we have now the ISO file of Windows XP professional 32-bit service pack 3, it’s time to get the Oracle VirtualBox. Here is the link to Download VBox. In case you already have the Vbox on your system then simply move to next.
The installation of the VBox is like any other executable software meant for Windows nothing will be complicated at all.
Step 3: Create a Virtual Machine for Windows XP
Run VirtualBox and click on the New button given on the Menu of it. Now in the Name box, type- Windows XP, and its corresponding options will automatically get set up. Then click on the Next button.
Step 4: Set memory size (Virtual RAM)
Although Windows XP perfectly works under 512 MB RAM, however, here we are assigning 1GB for better working and smooth performance.

Step 5: Create a Virtual Hard disk (VHD) for XP virtual machine
To store the installation file we need to attach a Virtual Hard drive to our Virtual Machine. The VirtualBox will automatically set it to 10GB which is enough. Thus, leave the default settings and click on the NEXT.
On the Next window, it will ask you to select the type of Virtual Hardrive, by default it will be VDI, however, here we are selecting VHD. It is because in case, tomorrow we want to run it under Windows Hyper-V, we can easily use the Windows XP VHD image.
Next, Select Dynamically allocated option.
File allocation and Size: By default, the VirtualBox will save all files of the machine on C: drive, if you want to change click on the folder icon and select the place.
Finally, click on the Create button.
Step 6: Set ISO image for boot
Select the created VirtualMachine and click on the Settings button given on the top menu of VBox.
From Settings -> click on the Storage-> Empty CD icon under storage device-> again on CD icon of Attributes and then “Choose Virtual Optical Disk File“.
An explorer will open and select the downloaded Windows XP ISO image.
Click on the OK button.
Step 7: Start Windows XP Virtual Machine
Now, our XP Virtual Machine is ready, time to boot it up. For that select the created virtual machine from the left side of the VBox panel and click on the Start button given in the menu of the same.
Step 8: Installing Windows XP
Windows XP Professional Setup will open, press the Enter button to continue.

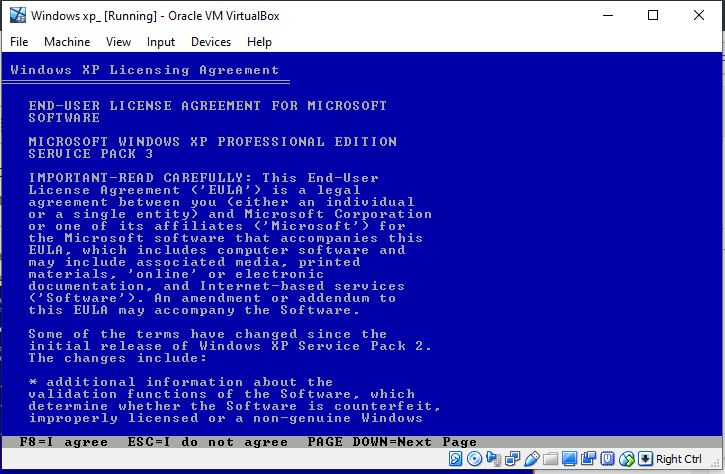
Press F8 to accept the Windows XP Licensing Agreement.
As we are installing Windows XP on VirtualBox, thus, a single partition will appear, simply press the enter button to format the whole partition.
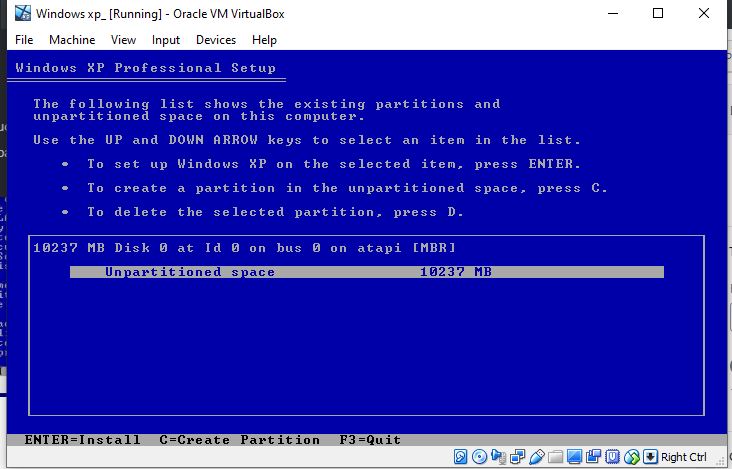
By default, a slow formatting option will be selected, use the arrow key of the keyboard and select “ Format the partition using the NTFS file system (Quick)”.

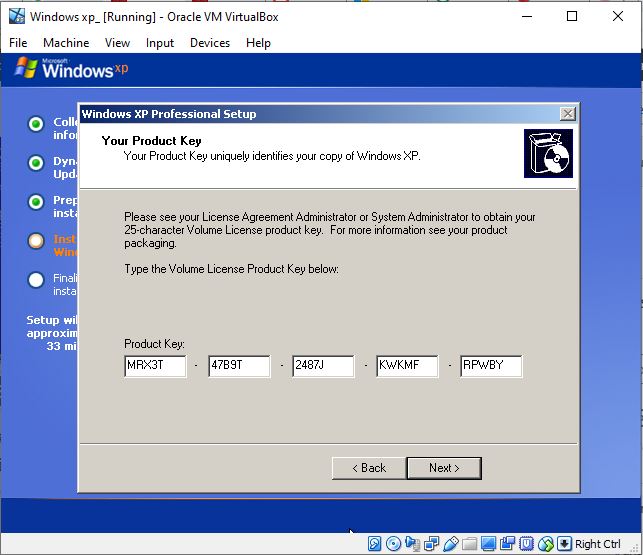
After some time, it will ask you to enter the license key for Windows XP. Type this official serial key: MRX3F-47B9T-2487J-KWKMF-RPWBY and click on the NEXT button to complete the installation.
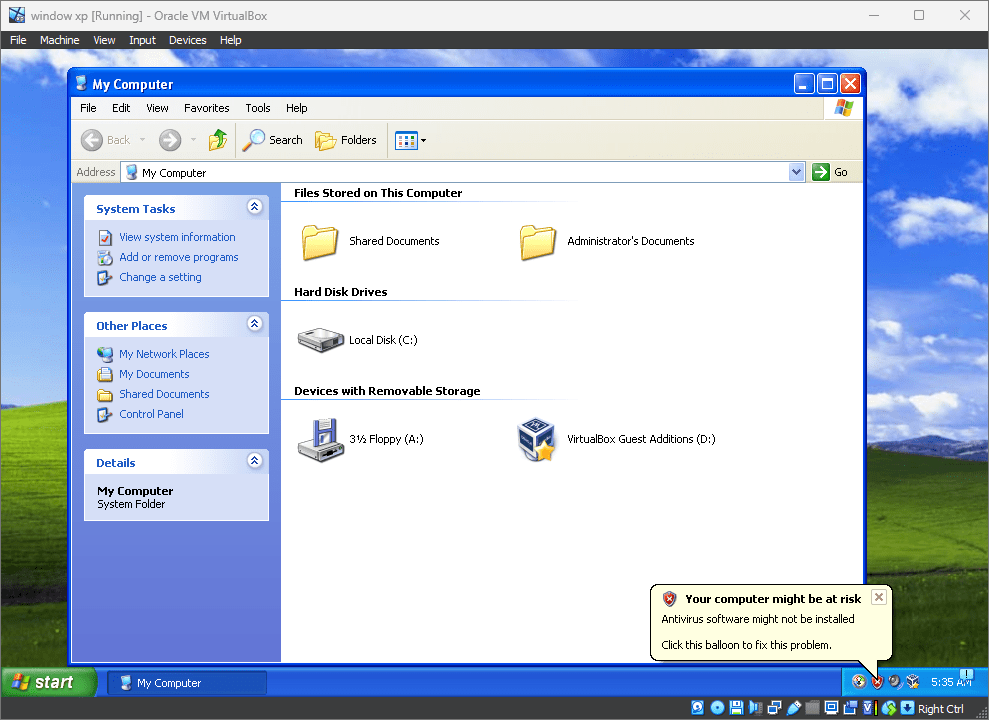
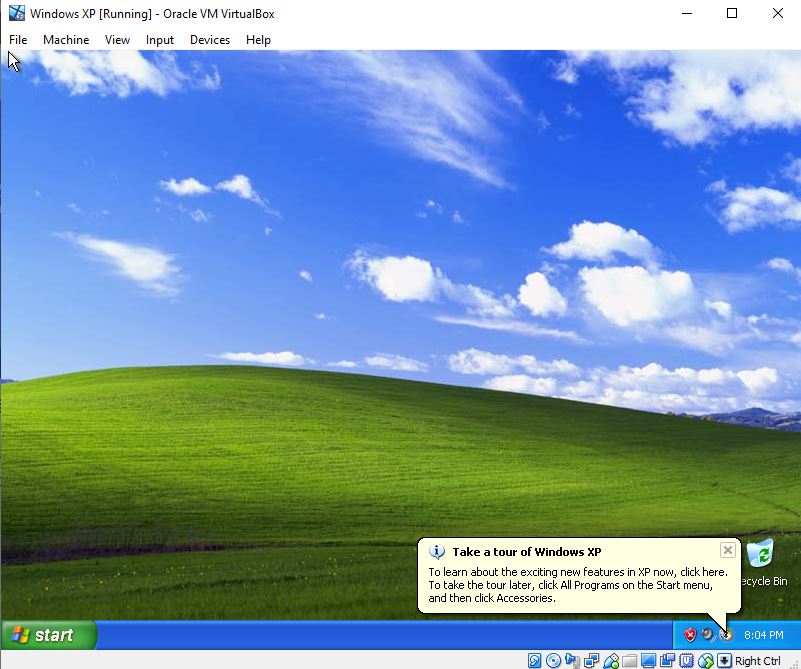
Once it will be done, you will get the old but very familiar interface of Windows XP with a familiar startup sound.
Thus, in this way, we can install our old Windows XP system on VirtualBox Virtual Machine for testing legacy software or learning purpose.
Other Articles to read:


Nice!
I love windows xp because is the OFFICIAL MICROSOFT OPERATING SYSTEM (OMOS).
Is simple to install, oldest windows have 1000 steps, this operating system is… BEAUTIFUL!
Thank you 😀
Thanks! Worked perfectly!
i cant do it
me too!
Is there any way to set it up for gaming? I have a game I haven’t been able to play in years because it’s incompatible with newer Windows computers. It seemed to install on the virtual computer just fine, but then I tried opening it and got this popup that said the game failed to load.
There might be some problem, please see that game is in working condition or there is something missing for example some update or file. Because it really hard to tell without actually getting hands on the game. Or just tell us which game are you planning to play on Windows XP and will try the same on our end to check whether it is working or not.
Seemed to install OK, but it doesn’t recognize my optical drive or my wireless adapter. Without those items, it’s pretty useless to me
In the old days, you needed to install drivers for most hardware. It was not a simple plug and play operation. If your hardware has drivers for XP, install those. Otherwise tough luck, it will be of no use without appropriate drivers.
Thanks for the tutorial on how to put XP in a virtual box. But I would like to know how to create a hard disk drive and fix my internet on Windows XP via virtual box.
I get to the ‘storage’ part of installation and a message at the bottom of the screen says ‘invalid settings detected’. I correct the error shown but nothing is corrected and I cannot progress any further. What to do?
it says the product id s not valid
CD87T-HFP4C-V7X7H-8VY68-W7D7M try this key is it the Professional Retail else you can go here https://github.com/fuwn/xp it has a good selection of keys
I’m dumb
For most people who are unable to do it….
First of all, thank you for the publisher to show picture wise how to install it.
Second, … the picture shows in the first 5 license letter a “T” instead a “F”…..what problem didn’t allow to install the operating system. But if you guys use the correct written license letters, you won’t have a problem to finish up the installation.
It worked for me as a Charme. Thanks again to the publisher who took the time to explain in details how to install it, inside a virtual box. 😉
oops! How embarrassing, I wrote in English thinking it was a site from another country and now I don’t know if it’s an Italian or English site …
when i press f8 to agree to the thing it doesnt respond. how do i fix this
I LOVE Windows XP THANKS
But i add optical disk a little bit after and it not ask the licence.
This is a great tutorial! I just installed Windows XP on my computer using this method and it worked great!
It aborted when it got to “Installing Devices” on VirtualBox 7.0.2
Worked beautifully! I used vbox 6.1.22 Thank you!
I downloaded VirtualBox 7.0.6. Your HOWTO did not match this version and failed to produce a working system.
I then uninstalled 7.0.6 and downloaded 6.1.22 prompted by the message from TimR. Unfortunately the Uninstall had not removed all trace of the previous installation so produced an error message. I uninstalled 6.1.22, deleted the three virtualBox directories under User/all users and Users/(my name) with their log files and reinstalled 6.1.22. This got me to the stage of nominating my ISO but the system objected “Invalid settings detected”.
I suggest that you re-edit your instructions to reflect the latest VB version. Unfortunately programmers win, users loose again.
Have updated the article, have a look
This is a great tutorial! I just installed Windows XP on my computer using VirtualBox and it worked great!
Every time I follow this tutorial, I end up with a working but tiny XP screen. VBox Additions isn’t available in the optical drive menu…