If you are engaged in your new project and is dealing with images and photos for any reason, you might need to make some part of the images transparent so that the background or any other element that is present behind that part is visible to the user. One cool implementation of dealing with transparent images is that you can help you create WhatsApp stickers which you can learn more about here. If you are on a computer though, and you have separate reasons to make an image transparent you have a number of applications for that. If you are a professional, you already know, how to make images transparent.
But if you are newbie, and is looking for the quickest possible way to make an image transparent, you can do that with help of Photoscape X on Windows 10, which is one of the best editing applications that I have been using for almost 4 to 5 years now. Photoscape is a small photo editing tool available for Windows and Mac, where you can combine photos, add finishing touches, create a collage, and do a plethora of other tasks with photos. The ability to make an image transparent is one among them and I’ll talk about how to do that here. I am using the Photoscape X Microsoft store app available for Windows 10, to make an image transparent, here.
So, without any for the delay, let’s get started with how you can make images transparent with Photoscape X on a Windows 10 computer.
Making images transparent using Photoscape X
Step 1: Download Photoscape X on Windows 10 from the following link.

Step 2: Open Photoscape X and in the home screen click on ‘Cut Out’.
Step 3: Now you can find a Windows Explorer-like part, on the top left part of the interface, and you can tap on any of the folders to find the images within it. You can expand and collapse the folders and drives to find the image that you are actually looking for. Once you find the image of the photo that you want to make transparent, just drag and drop it in the main window as shown in the screenshot below.
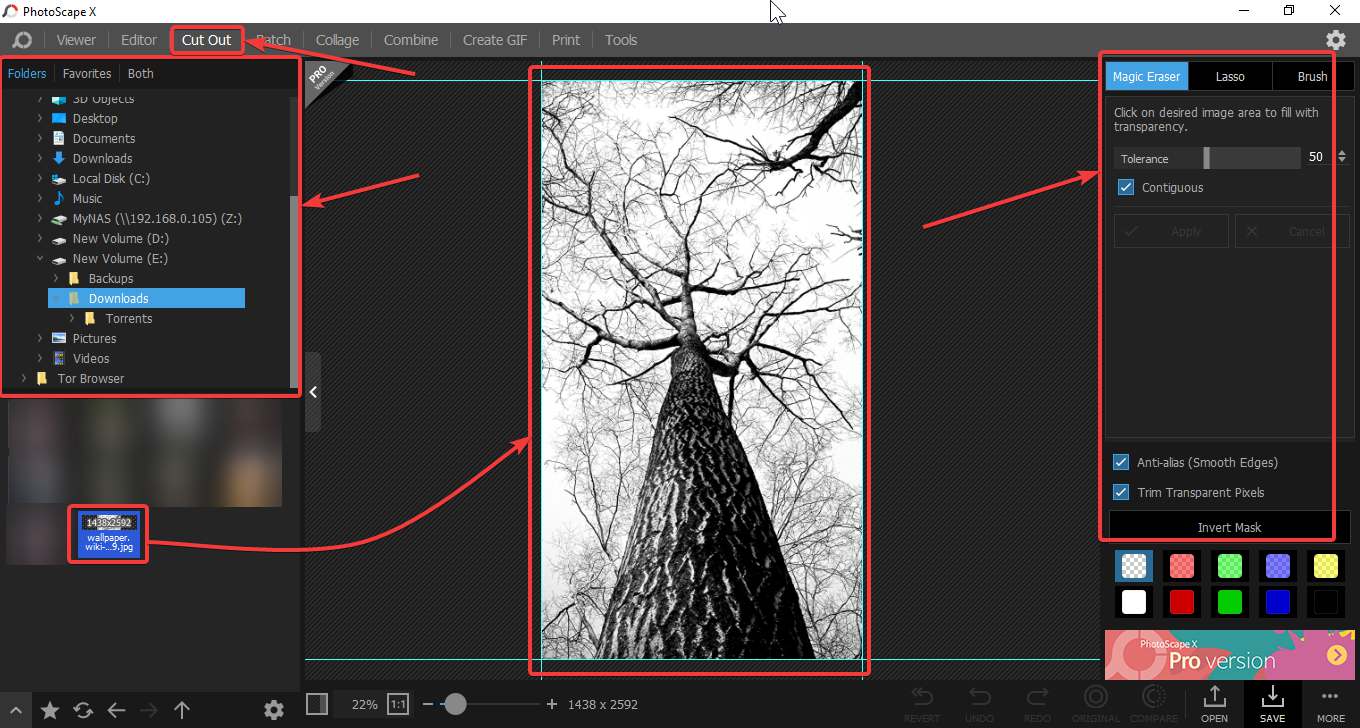
Step 4: Next, you can find multiple tools to make different areas of the image transparent.
Step 5: The magic eraser tool can be useful for most users, as it can automatically make all the parts of the image with the same colour combination, transparent.
You can also change the tolerance value depending upon how precisely the magic eraser will change all the regions, which are close to the colour, where you clicked to make the part transparent.
Let me make things clear to you. If you decrease the tolerance value, only that colour when you have clicked will be made transparent in other parts of the image. For example, if you have a shade of white within an image, and the tolerance value is set low, only those parts of the image will be transparent, which has the same shade of colour white.
However, if you increase the tolerance value, all the areas bearing shades that are close to the colour of the selected region will also be made transparent. For example, if you have multiple shades of white, and you select any region having a particular shade of white, all the other regions, which might have any other shade of white will also be transparent.

So, the magic eraser tool can be useful in most cases, however, you can also use Lasso and Brush tool to make different parts of the image transparent.
With the lasso tool, you can choose any closed region within the image and that will instantly be made transparent

The brush tool is simple, you might have already understood what it does. Using the brush tool, you can turn any region of the image transparent, no matter which colour or shade it bears. You can change the brush size as per your requirements, however, using the brush tool will not give you precise output, unless you are handling the complete process of making the image transparent very carefully.

With all the available tools, you can even anti-alias, or make the edges smooth, and trim the transparent pixels.
For the sake of convenience, you can even use a certain colour in the transparent region so that you can easily understand it when you look at the image with Photoscape X. However, after the image is saved, the transparent region will not bear any colour, and it will simply display the colour or any other content that is behind it.
After your task is complete, click on the save button to save the image we can you name in your desired location.

Step 6: At the time of saving the image, the image will be saved by default in PNG format, however, you can even change the format, but the transparency will not be retained if you save the image in JPG, BMP, any other format that you can find.

The ability to make images transparent can really be useful for you in different circumstances, and in most cases, you might have to make the white part of the image transparent, which can easily be accomplished using Photoscape X. On premium photo editing applications, you might find other options to make some part of the image transparent, obviously with more precision and options, but with the help of Photoscape X, at least, you have the option to make your image transparent in the simplest possible way.
So, that was all about how you can make images transparent using Photoscape X. Do you have any questions? Feel free to comment on the same below.
Other Articles:


Thank you for this post. The information you wrote cleared up some of the problems I have encountered using Photoscape X 4.2.1 Pro on my Mac (such as not saving transparencies in .jpg format).