When it comes to video editing, Adobe Premiere comes out to be one of the most popular, and most powerful video editing applications. It comes with a ton of features, and even the most skilful video editors might not know about all the features available in this powerful program. The more you keep working with Adobe Premiere Pro, the more tips and tricks you will learn, which can eventually help you to make your videos look better and complete the video editing process within a very short span of time. Even if you don’t want to be a video professional, it will be worth knowing a few of the most basic tasks that you can carry out on Adobe Premiere Pro.
One of the most useful tasks most users need to do is to adjust the speed of the videos so that they look like a slow-mo or a time-lapse video. You can even want all those in a single video, and you can easily slow or fast your videos using Adobe Premiere Pro. You don’t even need to have professional knowledge of Adobe Premiere to do this task, and you even if you find a number of small programs for this unitary purpose. But none of them can deliver the extra set of features, which Adobe Premiere has to offer, even for this very small task.
So, without any further delay, let’s get started with, how you can make an existing video play slow or fast, and export it to a new video file.
- Open Adobe Premiere Pro on your computer, and create a new project by clicking on ‘Project…’, under ‘New’, from the ‘File’ menu.

Make videos slow and fast using Adobe Premiere - Now, enter a project name, which I have given ‘Video_speed’ here, choose the location of the project on your hard drive, and leave all other settings to default, to finally click on ‘OK’.

- Now, click on ‘Import…’, under ‘File’, and choose the video that you want to change the speed of. Here, I have imported the video of a Firework.
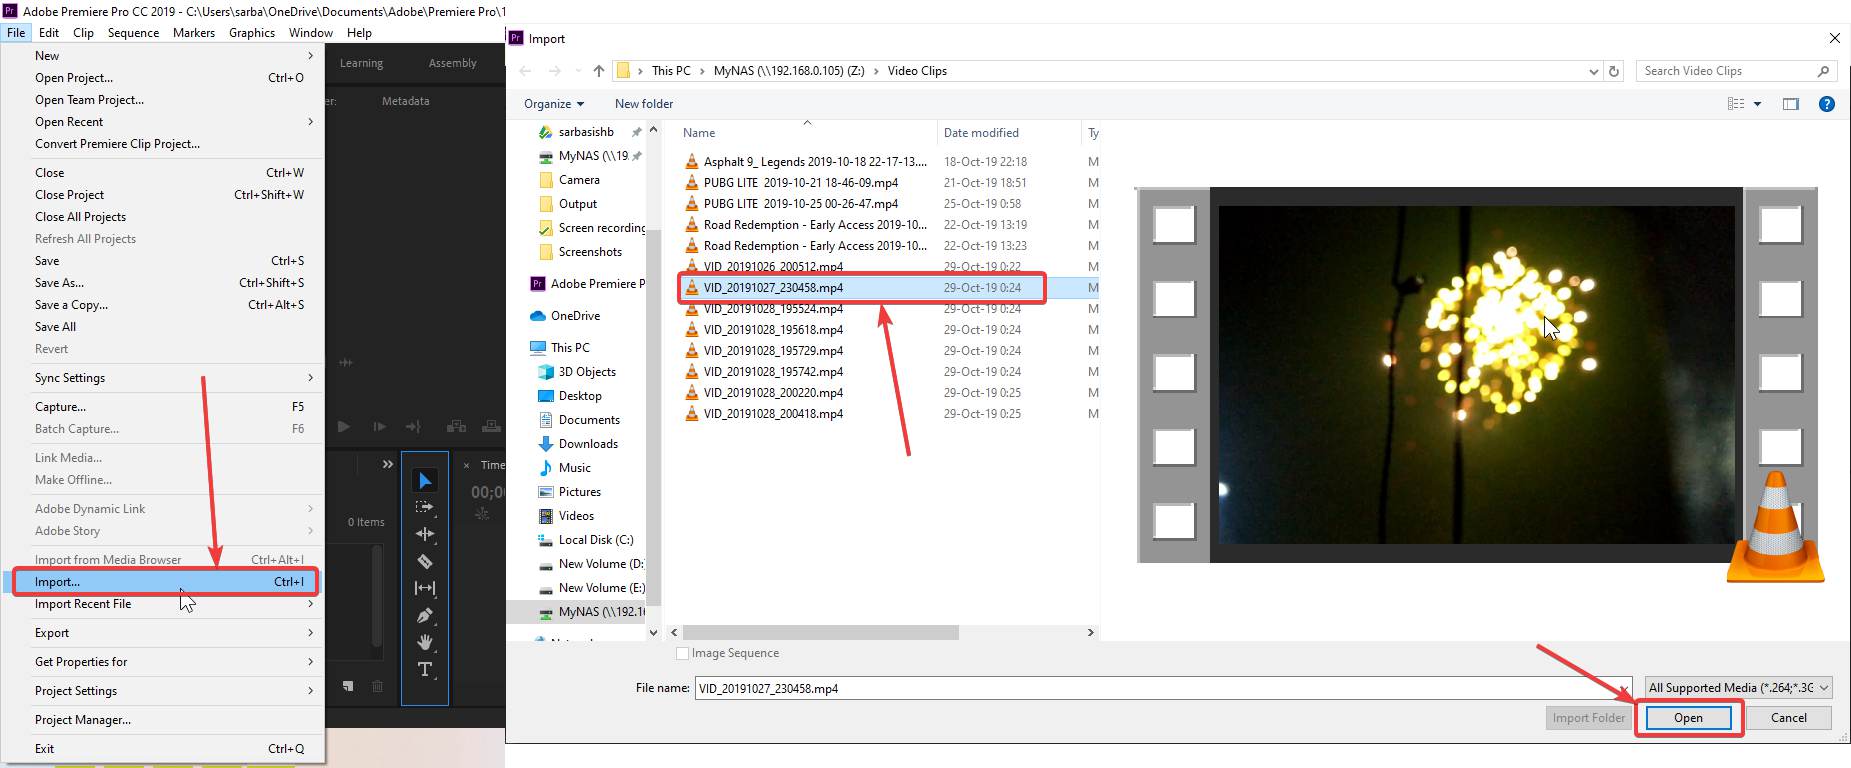
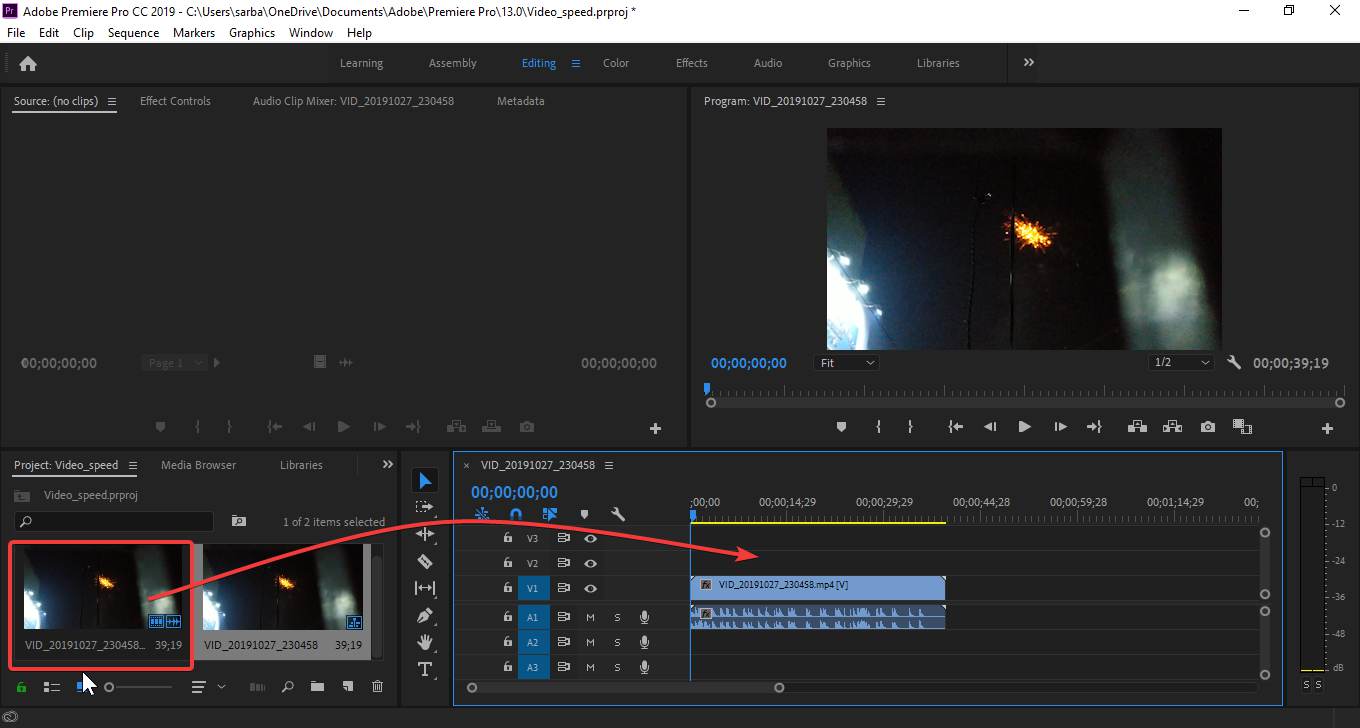
- After the video is imported, drag the video clip from the project area to the timeline.
- Now right click on the video on the timeline, scroll down in the menu that appears to point to ‘Show Clip Keyframes’, and then ‘Speed’, under ‘Time Remapping’.
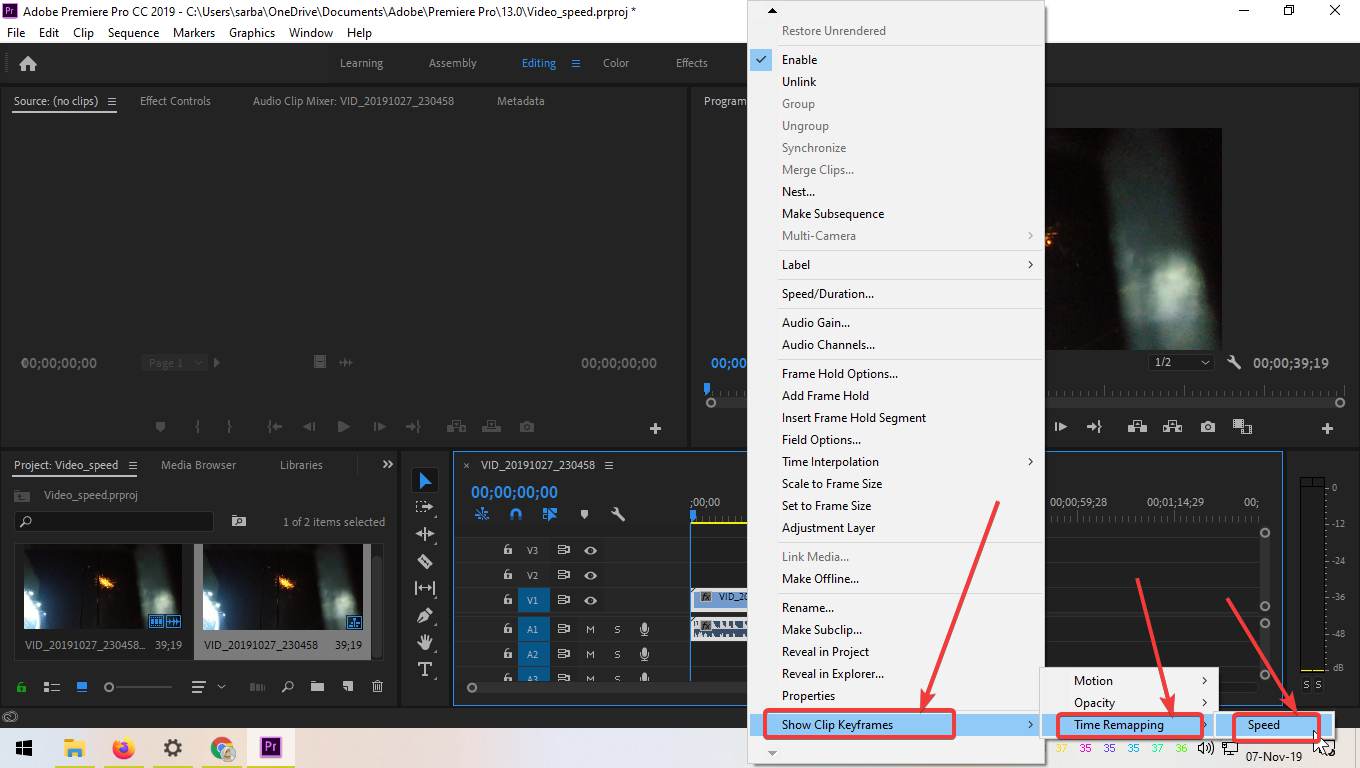
Show Clip Keyframes - Now, just pull from the top of the area corresponding to the video filename, as shown in the screenshot below, for your better understanding.

- Now, use a small pointer in the timeline to move to that point, where exactly you want to start slowing the video down or want to make it fast. Then, click on ‘Add-Remove Keyframe’.
- Again move the pointer to the area, where you want to stop the process of slowing the video down on making it fast, and click on ‘Add-Remove Keyframe’ once again.
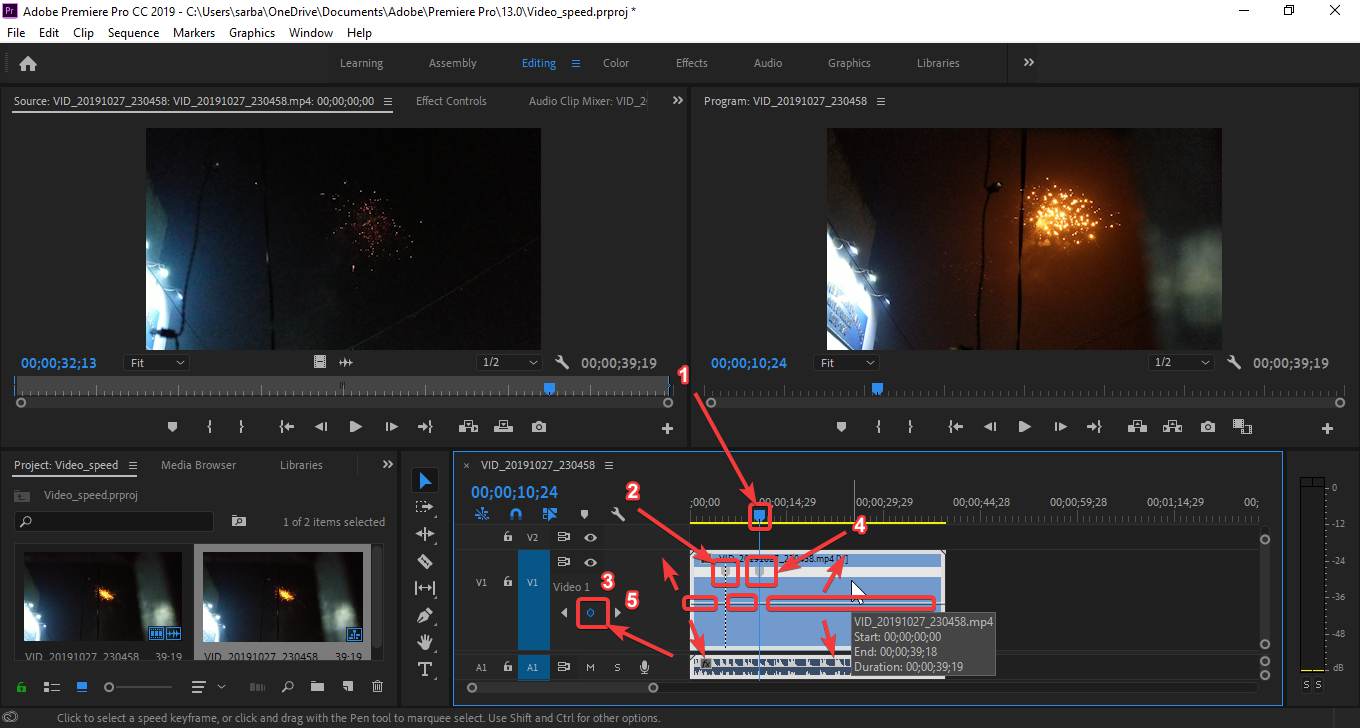
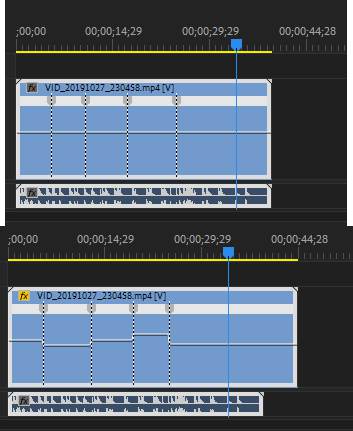
- Now, repeat the same steps for the other intervals, where you want to modify the video speeds. After this, it is the time that you should start making the videos play fast or slow, as per your requirements. You can find a white line, going across the timeline. Just pull it down to make that part of the video play slow, and that line upwards, in the other intervals, to make that part of the video play fast.
- Finally, after you make the appropriate intervals of the video fast and slow, the straight line will look something similar to this. You can have a look at the timeline to find out how exactly the duration of the video have changed before changing the video speeds, and after changing the video speeds respectively.
- Finally, play the video once, before you export it, to make sure the output is as per your requirements.

- If you find, the video requires mode improvements, you can always make necessary changes to it, unless you get the intended output. After you have completed everything, you can now export the video as a media file, the same way you do it in other cases. But if you don’t know how to export the video as a media file, I will help you with that as well.
- Click on ‘Media…’ under ‘Export’, in the ‘File’ menu.
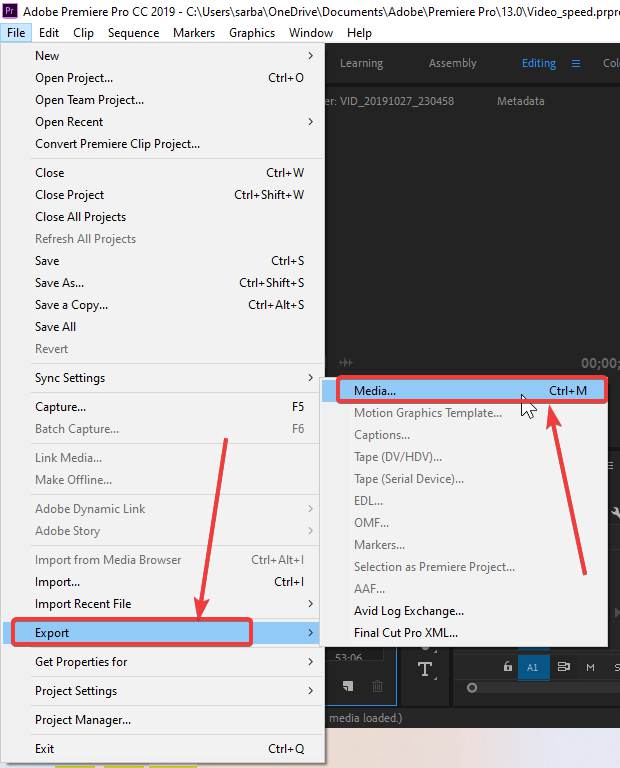
- Now, change the media format if you want, as I am changing it to ‘H.264’, the bit rate of the video, to change whether you want to export only the video, or both audio and video, and once you have configured all the settings to export the video, click on ‘Export’.
- The process of exporting will take some time, depending upon how fast your computer is, and also your CPU and GPU capabilities.
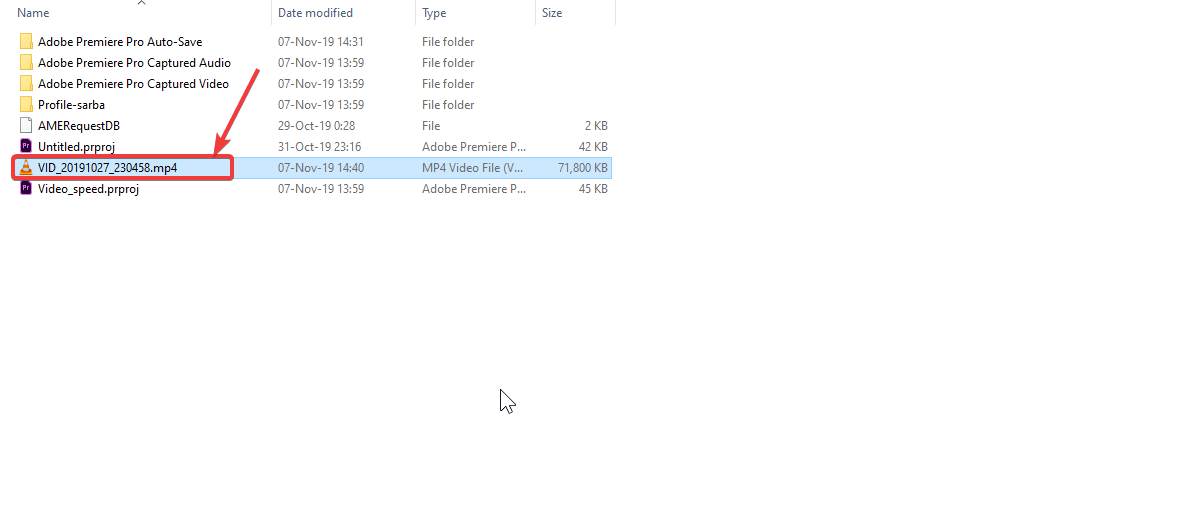
- After the export process is complete, you can now open the video file and play it on your computer, for converting it to any other media format, so that it is compatible with all the devices that you have in hand. If you haven’t set a path to save the output video file, it will automatically be saved within the ‘Premiere Pro’ folder, within ‘Adobe’, under ‘Documents’.
Changing the speed of the video is one of the most basic tasks, which you might have to do almost every time you deal with video files. Even if you have made your own vlog, and you want to make it look cinematic, you might have to change the video speed at certain times, so that you can emphasize on the most important part of the video in the most efficient way. Long story short, configuring the video playback speed can really be useful under different circumstances. Before you make a video play Slow, make sure the camera has captured enough frames, else the video might look choppy when you slow it down.
So, so that was all about how you can make certain parts of the video play fast and slow, using Adobe Premiere Pro. Do you have any questions in mind? Feel free to comment on the same below.
Other Articles:
- 11 Best free or Open source video editor for Window / Linux
- How to edit videos on windows 10 for free using inbuilt Photos tool
- Best 9 Free Video Editing Apps for Android
Related Posts
How to create email groups in Gmail? Send one email to multiple recipients in a matter of seconds.
Getting the right dashcam for your needs. All that you need to know
How to Install 7-Zip on Windows 11 or 10 with Single Command
How to Install ASK CLI on Windows 11 or 10
How do you install FlutterFire CLI on Windows 11 or 10?
How to create QR codes on Google Sheets for URLs or any other text elements