Are you using Ubuntu 18.04 LTS on Windows 10 WSL (Windows Subsystem for Linux) and want to upgrade it to Ubuntu 20.04 LTS Focal Fossa? Here are the commands to do that…
As we know on Microsoft Windows 10 we can run the Linux distros such as Ubuntu, Debian, Kali Linux, OpenSUSE and more in their native form with command-line interface. Thus, those are using Windows 10 they can easily increase their proficiency in handling the command line of Linux using WSL, especially the developers.
However, Linux distros available as Linux apps on the Microsoft app store are limited in choice. Also, right now Ubuntu 18.04 LTS Bionic is available to download and install from Microsoft store, thus if someone wants to use the latest Long Term Supported version Focal Fossa you have to upgrade that manually. Thus, let’s get started…
Note: If you are not running any crucial application on WSL Ubuntu 18.04 then no need to upgrade simply download the official version of Ubuntu 20.04 WSL Windows 10 app from Microsoft store.
Upgrade Windows 10 WSL Ubuntu 18.04 LTS to 20.04 LTS
So, the below-given steps of this tutorial to upgrade 18.04 LTS to Ubuntu 20.04 Focal Fossa are not limited WSL (Windows Subsystem for Linux) of Windows 10, we can use them also for full-fledged Ubuntu 18.04 running Ubuntu server as well, thus go through it without any worry…
Step 1: The very first thing is your Windows 10 system should have WSL and Ubuntu 18.04 installed if not then see this tutorial to know how te enables WSL.
Step 2: Search and start Ubuntu bash from Windows 10 search box.
Step 3: Now, you will have the command line of the Ubuntu Linux WSL app, first run the update command to make sure all the packages are up to date.
sudo apt update
Step 4: There would be some installed packages that need upgrade thus we run the upgrade command to bring Ubuntu 18.04 to its latest state.
sudo apt upgrade
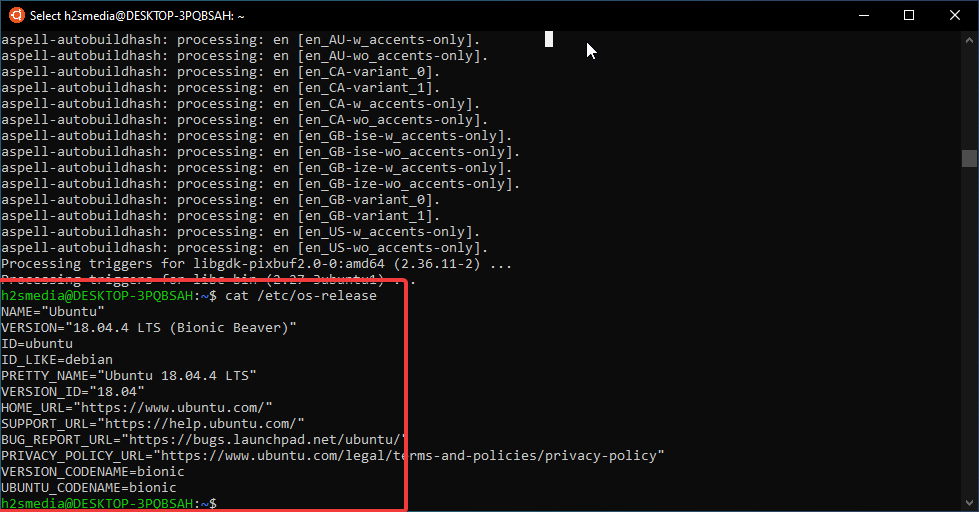
Step 5: To check the current version of your Ubuntu WSL type:
cat /etc/os-release
Step 6: By default, the Prompt line that indicates the OS to search what kind of upgrade packages is set to Prompt=LTS, however, if you want Non-LTS version such as 19.10 then set the prompt=normal. Nevertheless, we don’t need to edit this because we are upgrading to LTS, thus leave this step.
sudo nano /etc/update-manager/release-upgrades
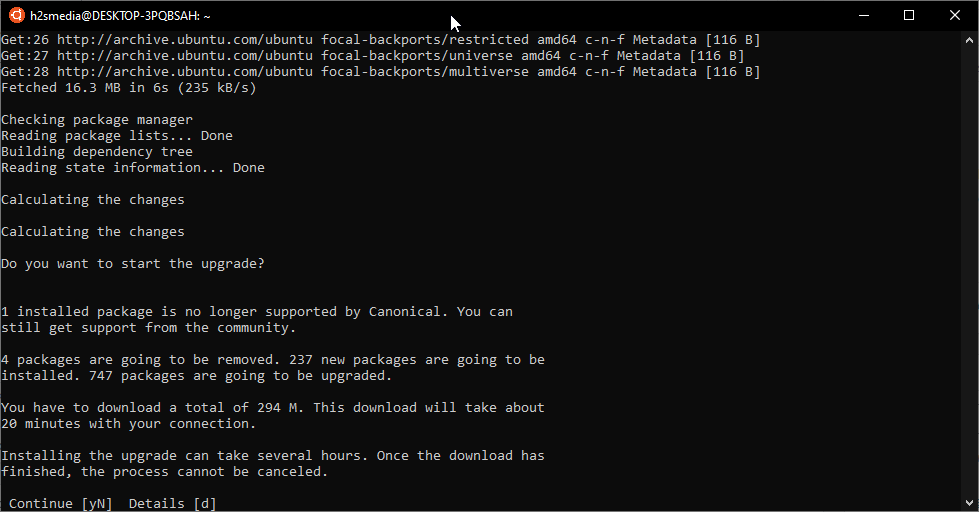
Step 7: Use the below command to check the available upgrade packages of Ubuntu 20.04 LTS for Ubuntu 18.04 LTS.
sudo do-release-upgrade -d
Step 8: Press Y key followed by the Enter key to start the upgradation process.
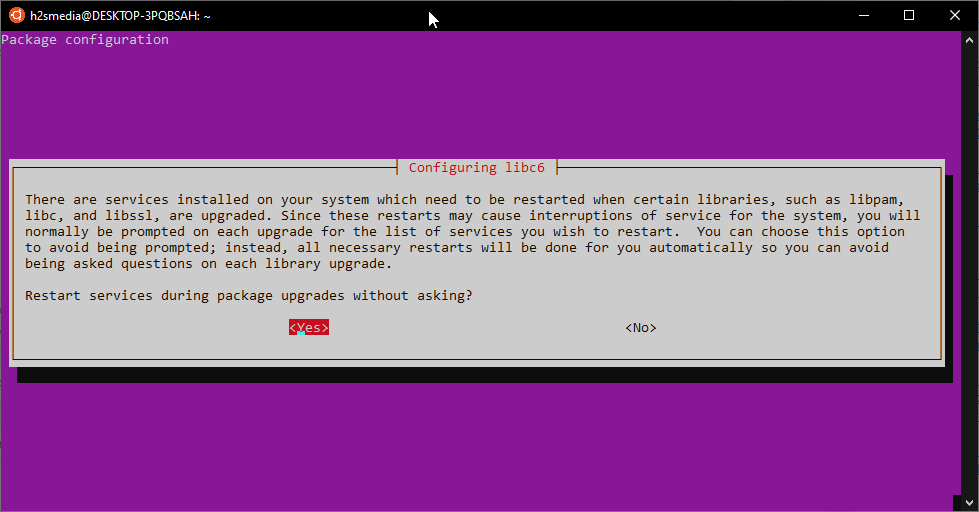
Step 9: When it asks to Restart services during packages upgrade without asking, select YES option and press the Enter button to continue the upgrade process.
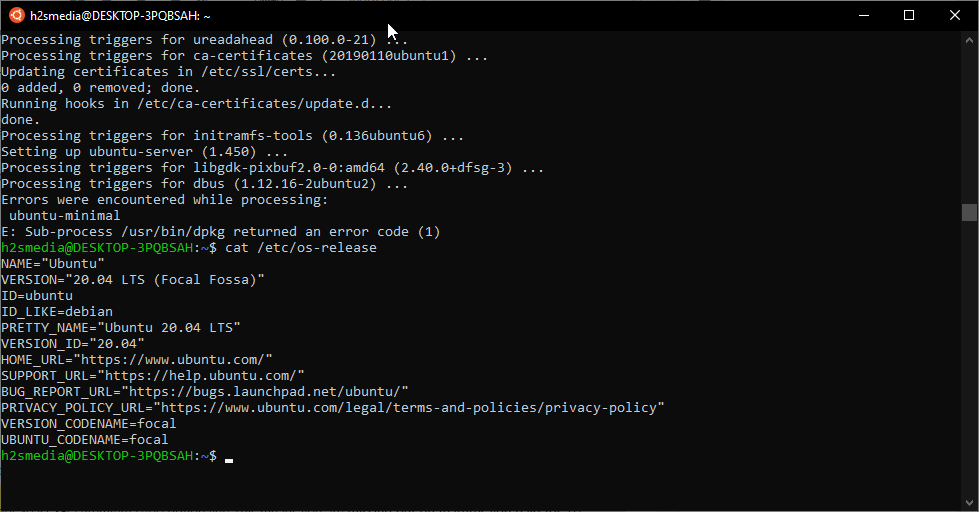
Step 10: Wait for the downloading and installing of the Ubuntu 20.04 Focal Fossa and repository. Once done you will get the latest system.
In case you are facing an error in upgrading such as:
“Error- sleep: cannot read realtime clock: Invalid argument”
Solution:
sudo -i
sudo mv /bin/sleep /bin/sleep~ ; touch /bin/sleep ; chmod +x /bin/sleep
Or
Libc6 dependency issue
Follow the given commands:
wget https://launchpad.net/~rafaeldtinoco/+archive/ubuntu/lp1871129/+files/libc6_2.31-0ubuntu8+lp1871129~1_amd64.deb
sudo dpkg --install libc6_2.31-0ubuntu8+lp1871129~1_amd64.deb
sudo apt-mark hold libc6
sudo apt --fix-broken install
Again run upgrade command:
sudo apt full-upgrade
Hope, now you would be able to upgrade without any problem
Check the current version of Ubuntu WSL App:
cat /etc/os-release
Here is the output in our case:


You may hit a problem with updating libc6:
If you receive the following message
sleep: cannot read realtime clock: Invalid argument
Edit /var/lib/dpkg/info/libc6:amd64.postinst and remove the sleep 1 that is in nearly the last line.
It’s true the `sleep 1` call causes the upgrade to fail. However the libc6 package isn’t the only postinst script with the problem. When I tried upgrading Ubuntu libpam0g:amd64 postinst was the stumbling block. Naturally it also contains `sleep 1`. Depending on the particular installation there could be other packages where the same call shows up. (FWIW in my case libc6 wasn’t a showstopper…go figure…)
I guess the origin of the problem is that WSL 1 doesn’t have access to the hardware/system clock. Running `hwclock` prints this message on the terminal: “Cannot access the Hardware Clock via any known method.” I imagine this will be fixed in WSL 2, but from what I read it won’t be released to the public until May at the earliest. Meanwhile the workaround of editing offending postinst scripts works to get the OS upgrade task done.
How to sovle this issue?
Sorry, I miss you messages. I saw the solution.
This bricked my 18.04 install with nothing like what noted in here. Don’t do the upgrade. Just uninstall 18.04 and install 20.04 from the store.
Thanks this worked perfectly.
Thank you so much! This works for me.
This doesn’t work, gives me the following:
$ sudo apt upgrade
Reading package lists… Done
Building dependency tree
Reading state information… Done
Calculating upgrade… Done
0 upgraded, 0 newly installed, 0 to remove and 0 not upgraded.
and this
$ cat /etc/os-release
NAME=”Ubuntu”
VERSION=”18.04.4 LTS (Bionic Beaver)”
ID=ubuntu
ID_LIKE=debian
PRETTY_NAME=”Ubuntu 18.04.4 LTS”
VERSION_ID=”18.04″
HOME_URL=”https://www.ubuntu.com/”
SUPPORT_URL=”https://help.ubuntu.com/”
BUG_REPORT_URL=”https://bugs.launchpad.net/ubuntu/”
PRIVACY_POLICY_URL=”https://www.ubuntu.com/legal/terms-and-policies/privacy-policy”
VERSION_CODENAME=bionic
UBUNTU_CODENAME=bionic
any ideas why this is?
Use:
sudo apt update && upgrade
sudo do-release-upgrade -d
I’m having the same problem with the Kali WSL install. I’m a noob to all of this. Would you be able to help me?
Please let us know what exactly do you want in your Kali WSL.
You may need to remove snapd if you get the message:
“There is no development version of an lts available”.
So run the command:
sudo apt autoremove –purge snapd