
If you are using Windows OS such as Windows 7, Windows 8 or Windows 10 and want to share the videos, picture, and songs to DLNA enabled device then you don’t need to install third-party DLNA software. The Windows itself has an option called “Media streaming“. It converts your Windows 10,7 or 8 into a DLNA media server.
The Windows Media streaming allows you to send your music, pictures, and videos to the other computers and devices on your network and vice versa.
Almost every device in your home is DLNA complaint such Play station, Smartphone, Chromecast TV and more…
What is a DLNA Media server?
DLNA is a service stands for Digital Living Network Alliance. In simple words, when some machine storing all your media files uses this DLNA service to stream them over a network with other DLNA supported devices then that particular machine known as DLNA server.
In this tutorial article, we will show you how to turn on media streaming feature on Windows 10 and share the media files with other DLNA supported devices such as a smartphone.
ALSO SEE: How To Setup Emby Media Server on Ubuntu Linux
How to Enable Windows Media Streaming Option to Convert it into a DLNA Media Server
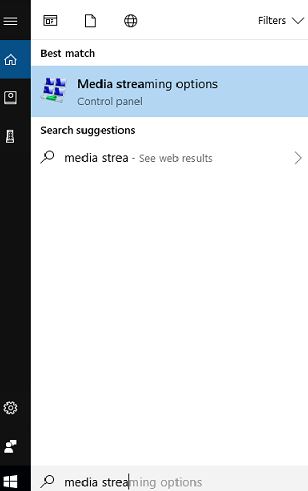
Step 1: To enable DLNA on Windows 10, go to start and search for Media Streaming options. When the option appears just click on that.
Step 2: The streaming option will take you to the control panel settings and asks you to turn on the media streaming. Now click on the media streaming button to enable the DLNA service on Windows.

Step 3: Click OK button to apply the default setting of Windows DLNA server.
It also offers few settings those can use to customize the media server are:
“Name your Media Library” you can use it to customize the library name.
“Show devices on” choose whether to show the server on your local network or at all.
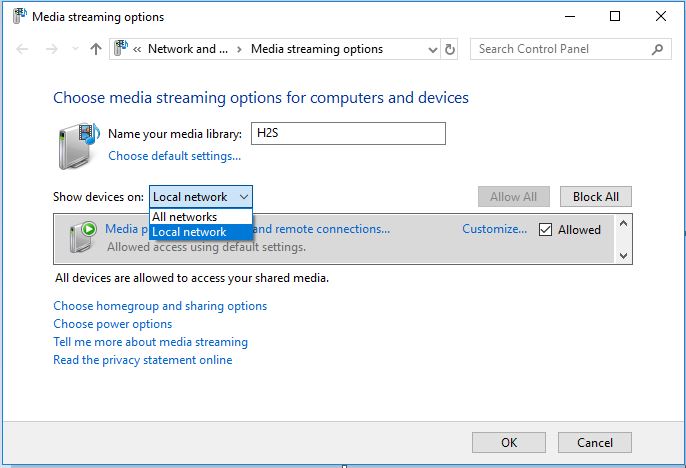
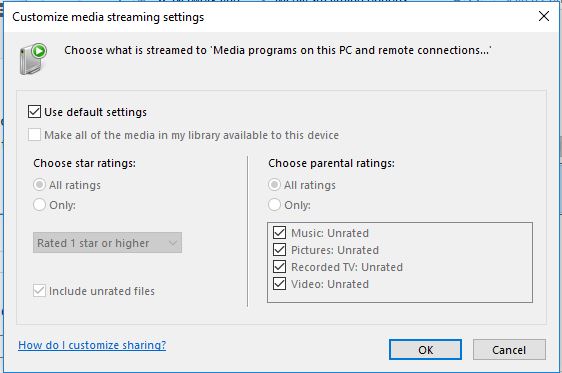
“Customize media streaming settings“, it helps to choose which media library content you would like to stream on remote connections.
Note: The media streaming service will not work if your computer goes into sleep mode. So, be sure you have changed the power plan by using the “Choose Power option“.
Now go to the other devices such as TV, XBox, Smartphone and search for DLNA server you will see your Window DLNA server there, select and share the files easily.
You can also use different Windows DLNA client to stream media file in an interactive way on other desktop PCs.
Also see: How to connect and share media files from Windows DLNA server to Android Smartphones.
Related Posts
How to Install 7-Zip on Windows 11 or 10 with Single Command
Install Google Earth on Windows 11 or 10 Using a Single Command
How to install Gaming Services on Windows 11
How to Install Telnet Client on Windows 11 Using PowerShell
How to Install ASK CLI on Windows 11 or 10
How do you install FlutterFire CLI on Windows 11 or 10?