AVerMedia EzRecorder 130 ratings ₹ 11,069
-
Features & Performance
-
Build quality and design
-
Pricing
Summary
If you do not want to go through the hassles of dealing with corrupted recording, or other problems at the time of recording and playback, AVerMedia EzRecorder 130 will never disappoint you in any way.
User Review
( votes)Entertainment is something that we all need and everybody like it in different forms. Some are fond of playing games, while others are nosy to watch movies and TV shows. However, there are some people who love showing off things that entertain them, to others. For the same reason, you can find a number of gaming channels on YouTube.
Sometimes, it is also necessary to record some TV shows so that you can watch it later on, just in case you are not present or have some important appointment when the show is aired on TV.
For recording games, you can use a screen recorder to record the game at the cost of your PC’s performance.
Using an external hardware-based recorder can help you to record both games and TV shows, without compromising on performance. That being said, I am using the AVerMedia EzRecorder 130 (ER130) for recording gameplay and some other activities with the gadgets I have.
The AVerMedia EzRecorder 130 is a pass-through HDMI video recorder, which means it will show the video and will record the output at the same time so that you can play the recorded video later on.
This is a great product from AVerMedia, and just like every time, I am here with the AVerMedia EzRecorder 130 review to help you decide whether this product is the perfect fit for you. I will start with the box contains, and then I will move forward with the features, how to set up pros and cons.
Let’s see AVerMedia EzRecorder 130 review
So without any further delay, let’s get started with the box contents of the AVerMedia EzRecorder 130.
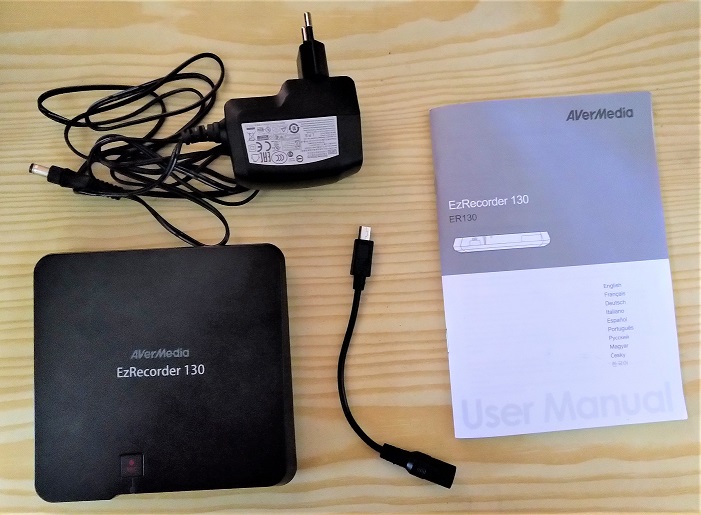
AVerMedia EzRecorder 130 Box Contents:
Here is a list of items you will get in the AVerMedia EzRecorder 130 box.
- The AVerMedia EzRecorder 130 recorder
- Installation guide
- 5 Volt and 2 Ampere power adapter
- DC to Mini-USB converter
- Remote Control with 2 AAA batteries
So those are the things that you will get in the box.
Besides the box contents, you will need a flash drive or an external hard drive, which will be a better choice, and 2 HDMI cables for pass-through video recording and displaying the output at the same time.
EzRecorder 130 Features:
Let’s have a look at the features of the AVerMedia EzRecorder 130 video recorder.
- The AVerMedia EzRecorder 130 has support for pass-through video recording at a maximum of 1080p resolution, and it also has support for taking screenshots, even at the time of recording.
- It offers pass-through video recording at a maximum of 1080p resolution, and it also has support for taking screenshots, even at the time of recording.
- Besides instant recording, AVerMedia EzRecorder 130 also supports scheduled video recording, with the ability to pause the process of recording in the middle.
- Real-time pass-through is supported on the AVerMedia EzRecorder 130, and output will be generated, even when the recorder is in standby mode.
- The AVerMedia EzRecorder 130 comes with support for H.264 video compression, which is an efficient video compression level at the hardware level. The audio will be recorded in AAC format.
- The AVerMedia EzRecorder 130 Support 480i/576i, 480p/576p, 720p, 1080i and 1080p HDMI video resolutions at maximum 50 or 60 Hz.
- With a source solution of 1080p at 60 FPS, the display resolution will be 1080i at 60 FPS, and the same will be recorded at 1080p at 30 FPS. Whereas, for a source resolution of 1080p at 50 FPS, the display resolution with 1080i at 50 FPS, and the recording resolution will be 1080p at 25 FPS.
- After video recording, you can even play the video on the device itself without disconnecting the USB drive from the recorder.
- The AVerMedia EzRecorder 130 also comes with a built-in video trimmer to chop off unwanted parts of a video right from the recorder.
- For the purpose of recording, AVerMedia EzRecorder 130 will format the USB storage device in NTFS file format.
So those are the major features of the AVerMedia EzRecorder 130 media recorder. Well, I don’t think you will need anything else.
Setting up the device for the first usage
Let’s see the step by step instructions to know how to set up and connect Avermedia Ezrecoder 130 first time for recording purpose…
1. Connect HDMI cable to the media recorder
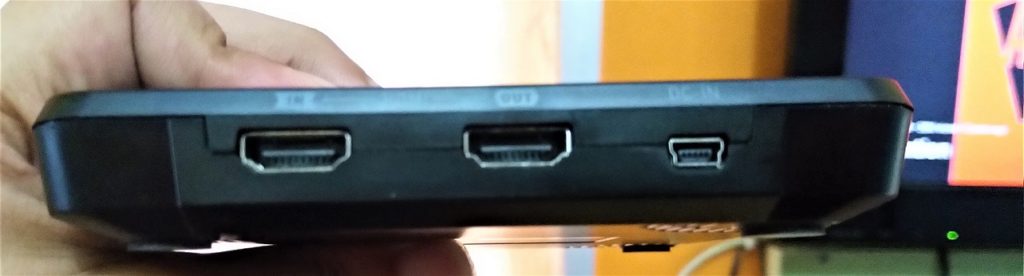
Before powering the device on, connect one end of an HDMI cable with the gadget which is the source, at the other end of the same HDMI cable to the HDMI INPUT port of the media recorder.
Get another HDMI device and connect one end to the HDMI OUTPUT port of the recorder and the other end to your TV or monitor to get the output.
2. Plug USB storage device
Finally, connect a USB storage device, like a flash drive or an external hard drive to the USB port of the recorder.
3. Select Source of the device to record
Turn your TV and gaming console what the source device on, and then finally turn on the recorder using the power button on the remote.
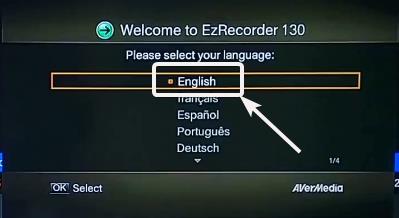
4. Choose Language
Fast, choose the language using the navigation buttons on the remote and then press the ‘OK’ button.
5. Select Time Zone
Now choose the Time Zone in the same way, and press the ‘OK’ button again.

Next, select the time zone with respect to GMT, using the navigation buttons, and then finally, press the ‘OK’ button.

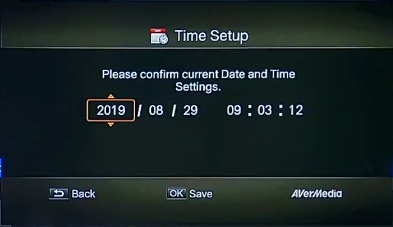
6. Set Date and time
Now change the date and time to the correct one using navigation buttons, and save it using the ‘OK’ button.
7. A/V pass-through enable or disable
Now you have to choose whether you want to enable A/V pass-through, which means, whether you want the device to display the output when the recorder is in standby mode. Switch between on and off using the navigation buttons and press the ‘OK’ button.

8. Finally, start the setup
Now, you will get a message saying you have to connect the USB storage device before startup. Just press the ‘OK’ button to complete the setup process and you will be shown with the basic controls of the media recorder.
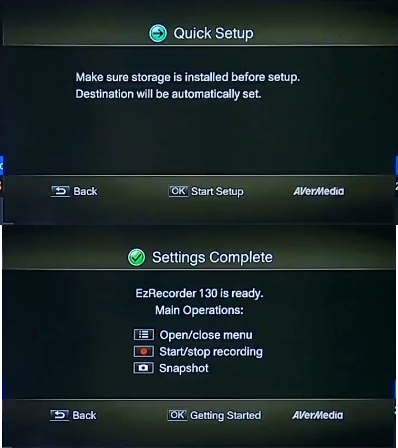
Now you can start using the device. Depending upon the USB storage device selected by you, it might be repaired if there are any kind of errors, which might take a minute or two.
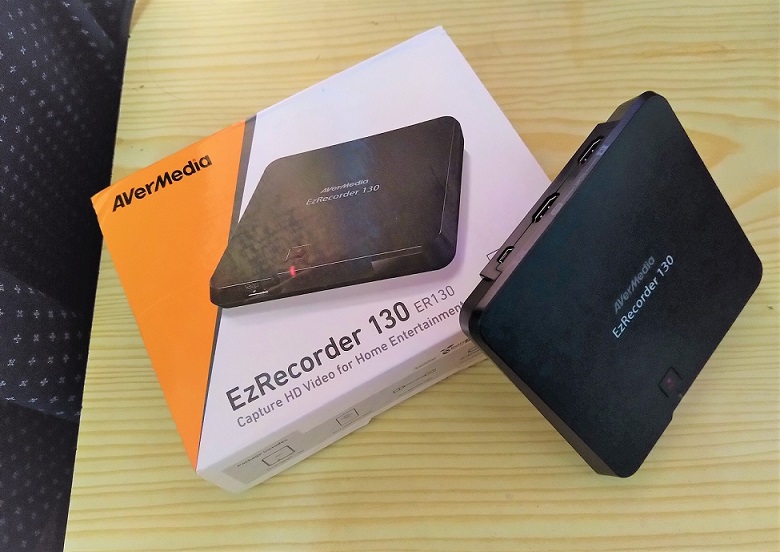
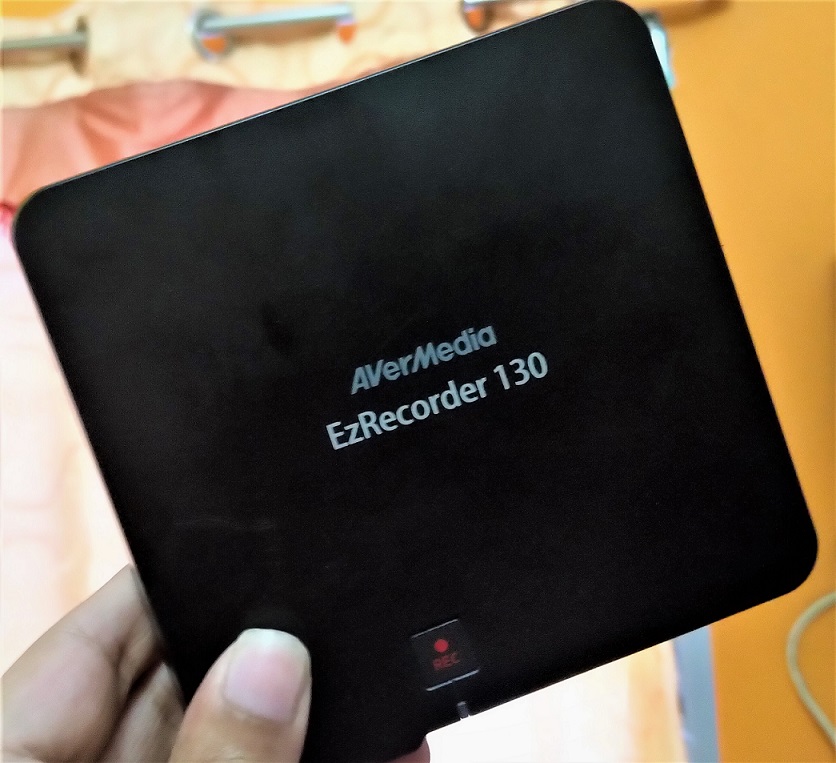
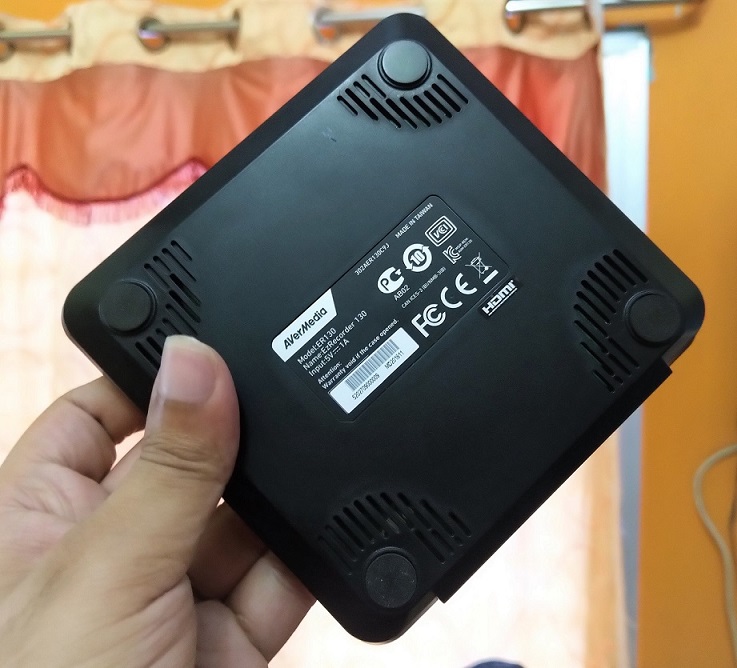
Recorder Pictures


AVerMedia EzRecorder 130 Pros:
Let’s have a look at the pros of the AVerMedia EzRecorder 130. This can help you understand how it exactly performs in everyday life.
- The AVerMedia EzRecorder 130 support flash drives, and other USB storage devices formatted in NTFS file format, which is the most preferred file format for Windows computers. Obviously, the storage devices cannot be formatted in the FAT32 file system as the recordings can easily break the 4GB file size limit which is the maximum size of a file that is supported on a FAT32 file system.
- The device is quite easy to set up and even a normal user can easily set the device up before the first usage. The controls of the device are also very easy and you can effortlessly understand the controls once you start using the device. There is also a dedicated recording button on the recorder itself which can help you start and stop recording just in case the remote battery is dead.
- The support for different video resolutions for the purpose of recording can help you get the most out of your storage space, just in case you are running out of space and you need to record a few more minutes of video. You can change the video quality with just a single place of a button on the remote.
- The video pass-through functionality can even work when the AVerMedia EzRecorder 130 is in standby mode. This can be useful in a number of circumstances and you will never have to reorganize the cables just in case you don’t want to use the device for a few days.
- The built-in video trimmer that comes with the AVerMedia EzRecorder 130 is very easy to use and is quite responsive. Though you cannot expect the performance of a premium video recording software that runs on a computer, on the inbuilt video trimmer. However, the built-in video trimmer can be good enough to trim the unwanted parts of a video before you upload it, show it to somebody, or simply before save it in your library.
- The AVerMedia EzRecorder 130 support pass-through video recording, however, I didn’t find any distortion or degradation in audio or video quality, and no latency at all, even when the device is recording and playing the same content at a certain point of time. So you don’t need to compromise your while you are using the recorder.
- The AVerMedia EzRecorder 130 don’t support video and audio output from video players, which display copyrighted content. This feature ensures, nobody uses the device for pirating any content that is shared through a TV or a media streaming device.
So basically, those were the pros of using the AVerMedia EzRecorder 130. Yes, it is very convenient to use the device for your recording requirements.
AVerMedia EzRecorder 130 Cons:
Let’s have a look at the cons of using the AVerMedia EzRecorder 130. I didn’t find a lot of cons, however, there are some which I will discuss here.
- Sometimes while carrying out some activities, the output goes out for one or two seconds which is something that is really frustrating. Though it doesn’t happen with every function if you are watching something really important that missing one or two seconds can really be a big deal for you.
- In the case of video recording at 1080p, 60 and 50 FPS, the frame rate of the recorded videos is halved to 30 FPS and 25 FPS respectively. So if you are gaming at more than 30 frames per second, you will find degradation in quality, while you play the recording, or share the same with your friends. I don’t want the recording to be at 120 FPS or more if your video card supports it obviously, but recording at 60 FPS is a standard resolution, which makes things look more realistic.
- From time to time, we might need to take short breaks at the time of watching our favourite shows. In such a situation, pausing the video for quite some time can be really useful, and that can be accomplished by saving the recording for a few minutes or seconds in the storage device, and by resuming the playback from that point when the user paused the playback. But there is no option to pause a video that is being played in real-time, however, you can always pause a recorded video.
These are the three problems that I found while using the AVerMedia EzRecorder 130. However, none of them is a deal-breaker.
Bottom line:
Hope you have already taken your decision about whether this is a perfect gadget for you! The AVerMedia EzRecorder 130 is one of the best HDMI recorders, you can go for as it is quite reliable.
Some other products might offer additional features, but the AVerMedia EzRecorder 130 is the best one, as it offers decent performance without making you face any troubles.
If you do not want to go through the hassles of dealing with corrupted recording, or other problems at the time of recording and playback, AVerMedia EzRecorder 130 will never disappoint you in any way. AVerMedia is also a reliable brand, which is another reason this product can offer great value to you.
Other Reviews:


Just purchased an EZRecorder 130. Unfortunately the review DOESN’T mention that the recorder places a large, ugly “AVERMEDIA” logo at the top left of the screen in the recorded video!! The product documentation doesn’t mention this either. This thing is going back! I didn’t pay good money for this thing just to make commercials for Avermedia. Very disappointing. Please make sure you mention such drawbacks in further reviews; it’s really important to people who use your reviews to help make purchase decisions.