We already published two articles on how to check the speed of installed RAM in Windows 10,8,7, & XP system using CMD and third-party software called Piriform Speccy. But if you just want to know only about the speed of your RAM with a couple of other basic details then you can simply use your Windows TaskManager Performance option.
Check RAM details in Windows 10 using the Task Manager
The steps given below to check the frequency of the RAM are the same for all versions of Microsoft Windows operating systems.
Step 1: Go to your Windows 10 Taskbar and right click there.
Step 2: From the options of the Taskbar select the TaskManger.

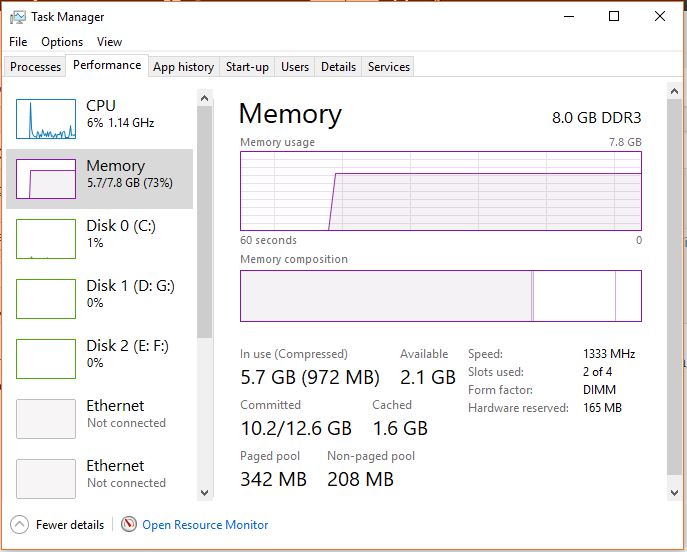
Step 3: Once the Task Manager will open click on the Performance Tab where you can easily check performance related details of your system.
In the Performance tab of the Task Manager, you will get the CPU, Memory, Disk and Network performance report. To see the details of the RAM, just click on the Memory.
Under the Memory option, you will get the RAM speed and frequency, Slot used, Form factor, hardware reserver, Total memory in use and available including Cached, Paged pool, Non-paged pool and committed.
You can also check other articles related to it:
- Check ram frequency using CMD in Windows 10, 8, 7 & XP
- How to Set an Ethernet metered connection on Windows 10
- How to Check Motherboard Model Number in Windows 7, 8 & 10
- Find the actual DRAM frequencies of the connected RAM sticks including other hardware information of your computer using Speccy?


very straight forward! thanks!
This DOES NOT show the actuall RAM speed! Seems like it is only RATED frequency, because this number does not change when you do overclocking and still shows the lowest