There are dozens of software available for Windows to manage and format SSDs or HDDs, and DiskGenius is one of them. It is a comprehensive disk management and data recovery software designed to help users manage their storage devices, partitions, and data effectively.
Some of DiskGenius’s key functions are:
- Disk Partitioning allows users to create, resize, delete, and format partitions on their hard drives, SSDs, and other storage devices.
- Data Recovery to scan and recover lost or deleted files and partitions from various storage devices, including damaged or formatted drives.
- Disk Cloning and Imaging to clone entire disks or partitions to create backups.
- File and Partition Backup feature for individual files or entire partitions backup.
- Partition Recovery is a part of Data recovery but some lost or deleted partitions.
- Disk Utilities offers various tools to manage disks such as checking and repairing file systems, wiping data securely, and managing bad sectors on hard drives.
- File System Support includes NTFS, FAT32, exFAT, HFS+, EXT2/3/4, and more.
- User-friendly interface and compatibility with almost all active Windows versions such as Windows 11, 10, 8, and 7.
- DiskGenius offers both free and paid versions. OFcourse the free one provides only some basic disk management features.
Well, formatting an SSD or HDD using DiskGenius is just like the Windows native option available for the same purpose. Here are the steps to format a storage drive using DiskGenius:
Important Note: Formatting a drive will erase all data on it. Make sure you have backed up any important data before proceeding.
Step 1: Download and Install DiskGenius:
Those who already have DiskGenius can go for the next step others can visit its official website and download the software. Alternatively, Windows 11 and 10 users can use the command terminal to install it. Just right-click on the Start button and select PowerShell (Admin) or Terminal (Admin). After that run the given command.
winget install Eassos.DiskGenius

Step 2: Run the DiskGenius software on your computer.
So, if you already have the DiskGenius or just installed it, go to the Start button and search for it. As its icon appears click to run it.

Step 3: Select the Drive to Format:
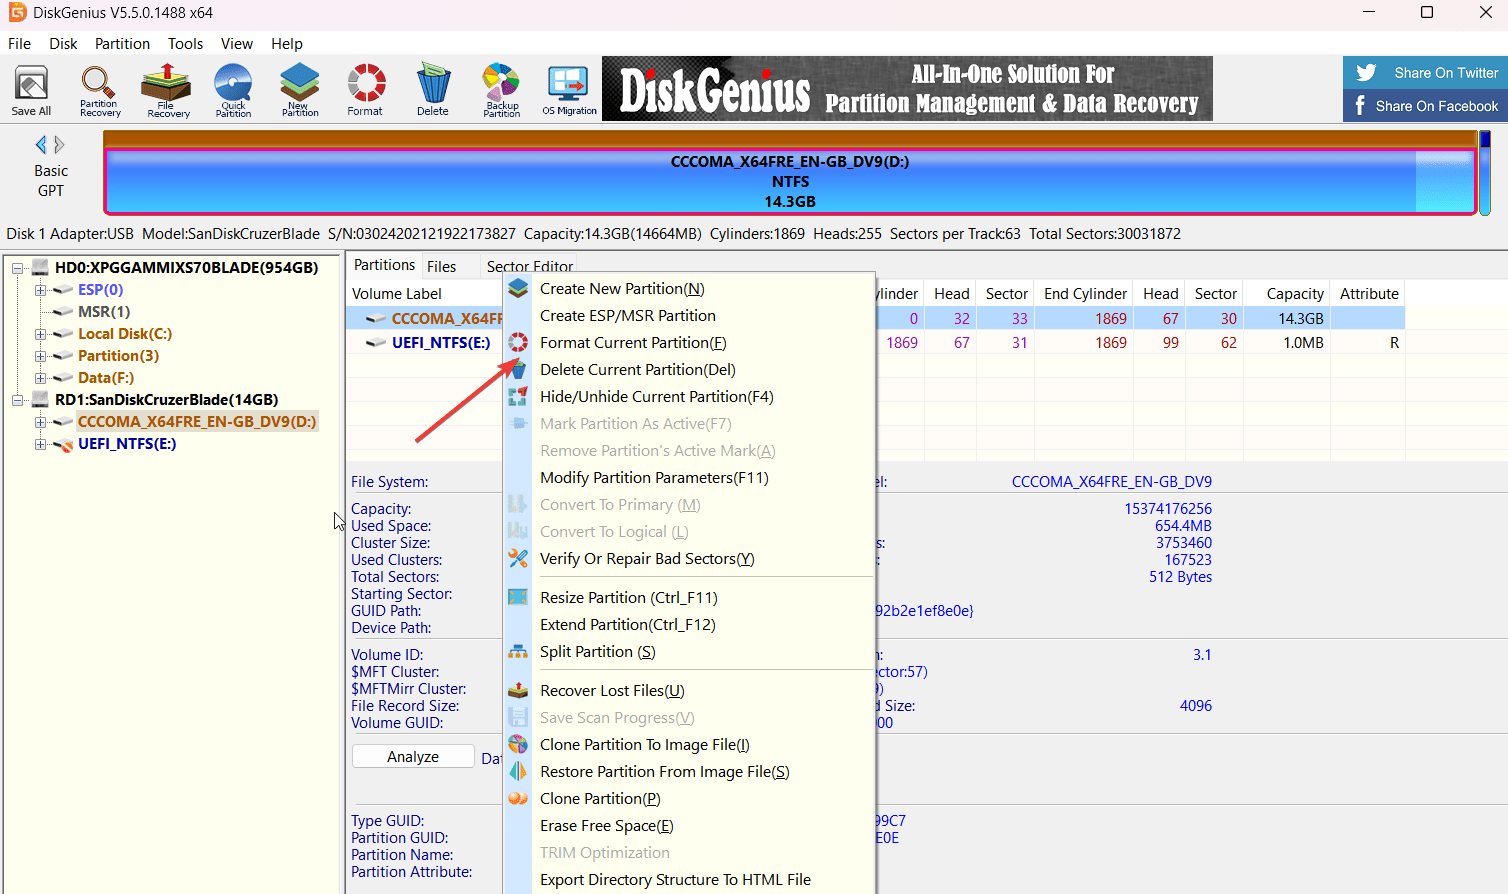
As you open this Windows Disk management software, you will see all your PC or laptop-connected SSD or HDD drives even the onboard M.2 SSDs. Identify the disk which you want to Format, however, before that make sure you have backed up the important data from that particular drive or partition. Because formatting will delete all of the Data residing on the disk.
Now, right-click on the SSD or HDD you want to format and select “Format Current Partition” from the context menu of DiskGenius.

Step 4: A dialog box will appear with formatting options:
As you select the formatting option for your selected drive in the previous step, a dialog box will appear from where you can select in which file system you want to format your drive. Select the desired one (e.g., NTFS for Windows, exFAT for cross-platform compatibility, or FAT32 for smaller drives).
Although, the system will by default assign a Volume label to your drive, if you want to use some custom name then can do that as well.
After selecting your options, click the “Format” button to begin the formatting process. A confirmation dialog will appear, warning you that all data will be erased. Confirm that you’ve backed up your data and click “Yes” to proceed.
It will take some time depending on the size of your selected drive. Once formatting is completed, you’ll see a confirmation message. Click “OK” to close the format completion dialog.

Step 5: Close DiskGenius, and you’re done.
Now, you can exit the DiskGenius software because your SSD or HDD should now be successfully formatted and ready for use. Go to “This PC” or “My Computer” and start using the drive.
Other Articles:
Related Posts
How to create email groups in Gmail? Send one email to multiple recipients in a matter of seconds.
Getting the right dashcam for your needs. All that you need to know
How to Install 7-Zip on Windows 11 or 10 with Single Command
How to Install ASK CLI on Windows 11 or 10
How do you install FlutterFire CLI on Windows 11 or 10?
How to create QR codes on Google Sheets for URLs or any other text elements