Learn the steps to delete, create or format partitions on Windows 11 or 10 for installed Hard disk or SSD drives to claim and utilize their full storage capacity.
Imagine your existing PC has a conventional hard drive, however, now you want to add one more drive or SSD. And of course, the latter one will be used to boot the OS whereas the previous one will act as pure Data storage. After successfully migrating the OS and other data from your Hard drive, you would want to delete all the extra partitions on the old boot drive to use its total capacity. For this task, we recommend Disk Management, which you can find by searching the Windows taskbar.
Here in this tutorial, we will learn how to use Disk Management to delete, create and format partitions on Windows 11 or 10.
Steps to Create & Delete Partitions on Windows 11 or 10
Estimated reading time: 8 minutes
1. Create and format Partitions
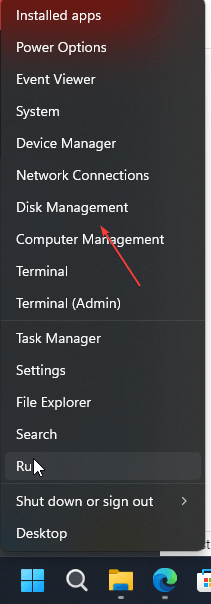
Go to your Windows search bar or click on the Start button and type – Create and format Partitions. As you get its icon, click on it and you will have the Disk Management window. Alternatively, we can right-click on the Start button and select Disk management.
2. Find the Drive
Now it’s time to determine the right drive. In the upper area, in the Volume column, you can see the respective labels and drive letters. Our example is the HDD (D:) volume. In addition to the name, you may also be able to refer to the capacity that is also listed.
3. Select and Delete Volume
When you select the volume, the corresponding area appears hatched at the bottom of the window. In addition, in our case, there are two or more partitions on the disk. To get rid of them, right-click on it, select Delete Volume from the context menu and answer the question with Yes.

In this way first, delete all the available volumes or partitions on this disk to free all the available disk space.
4. Delete Volume Greyed Out in Disk Management
However, what happens if you don’t get the “Delete Volume” option to remove the Disk partition on Windows 11 or 10? For example, you can see that in below-given screenshot we are not getting the “Delete Volume” option for Disk 3’s First partition. In such a case, we will use the command prompt to delete the volumes.

Command line method to delete Windows 11 or 10 partitions
Open Command prompt, terminal, or Powershell
Right-Click on the Windows 11 Start button and select Terminal (Admin); on Windows 10 you may have Powershell (Admin). Confirm the default query of the User Account Control by clicking on the Yes button.
Run Diskpart
Diskpart is a Windows in-built command line tool to manage disk and its paritons. To evoke it, simply in your Terminal type:
diskpart
List Disk
Now, list the Disk Drives available on your system using the given command:
LIST DISK
Select the disk and identify the partition
Once you got the list of all disks, you will have the serial number along with them. Now, select the DISK that volume or partition you want to delete.
Here we are selecting our disk, assigned number 3.
SELECT DISK 3
List all the available partitions:
Now, let’s list all the available partitions under the selected DISK.
LIST PARTITION
Once you have identified which Partition you want to delete, select that using its serial number. For example:
SELECT PARTITION 1

Once you have selected the partition, you can delete it using the given command.
DELETE PARTITION
Based on our above example, the commands will select disk 3 and select partition 1. Then delete the selected partition with the command delete partition or in case of an error message occurs then use the delete partition override command:
DELETE PARTITION OVERRRIDE

Disk Management
You can now close the command prompt and return to Disk Management. There you have the possibility to allocate the freed-up space elsewhere, for example by enlarging another partition.
Again Delete the rest of the partition you are seeing on your Disk Management Interface.

5. Format and Create a New Volume
Now, you will see a single big unallocated space on your select disk. Well, we have freed up the space, now it’s time to use it by creating a New Volume on Windows 11 or 10.
For that right-click on the “Unallocated” Space and select New Simple Volume.

Assign Volume Size
If you are planning to create multiple partitions on Windows 10 or 11 then enter the amount of space you want to assign to your partition. Whereas those who want to use complete space of the Hard disk without multiple partitions instead want a big partition that uses the whole space of the drive, leave the default volume size as it is and simply click on the NEXT button.

Assign Drive Letter or Path
To identify the Drive on Windows 11 or 10, we have to assign it a Drive Letter or Path. You can leave the default settings as it is or in case you want to assign some specific Drive Letter then select that from the drop-down box and then click on the Next button.

Format Partition
In the Format section of Windows 11 or 0 Disk Management, the system will format the drive to make it usable. By default, it will use the NTFS, leave the settings as they are, and just move forward using the Next button.

New Partition Created
Finally, a new partition with the whole drive space allocated is ready to use on Windows 11 or 10. Go to This PC (My Computer) and start saving your files and folders into it.

FAQ
“Create and Format Hard disk partitions” is another term used for Disk Management in Windows 11 or 10. This feature is used to manage attached hard disks; for formatting, creating, and deleting partitions of a hard drive. Also, we can put any drive offline or online using this feature of Windows.
Format partition means, selecting any partition of the attached hard drive in Windows, macOS, or Linux and deleting or erasing the data of the selected partition while assigning a particular type of file system such as NTFS, ext4, FAT, and more…
Partition Disk stands for Split Disk. By default, you get hard drives of new PCs or laptops in one piece. You can logically partition them so that you have several “smaller hard disks” virtually (depending on how much you partition) on them. It means you are specifying the boundaries of areas (storage space) on the disk. On the other hand, Formatting is creating a filesystem volume. For example, you have a free space on a drive just like a white piece of paper where you are creating a table for storing filesystem volume objects like files and directories.
Yes, formatting will erase all data available on your Disk. However, the data can be recovered, if, after formatting, nothing has been stored on it again. For recovery, we need a special kind of software such as stellar data recovery.
When we hit the Format button for any Hard drive, the system will erase all the data and pointers allocated for them to make space for new data. In short, all of your data will be gone, once you format your hard drive.
Other Articles:
⇒ How to create an active partition in Windows 10,8,7 & XP via command prompt
⇒ How to hide partitions in Windows 10,7 & 8 via command prompt
⇒ Delete or unpartitioned USB drive partitions on Windows
⇒ How to change drive letter in Windows 10,8,7 PC or Laptop
Related Posts
How to Install 7-Zip on Windows 11 or 10 with Single Command
Install Google Earth on Windows 11 or 10 Using a Single Command
How to install Gaming Services on Windows 11
How to Install Telnet Client on Windows 11 Using PowerShell
How to Install ASK CLI on Windows 11 or 10
How do you install FlutterFire CLI on Windows 11 or 10?