SSH server or client installation on CentOS 7 or 6 is really super easy you need to follow some commands given in the article…
SSH stands for Secure Shell protocol used to remotely log in and access computer system -servers or PC. It was primarily developed to use in the UNIX system but later on, spread to other OSs too. It is developed to securely connect systems by simply bypassing any vulnerability of network or hackers. Systems with SSH server and Client uses a special key to establish a connection. It is a cross-platform tool that can be used on Windows, Linux, FreeBSD, Android or MacOS. Know more about SSH (secure shell protocol).
Here we will show how to install OpenSSH on CentOS 7 to access it remotely from Windows 10/7 OS using Putty.
Install ssh client on CentOS 7/6
On CentOS Desktop or Server, whatever you have, we will install two part of the OpenSSH (an open source SSH tool); one will be OpenSSH client to access other systems using SSH and another one is OpenSSH server to run an SSH server daemon so that you can access your CentOS remotely.
sudo yum -y install openssh-server openssh-clients
Enable SSH as System services
If every time you don’t want to run SSH service on CentOS manually than simply we have to enable SSH as Systemctl service (system services). It means the moment your system get booted, it will automatically enable and run.
chkconfig sshd on
Start CentOS SSH service
Simply use the below command to finally start sshd daemon (openssh-server)
service sshd start
To Stop
In case you want to stop SSH server on CentOS:
sudo service sshd stop
To Disable service (optional)
Use command to disable SSH service on and then delete it, so that it can’t up and run with system boot up
sudo chkconfig sshd off
Remove it
sudo chkconfig sshd --del
Uninstall OpenSSH server
In future, when you don’t need it anymore, use the below command for uninstalling SSH server from CetnOS
yum remove openssh
Finally, your system has the SSH, now let’s say you want to connect CentOS 7 from Windows 10 using PuTTY.
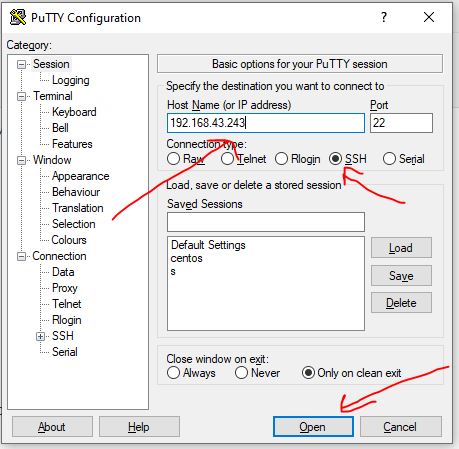
- First, download and Install Putty on Windows 10
- Run PuTTY
- Enter the IP address of CentOS running with OpenSSH server. If you don’t know the IP address of your CentOS server or Desktop then simply run a command ifconfig in Terminal.
- Select SSH as a connection type
- Finally, click on the Open button.
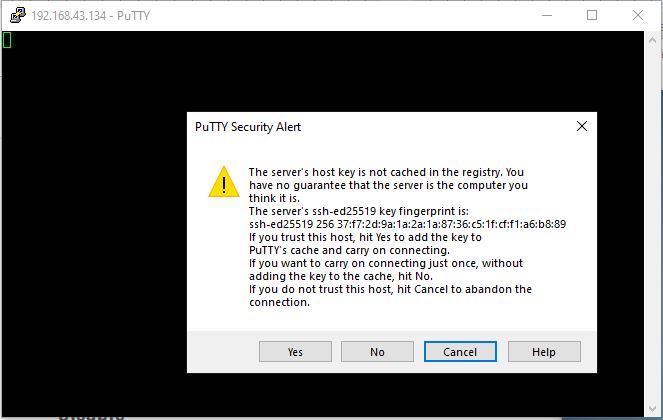
PuTTY will ask to accept the server generated ssh key by clicking on the YES button.
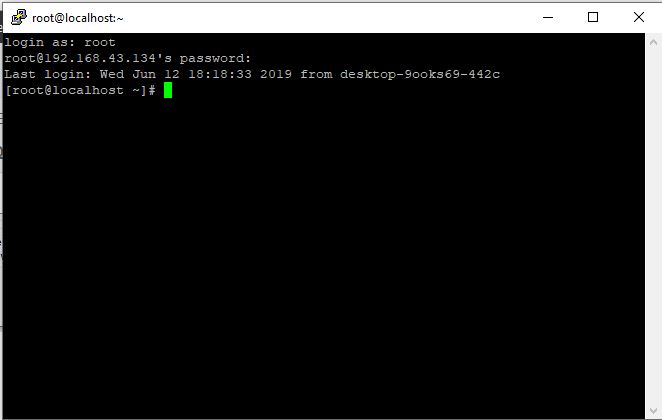
A terminal window will open asking you to log in. Now you can log in as root or any other user that present on CetnOS and you want to connect.
OpenSSH Server Configuration (optional)
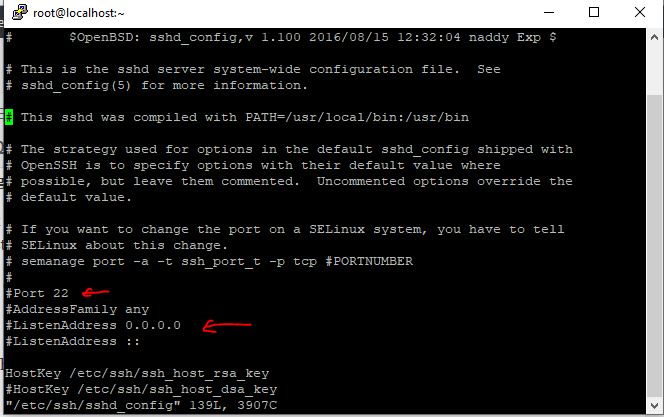
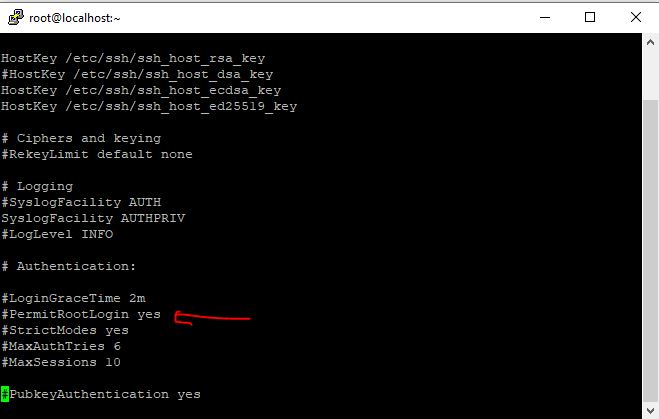
In case you want to restrict some IP address to SSH, or disable the root access of server or want to change the default 22 port of SSH to some custom one, then simply edit the shd_config file of OpenSSH server on CertnOS.
From Terminal use VIM to edit the configuration file:
vi /etc/ssh/sshd_config
In the file, find and replace:
To bind some IP address to SSH, first, remove the # from ListenAddress and replace 0.0.0.0 with the IP address.
To change the Port 22 to some other, then again remove # given in the front of Port 22 and replace 22 with a port number you want to assign.
To disable the root login, remove # and replace yes with no given in front of PermitRootLogin option.
PermitRootLogin no
To restrict login to some User, then add the following
AllowUsers users
Replace users with your username.
After performing all the changes save the file, for that first press ESC button and then type :wq
Finally, restart the SSH service.
service sshd restart
Other Resources:
Related Posts
How to create email groups in Gmail? Send one email to multiple recipients in a matter of seconds.
Getting the right dashcam for your needs. All that you need to know
How to Install 7-Zip on Windows 11 or 10 with Single Command
How to Install ASK CLI on Windows 11 or 10
How do you install FlutterFire CLI on Windows 11 or 10?
How to create QR codes on Google Sheets for URLs or any other text elements