After installing the Apache on Centos, if you are looking for a web-based tool called phpMyAdmin then this article will help you. The phpMyAdmin is the necessary tool for a web server that needs a graphical web interface to manage all databases without the hectic of using the command line. You can say, it provides an interface for the MySQL databases. The following tutorial will help you to install the phpMyAdmin on Centos 6 and Centos 7 base servers whether it is local for testing, VPS or Dedicated, the commands are same. However, if you are planning to install CPanel software on your server then you don’t need to install the phpMyAdmin separately, it comes along with it by default.
Note: Before installing the phpMyAdmin, make sure the MYSQL server and Apache web server are already installed on your CentSO machine where you are going to install the phpMyAdmin. Here, we used the Digitalocean server to install phpMyAdmin on centos 7 but the steps given below are same for other VPS server too. You might want to see: Install Apache web server on CentOS 7/6 with a single command
Steps and commands to install the phpMyAdmin on Centos 7 & Centos 6 using command terminal:
- Open the Command line terminal or putty to connect the CentOS server remotely.
- Log in as root or if you are using the standard user then you should know the root password.
- We need to install the EPEL repository because right now by default no package for phpMyAdmin is available for Centos 7. So use the below command:
sudo yum install epel-release
- After adding the Epel repository, use the below yum command to install the phpMyAdmin package:
sudo yum install phpmyadmin
- Now configure the phpMyAdmin with Apache, so that it would easily work with your server IP address. Edit the phpMyAdmin configuration file. I used the Vim to edit the file, you can also use the nano, if it already installed on the system.
sudo vi /etc/httpd/conf.d/phpMyAdmin.conf
or
sudo nano /etc/httpd/conf.d/phpMyAdmin.conf
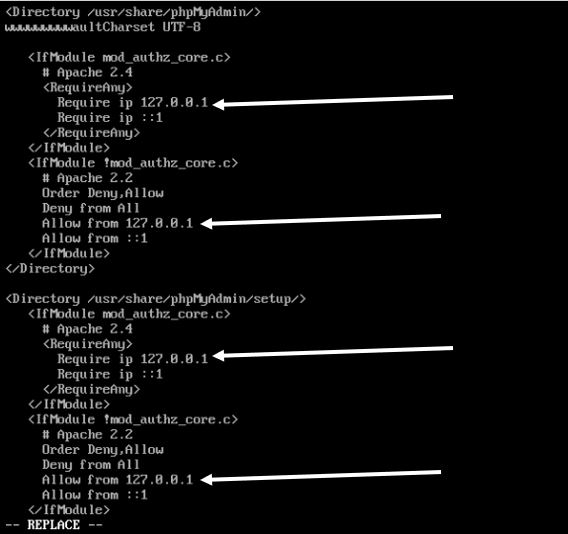
- Once the configuration opened, replace the localhost IP
127.0.0.1
with your server to make the phpMyAdmin work with Apache and can be accessed through Internet from anywhere.
- You will Ip that need to be changed in the front of text: Require IP Server_IP_Address and Allow from Server_IP_Address. If you are using the Vim to edit the file then after editing use the Esc button and then type :wq to save and exit the file.
Once the editing gets finished. Restart the Apache web server to reflect the changes. To do that here is the command:
sudo systemctl restart httpd.service
How To Access PhpMyAdmin Panel: To access the installed phpMyAdmin on the CentOs just open the browser and type your domain or IP address following by phpMyAdmin: Example http://server-IP or domain name/phpMyAdmin.
To login, the phpMyAdmin installed on Centos, use your MySQL root username and password or standard MySQL user along its password.

Secure the phpMyAdmin by changing the URL
By default, the phpMyAdmin uses your server_IP/phpmyadmin address to open. It is easy to vulnerable by hackers and bots, however, you can change to add a bit layer of security to your phpMyAdmin server.
Step 1: For doing this, again we need to edit the phpMyAdmin configuration file. Run the below command again:
sudo vi /etc/httpd/conf.d/phpMyAdmin.conf
Step 2: As it opens, edit the default Alias.
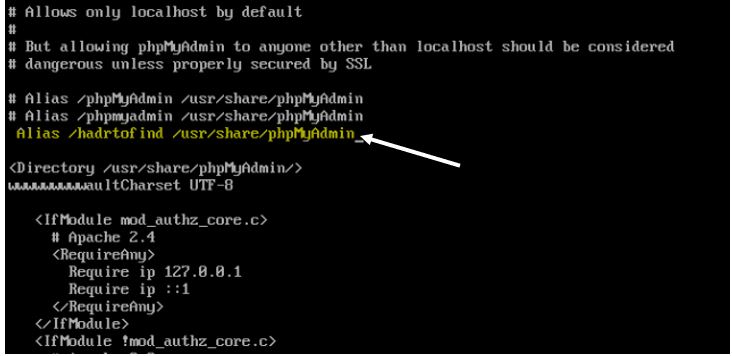
To banish the default Alias just add the comment (#) at the beginning and add your own custom Alias. What you have to do:
By default it is: Alias /phpMyAdmin /usr/share/phpMyAdmin. It means whenever you use the /phpMyAdmin after your server IP or domain it looks the phpMyAdmin files and configuration under the directory /usr/share/phpMyAdmin
So, just change /phpMyAdmin to whatever you want. For example, here we are using the text/hardtofind for phpMyAdmin URL.
Alias /phpMyAdmin /usr/share/phpMyAdmin
Changed to
Alias /hardtofind /usr/share/phpMyAdmin
Our new URL for phpMyAdmin will be http://server-IP or domain name/hardtofind.
After editing press ESc button and type :wq to save the edit in the file.
How to uninstall phpMyAdmin Centos
To uninstall the phpMyAdmin from the CentOS you can use two methods given below:
Method 1#: You can directly use the Yum to remove the phpMyAdmin packages, the command is:
yum remove phpMyAdmin.noarch
Method 2#: Another method of uninstalling the phpMyAdmin from Centos is using the RPM but make sure the RPM support is installed on your computer.
rpm -qa |grep phpMyAdmin
When you run above command you get the currently installed phpMyAdmin version on your Centos. Now copy that and use it with the below command.
rpm -e rpm -e phpMyAdmin-4.4.15.10-3.e17.noarch

You might like to see:
- How to install Audacity on Ubuntu Linux using terminal
- Install Lamp Stack (Apache, PHP, and MySQL) on Ubuntu 16.04 Server
- Change Ubuntu Root Administrative password, if Forgotten
- How to install Owncloud 10 on Ubuntu 16.0.4 Server
- Install Android emulator Anbox on Ubuntu Linux
- How to Setup a Media Streaming Server on Windows Without Any Software
Related Posts
How to install Adminer on Windows 10 or 11?
How to install Apache, MySQL, PHP & PhpmyAdmin on Windows 10 WSL
How to Create a Database in PHPMyAdmin
How to install phpMyAdmin on Centos 7 & Centos 6
Backup WordPress database with phpMyAdmin