We store a lot of information on our computer, and sometimes we don’t want others to see them. The best way to hide such things from getting accessed by others is to move them to a particular partition, and encrypt it. But with encryption, you will have an additional headache to remember the password, and in case it is lost, you might see darkness everywhere. But you can always hide a partition, which contains some sensitive information quite easily. You will not need any hide drive software or Windows drive hider like Nodrives Manager for that purpose. You will just need to use some Command Prompt commands for this purpose.
You can use the tutorial to hide external hard drives, as well. So here I will show you how to hide drive partitions using CMD. This tutorial can be followed on any Windows operating systems, like Windows 7, 8, 10, and the older versions of Windows, as well. I will show you how to hide the drives and the way on how to access hidden hard drive partition after unhiding it. This tutorial can be helpful to hide some sensitive things, without the need of going through the BitLocker hassle.
But the process in this tutorial is just going to hide the partitions. They are not getting encrypted or you are not protecting it in any way. If you have some geeky friends who are expert in computers, it will be a piece of cake for them to find out the hidden partitions and see the contents. So never consider this method as a security measure. It can be enough to hide the partitions from your family members, who are not that expert in computers.
So let’s get started with this tutorial.
Hide partitions in Windows 10,7 & 8 via command line prompt
The steps to follow
-
- Here is a list of drives before I hide any drive. I will be hiding the ‘Audio CD’ drive. You can always use this tutorial on any other hard drive partitions, or other volumes as well. The steps are not different.

- Open ‘Command Prompt’ on your Windows. You can hit ‘Windows key + R’, type ‘cmd’, and hit the enter key to open it easily.
- Now type ‘diskpart’ and hit the enter key.

- Now a new Command Prompt window will open with the ‘DISKPART’ prompt.

- Hiding a volume…
- Now type in ‘list volume’, and you will see the list of partitions and volumes attached to your computer. You can even find some connected flash drives, CD and DVD drives, etc.
- Each of the partitions that will be shown to you, will come with a volume number, a drive letter, volume label, disk type, partition size and different other details. You will have to choose the one that you want to hide.

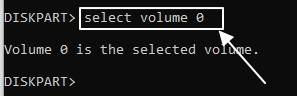
- Now type ‘select volume x’ and hit the enter key. You should replace ‘x’ with the volume number. I will be hiding the drive with the label ‘Audio CD’ in this tutorial. The number for me is ‘0’. So my command will be ‘select volume 0’ followed by hitting the enter key.
- Now type in the following ‘remove letter x’ and hit the enter key. The ‘x’ should be replaced by the drive letter. For me, the command will be ‘remove letter F’ followed by hitting the enter key.

- Now the drive will be hidden from the list of drive in your Windows Explorer.

- Here is a list of drives before I hide any drive. I will be hiding the ‘Audio CD’ drive. You can always use this tutorial on any other hard drive partitions, or other volumes as well. The steps are not different.
Now you might need to know how to access hidden hard drive partition. For that, you will have to unhide the drives. The process for that is as shown below.
How to unhide drive in windows 10, 7 & 8 using command line prompt tool
Step 1: The steps are pretty similar in case of unhiding volumes, as well. In case you have exited DISKPART and is unhiding the disk partition or volume in a new session, you will have to repeat all the steps until the command of ‘select volume x’.
Step 2: Still, I am just recapping the commands, if you do not want to scroll up.
diskpart

DISKPART>list volume

DISKPART>select volume x
Note: Volume X- where X should replace with a value of drive like in my case it is 0.
Step 3: Now the next command will be ‘assign letter x’ followed by hitting the enter key. You should replace ‘x’ with the drive letter, which you have hidden. Thus, for me, the command will be ‘assign letter F’ followed by hitting the enter key.

*In case you want to unhide the partition in the same session, just execute the last command.
Step 4: Now you will be able to find the hidden drive back in Windows Explorer or when you open ‘My Computer’.
Hope the information on how to hide a partition in Windows 10 or other Windows versions was helpful for you. If you wanted to know to hide OEM partition, this tutorial can also be helpful for you as well.
Do you have any questions in your mind about the following tutorial? Feel free to comment it down below.
You might also like to know about:
- Install Java in Ubuntu / Linux mint using Terminal
- How to download and install WPS office on Ubuntu via command terminal?
- How to encrypt pen drives, flash drives or external hard drives with a password on Windows 10, 7 & 8
- Shutdown computer with the keyboard the Windows 10, 8 & 7
- How to install Kali Linux on VirtualBox on Windows, Linux, Mac, or other platforms
Related Posts
How to Install 7-Zip on Windows 11 or 10 with Single Command
Install Google Earth on Windows 11 or 10 Using a Single Command
How to install Gaming Services on Windows 11
How to Install Telnet Client on Windows 11 Using PowerShell
How to Install ASK CLI on Windows 11 or 10
How do you install FlutterFire CLI on Windows 11 or 10?