Windows 10 comes with the OneDrive client application to sync files and folders with its respective cloud service. However, if you are not using OneDrive you can disable its autostart on Windows 10. Or even can uninstall it completely. In this tutorial, we will show the steps on how to do that…
Steps to Disable autostart of OneDrive in Windows 10
The autostart of Startup application in Windows including cloud storage OneDrive consume hardware resources, thus if you are not using it often then deactivating it is a wise idea.
- Open Windows 10 File Explorer
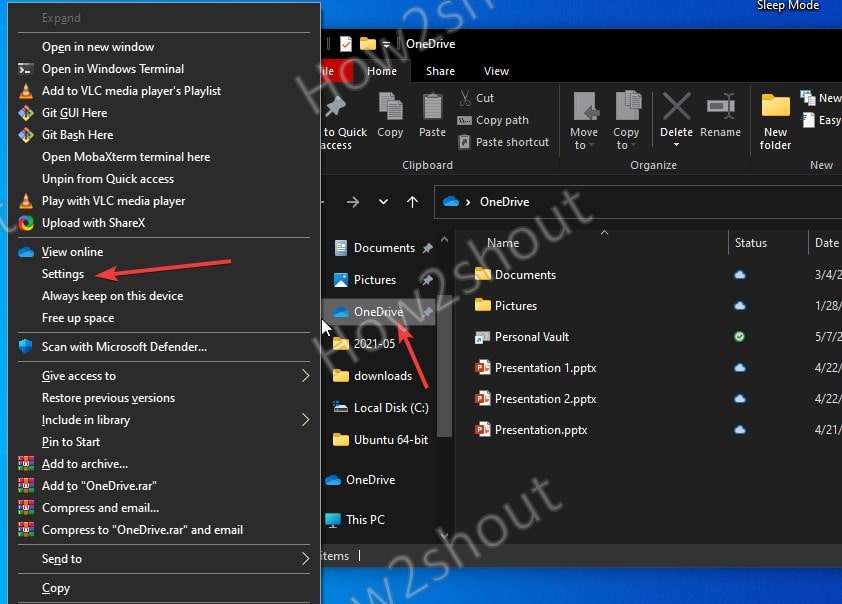
- On the right side tree structure, you will find OneDrive pinned icon.
- Right-click the OneDrive icon and select the Settings option.
- Switch to the “Settings” tab and uncheck the box given for “Start OneDrive automatically when I log into Windows“.
- Click on the “OK” button to save your settings.
- Now onwards when you restart your computer, the OneDrive will not start automatically.
Alternate method- open the path “C: \Users\your-user\AppData\Local\Microsoft\OneDrive” and inside the folder rename the file “OneDrive.exe” to “Drive.exe”.
Completely uninstall OneDrive on Windows 10 instead of deactivating it
Well, those who don’t require OneDrive on their system anymore can uninstall it completely instead of deactivating its running with Windows 10 startup.
- Go to Windows 10 Search
- Type- control panel and open it when its icon appear
- Alternatively, press Win key +R and type the “control panel”, and hit the Enter key.
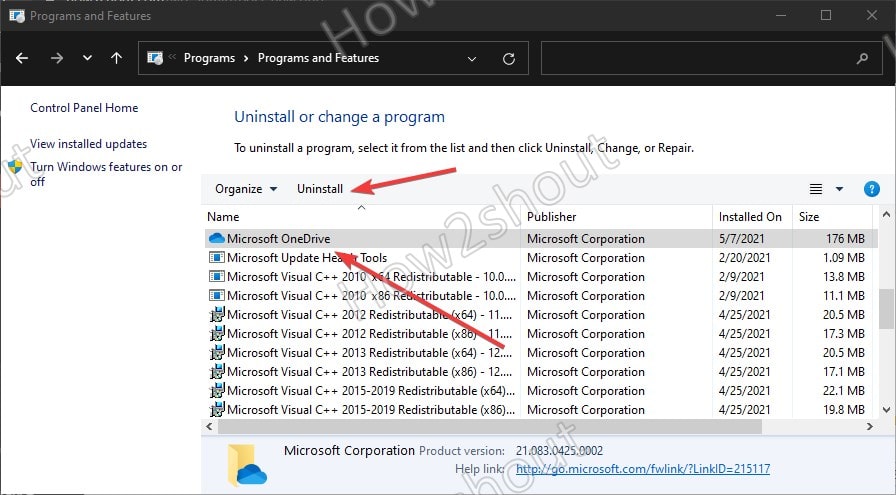
- Click on Programs- Uninstall program option.
- Select Microsoft OneDrive and hit the Uninstall option.
- Windows 10 will ask for confirmation, click Yes to allow the system to remove OneDrive completely.
Other Articles-
- How to add programs to the Windows 10 Startup folder
- How to Remove and add Windows 10 startup programs
- Steps to delete the Twitter account in 6 steps
- How to Update Drivers in Windows 10 Using Device Manager


Related Posts
How to create email groups in Gmail? Send one email to multiple recipients in a matter of seconds.
Getting the right dashcam for your needs. All that you need to know
How to Install 7-Zip on Windows 11 or 10 with Single Command
Install Google Earth on Windows 11 or 10 Using a Single Command
How to install Gaming Services on Windows 11
How to Install Telnet Client on Windows 11 Using PowerShell