If you are planning to start your career as an ethical hacker, or have interest in hacking, you must have heard about Kali Linux. Yes, it is yet another great distribution of Linux, which is targeted to the penetration testers and white hat hackers. Kali Linux is, just like other Linux platforms, an open source project, but is maintained and funded by Offensive Security, which provides a handful of security and penetration testing services. Kali Linux is not the only best available open source penetration testing and ethical hacking distro; there are dozens. So, If you always have been a Windows or Mac user, it will be a tough time to cope with the new user interface and a new set of features and software, available on Linux, and thus, it is not recommended to install Kali Linux, on your system, as the main operating system.
Most users want to know how to install Kali Linux on the virtual machine, and you will get the answer to your question here. There are a number of virtualization platforms, where you can install Kali Linux on top of your Windows or Mac, and even Linux, if you are comfortable with some other Linux distro. I will show the tutorial to install Kali Linux on VirtualBox, as VirtualBox is a virtual machine platform, which is available for Windows, Linux, Mac, and a number of other platforms like Solaris. If you know, how to use other virtual machine platforms like VMWare Player or VMWare Workstation, you can even install Kali Linus, on that, and the process is not going to be too much different. Furthermore, the VirtualBox is also available in a Portable version that can be used directly from to run any operating on any computer without installing the Virtualbox software locally. Here is a tutorial on that– Install Portable Virtualbox on USB to Run Virtual Machines Anywhere.
The step by step process of Kali Linux Installation on Virtual machine given here in this tutorial is same for Window 10, Windows 8, Windows 7, Linux (different flavors & version) including MacOS.
Install Kali Linux on Virtualbox
Download the Kali Linux installer image for a Virtual box.
Your first task would be to download the Kali Linux ISO from the official website of Kali Linux. You can get a list of all the downloadable ISOs here.
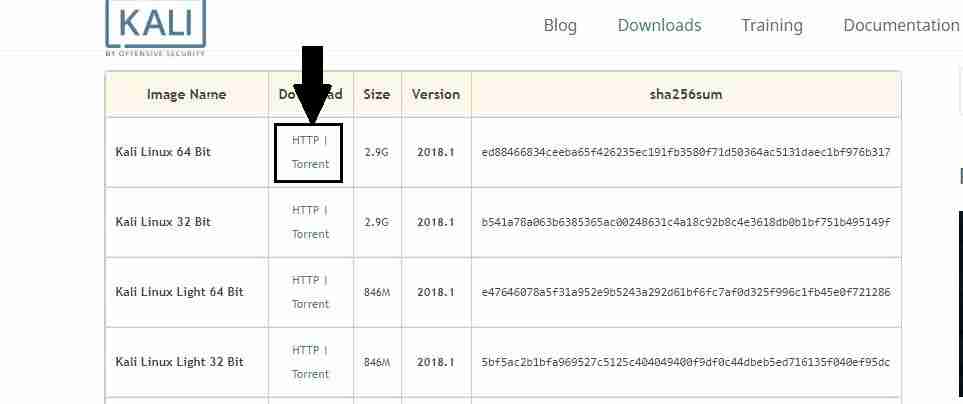
You can find a number of ISOs, but I will recommend you to go for a 64-bit edition of Kali Linux. Just go for the one, at the top. You can even download the same ISO image, by clicking here.
*If you think, you are not having enough resources, you can even go for the Light versions, which I haven’t tried though. If you are having an internet connection, offering faster peering, you can even go for the torrent download, instead of the regular HTTP download, recommended for most users.
Configuring the Kali Linux virtual machine
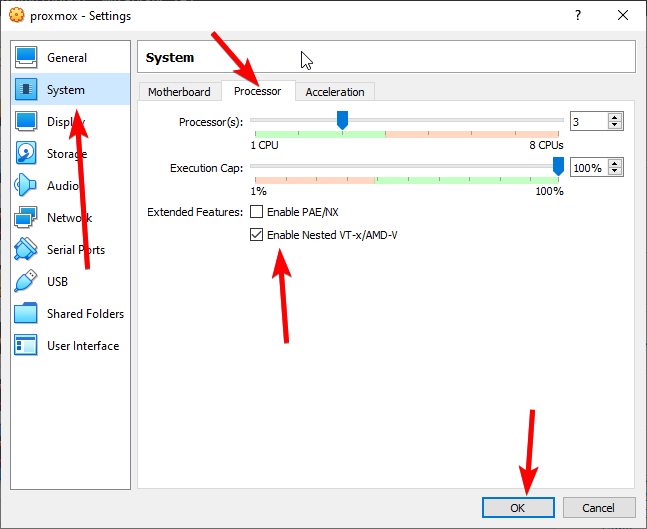
After downloading the image, open VirtualBox, and click on the button saying ‘New’. You will have to set the type to ‘Linux’, and the version to ‘Other Linux (64-bit)’ You can give any name, but I have given the name Kali, to easily recognize it, when there are many virtual machines. 
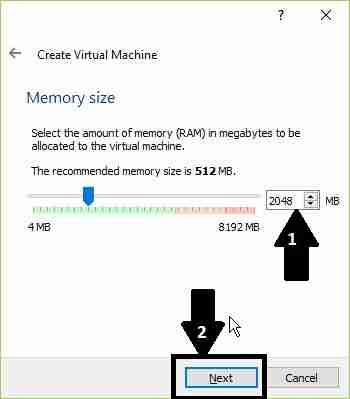
Assigning RAM to Kali Linux on VirtualBox
Now, you will have to choose the amount of memory, you would like to reserve for the virtual machine, or the Kali Linux installation. I will recommend you to go for a minimum of 2 GB or 2048 MB. If you can assign more, it is always a great idea. Click on ‘Next’
Create a virtual hard disk for Kali Linux
Now, choose the option saying ‘Create a virtual hard disk now’, and click on ‘Create’. Now choose VDI or VirtualBox Disk Image. If you know how to use VHD or VMDK, you can even choose them. Click on ‘Next’ once again.
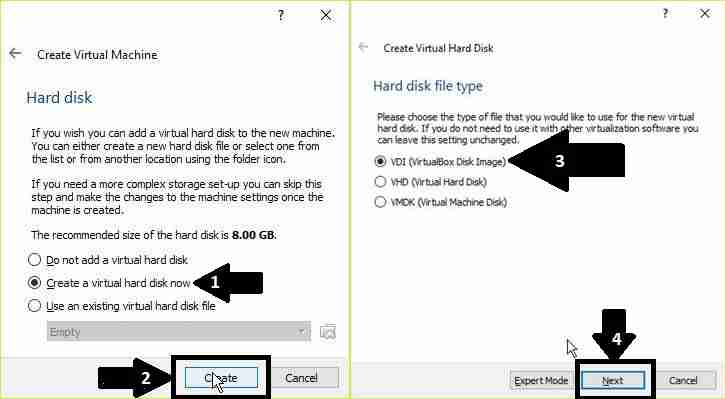
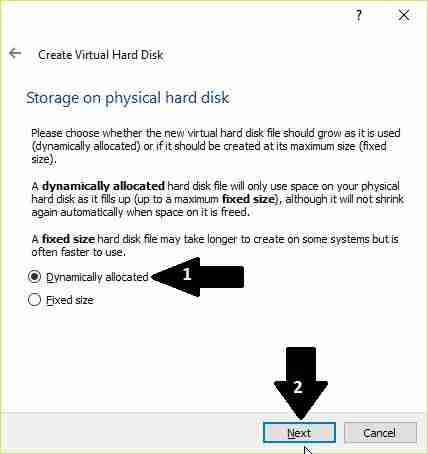
Now, you will have to choose the allocation of the virtual hard drive on your physical disk. I will recommend you to choose the option saying ‘Dynamically allocated’, to allow VirtualBox to allocate the space on your physical disk, smartly. Click on ‘Next’.
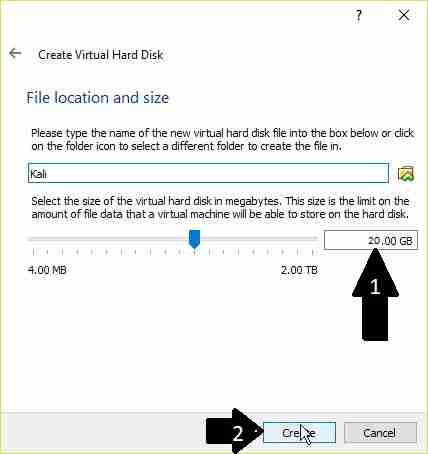
Now you will have to choose the size of the disk, or the storage space from your hard drive or SSD, which you want to assign to Kali Linux. I will recommend you to go for 20 GB. But if you are having more room, go for more storage, as well. Do not set the default value, i.e. 8 GB, as it will no install on that little amount of storage. Click on ‘Create’ now.
The creation of the Virtual Machine is complete. Now it is the time to start the real game of installing Kali Linux on the virtual machine created.
Installing Kali Linux on VirtualBox
The process of installing Kali Linux is going to be same for other virtual machine platforms, and it is kind of similar, with some basic differences, in case of installation on a physical machine, as well.
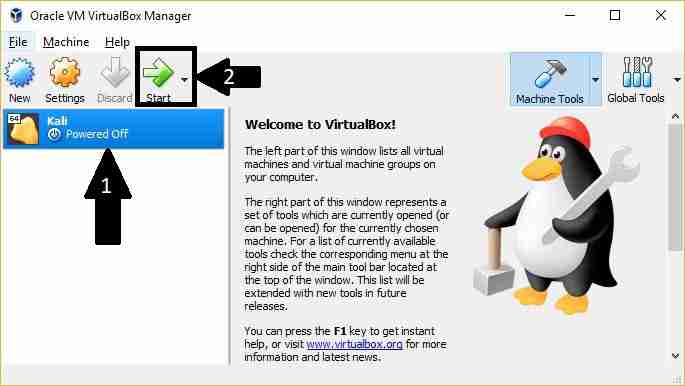
Choose Kali on the left hand side of VirtualBox, and click on ‘Start’.
Select Kali Linux ISO file
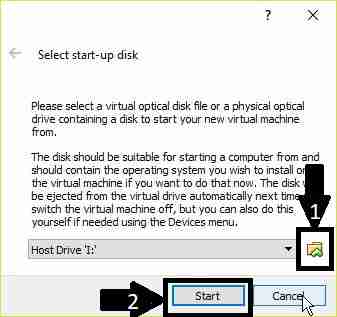
Now, you will have to choose the location, where the ISO of the Kali Linux is present. You will have to click on the icon beside the drop-down menu saying Host Drive. Locate the ISO, and click on ‘Start’.
Kali Linux Boot Menu
You will get the following screen, and you will have to select ‘Install’, and hit the enter key. (Use the up and down arrow keys to select, as you will be unable to use the mouse, as long as the installation continues, which you should keep in mind.)

Language Selection
Now, you will have to language. Select your preferred language, which is ‘English’ for me, and hit the enter key. Then, you will have to choose the country, which is ‘India’ for me, and hit the enter key once again.
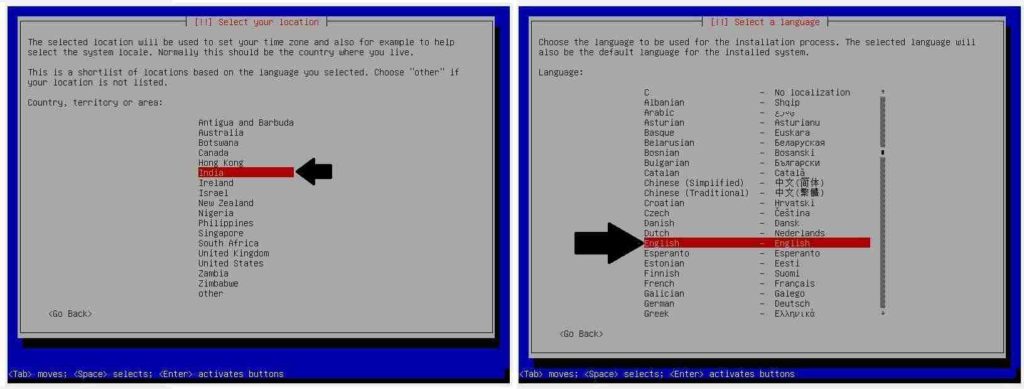
Now you will have to choose the Keymap, and I am choosing ‘American English’, which can also be different, if you are having a keyboard with some different layout, and hit the enter key.

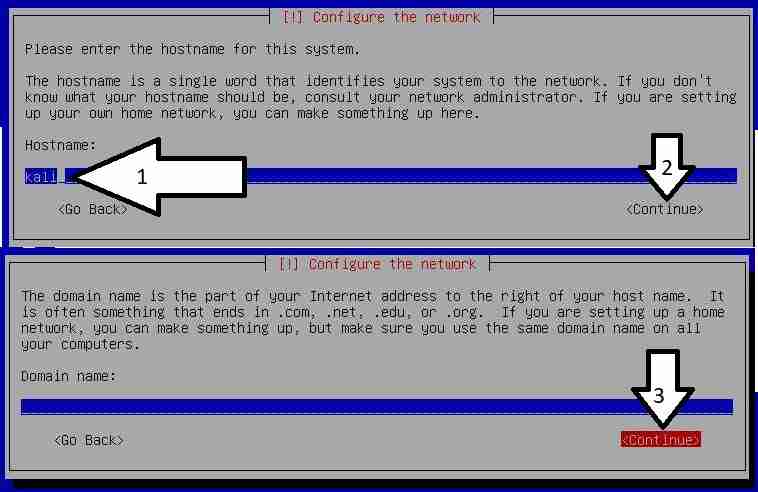
Network Configuration
Now, you will have to assign a Hostname. You can give any name. I am assigning the name ‘Kali’ to it. Now select ‘Continue’, and hit the enter key. You will get the option to choose the Domain name. Keep this field empty, and carry on. You can change such network settings later on.
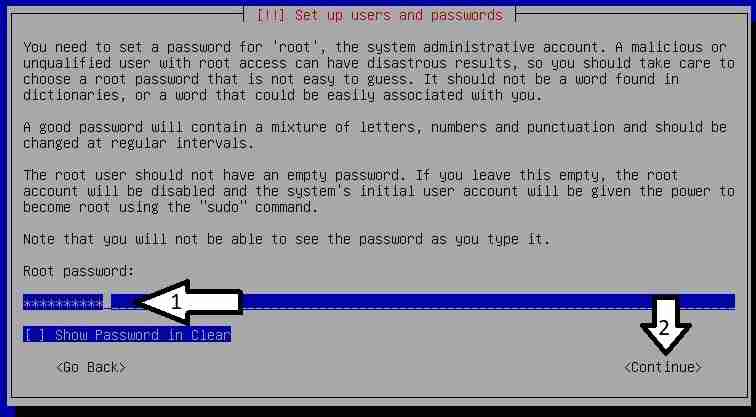
Set Kali Linux root password
Now, you will have to enter a password. Just enter the password, and continue. Just like entering passwords in different other places, you will have to enter the password twice, by selecting ‘Continue’.
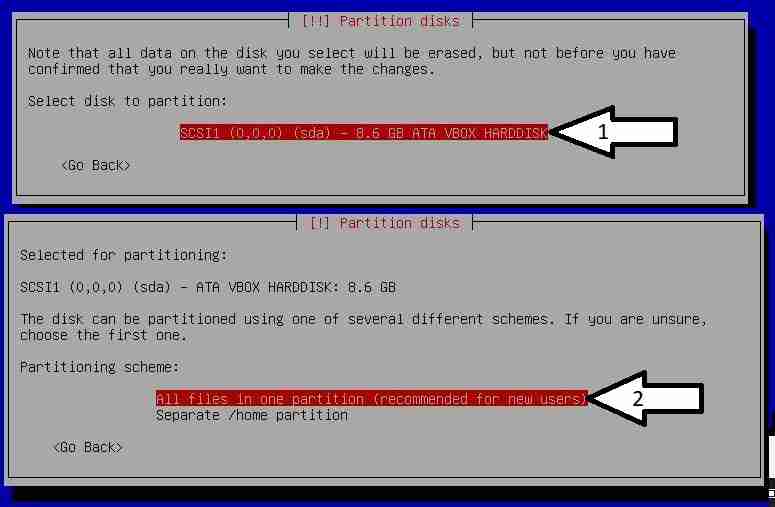
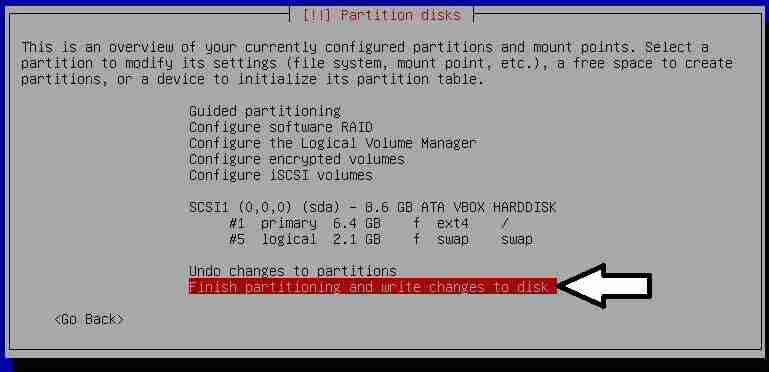
Partition the disk
Now, you will be asked to partition the disk. I will not recommend you to partition the disk, as we are using a virtual disk. Though you can partition, if you feel like doing that, for a better experience. To skip partitioning, just select ‘Guided – use entire disk’, and hit the enter key.

As you haven’t portioned the disk, there will be a single disk available. Just hit the enter key to carry on. Now, you will get two options. Go for the first option saying ‘All files in one partition (recommended for new users)’, and hit the enter key.
Now select ‘Finish partitioning and write changes to disk’, and hit the enter key.
The installation will start, and if you have followed all the steps properly, the installation will be completed without any issues, and you will get the following message, after the installation is complete. The installation will take few minutes, and I will recommend you not to use your computer, when the installation takes place.
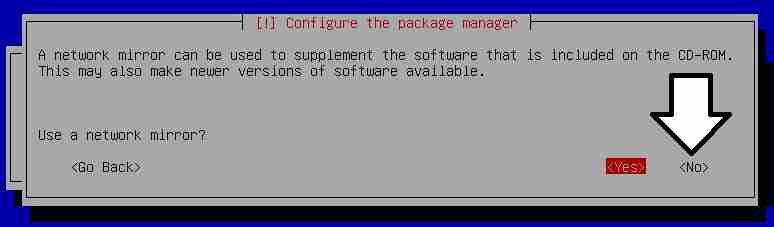
Configure the package manager
Once the files are installed, you will be asked, whether to install a network mirror, in order to configure the package manager. I will recommend you to select ‘No’, and carry on with the installation process.
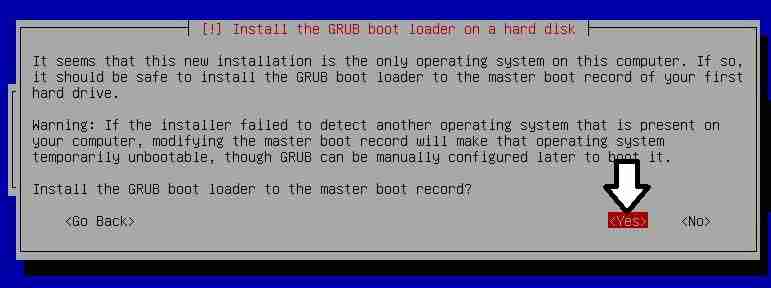
Finally, you will be asked, whether to install the GRUB. Just click on ‘Yes’. After that, you will get two options. Go for the second option, which is available.
Now finally select ‘Continue’ in order to start using Kali Linux.

The installation is not complete.
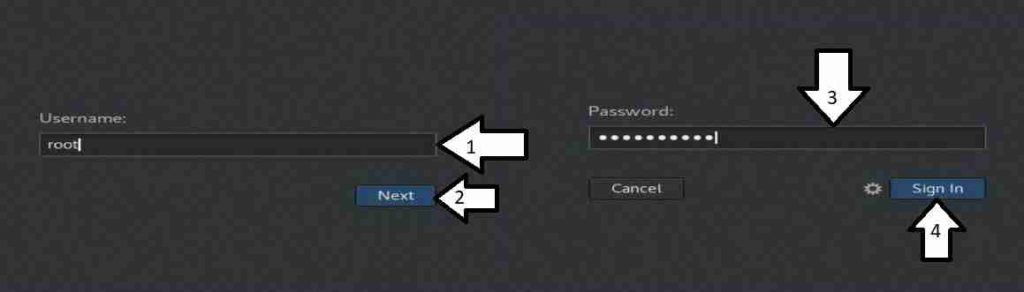
Starting Kali Linux
Once everything is completed, you will be asked to enter the username, which should be ‘root’. Just hit the enter key, and you will asked to enter the password. The password should be that password, which you entered, at the time of installing Kali.
At the time of booting your virtual machine, you will get 2 options. Just go for the option saying ‘Kali GNU/Linux’, to carry on with the process of starting Kali Linux.

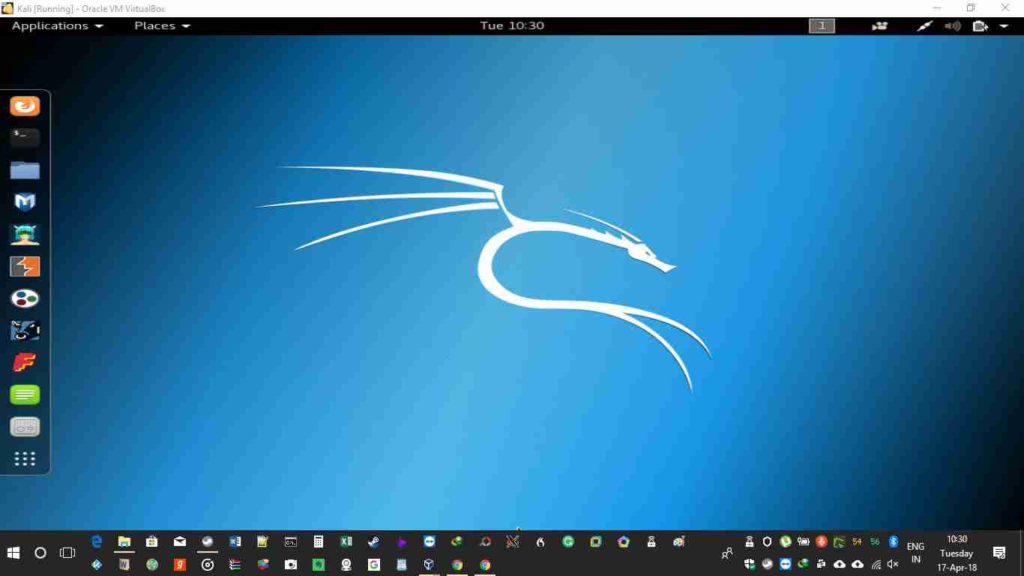
After the booting completed, you will get the following screen. Yes, the cool refreshing user interface of Kali Linux. Once you see the image, your hard work is now fruitful.
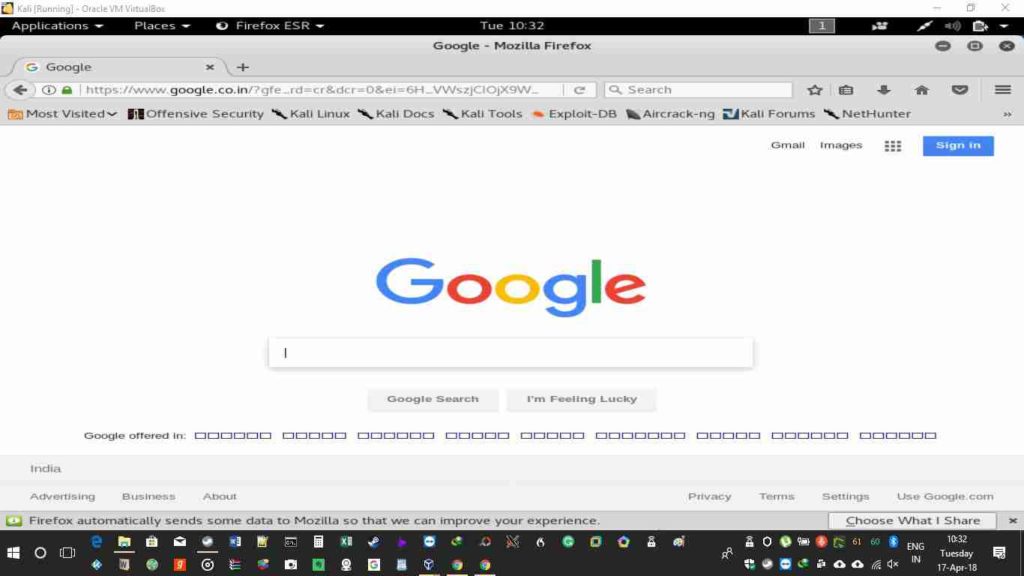
Now, you can start using Kali Linux, just in the way, you can use any other operating system. Here is a screenshot, showing Mozilla Firefox on Kali Linux, with the homepage of ‘Google’ loaded on it.
You can even install the Virtual Box Guest Additions, if you need that. Moreover, you can also download and install the Virtual Box Guest extension pack in order to get the extra hardware functionalities, which is present on your computer. If you don’t the installation of extension pack then see our article: An easy way to Install VirtualBox extension Pack on Windows, MacOS & Ubuntu Linux.
The installation process is quite easy, and it is going to be the same on all other virtual machine platforms. I have chosen VirtualBox to show the installation of Kali Linux, as the same process can be used to install Kali Linux, on all the operating systems, as VirtualBox is open source, and is available for all platforms, unlike other virtual machine platforms, limited to a certain platform.
Hope the small tutorial on how to install Kali Linux on VirtualBox, was helpful for you, and if you face any kind of troubles at the time of installation, feel free to comment it down below.
ALSO SEE:
- 7 Top Free Apps To Learn Linux/Unix Command Line Shell on Android Phone
- A process to Install Java in Ubuntu / Linux mint using Terminal
- Know how to Proceed with the Python Canopy installation steps, on Windows and Linux?
- Install Ubuntu on Windows 10 using Virtualbox Virtual Machine
- How To Change Ubuntu Root Administrative password, if Forgotten


Thanks for these tips. I shall be waiting for more such lessons as I feel they are really effective and I see that I am learning a lot from them. Hope you keep coming up with more such information and soon.
Dear Isla, thanks for your support. You can find more such information, on the website.