
I know how pleasing it is to type a document in Microsoft Word. From numerous formatting options to add a number of elements. You can get almost everything with Microsoft Word. Yes, you can even add tables. You can even add data to it to make it look the way you want. But the only thing, you cannot do, is, you cannot apply formulas. You might be having a huge set of data in Microsoft Word. In such cases, you have to put out the calculator some them up and insert the value manually.
It is not only about adding values. You might need to do a plethora of things with the set of data you are having in a table. In such cases, Microsoft Word doesn’t offer any kind of options for calculation or do similar other things. But wait, you can do that. Yes with the help of Microsoft Excel. But that is not feasible all the time as Microsoft Excel doesn’t offer a good interface for typing as Microsoft Word offers. But you can even work with Microsoft Excel within Microsoft Word. Great! But how? We will find here in this article, how to get Excel inside the Word document. The tutorial or steps given below are same for Microsoft office 2007, 2010, 2016 & office 360.
How to insert an Excel spreadsheet into Word
Step 1: Go to the ‘Insert’ tab. Click on the small and down arrow beside ‘Object’. Now click on ‘Object…’. You can even directly click on ‘Object…’. Both do the same job.

Step 2: You will get a new window just like this.
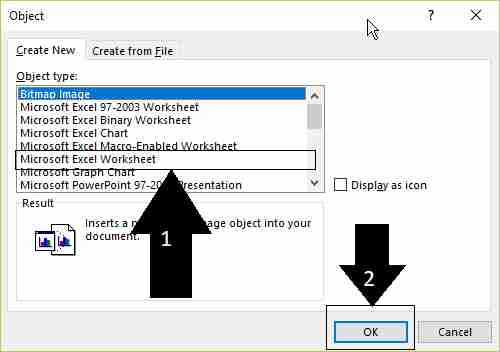
Step 3: Now choose ‘Microsoft Excel Worksheet’. Click on ‘OK’. Now you will get a small Microsoft Excel sheet in the current document. Just like the one shown here.
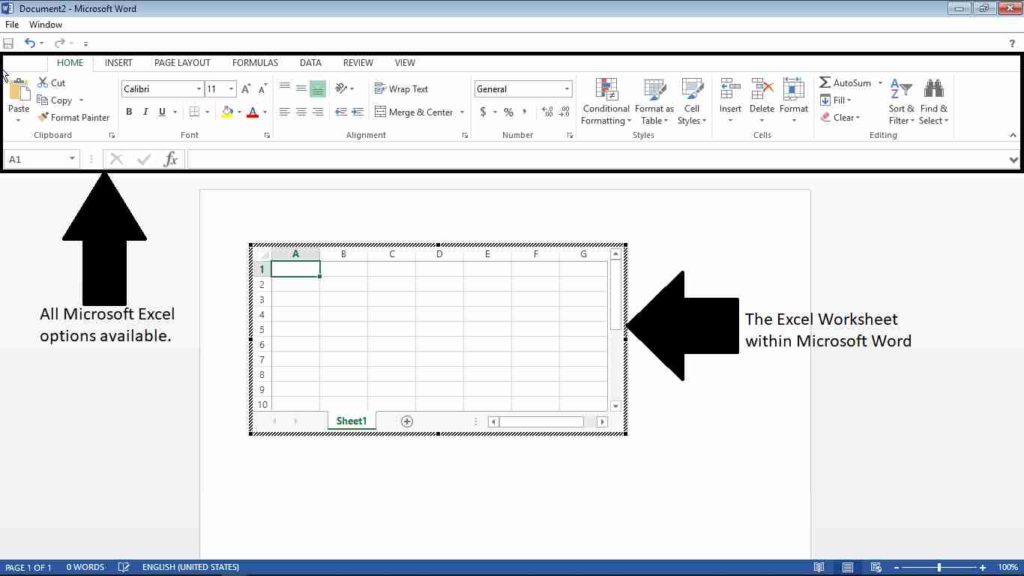
Step 4: The table will happen to look like a normal table in Microsoft Word. But it isn’t so. Just select the table and you can get a number of options. Those options, which you can get in Microsoft Excel.
On selecting the table, you can get all the Microsoft Excel options. That is indeed great. From formulas to charts, you can get everything with the help of this tool. Once you’re done working with the data, just click outside the table to go back to a document. You can even resize the table depending upon your requirements.
This is one of the coolest features, which you can get in Microsoft Word. It is not only helpful for me. I have found a number of geeks working with this tool to make things simpler. But I know it is not known to everybody. That is a reason I presented this tutorial.
Hope the little information was helpful for you. If you need more such tutorials, please let me know in the comment section down below.
ALSO SEE:
- Install Owncloud 10 on Ubuntu 16.0.4 Server
- A simple way to link Facebook Page to Instagram through Facebook on Computer
- How to make memes on smartphones and online web in the easiest way
- Tutorial on how to send messages and call numbers on Whatsapp without saving the contact
Related Posts
How to create data bars in Microsoft Excel for numeric values
How to dynamically adjust column width in Microsoft Excel based on cell contents
How to open Microsoft Word and other Windows apps using a shortcut keys
Microsoft’s Smart AI Attendee is Here to Take Your Place in the Office Meetings
How to combine first name and last name or split a name in Google Sheets
How to calculate age with Google Sheets, Microsoft Excel, or any other spreadsheet program