The Owncloud installation on Ubuntu Linux allows you to setup and create a self-hosted DIY personal cloud solution. The Own cloud community edition is the completely open source and free to use. It can store your content including image, videos, documents in a centralized location those can be accessed through desktop and smartphones remotely or locally via the OwnCloud client. It also lets you sync the content between your mobile devices so that you always be up to date.
The Ownloud is very much like a Dropbox but personal and very straightforward way to share and sync the data. You can use your old server or desktop machine to install the Owncloud to create DIY personal cloud storage solution. The main benefit is, if you have some sensitive data and not want it to be on public cloud servers for security reason then you can install the Ownloud either on Windows, Ubuntu, MacOS or any other Linux based system. It ensures that only you have a full control on what you own and also let you save few bucks those you are spending on third-party cloud services like Amazon drive, Google cloud storage, Dropbox and more. No doubt, they all provide some quota of free storage but still, the free one is limited and eventually, you have to spend some money at the end of the day to extend your free package… For example, if you are an iPhone user and we all know it has a limited amount of space, after which we need to buy services like Dropbox; but why you want to pay for it when you can set up one of your own using the OwnCloud.
The ownCloud client apart from Windows, Linux and MacOS; is also available as client app for Android and iOS devices. Using the OwnCloud client app one can automatically upload the pictures after taking them to the ownCloud server which is running at your home. Basically, you can call it, your own small cloud-based NAS.
Sync files at home or work with the Owncloud desktop client allow you to use them across multiple devices. You can also use the web browser to view, share and edit your files.
It is not limited to only the storage available on your computer hard disk, instead of that, it can integrate third-party storage service providers such as Dropbox, Microsoft OneDrive and more via a plugin system . OwnCloud offers a marketplace with wide range of plugins to extend the capability of your personal cloud storage running on ownCloud.
Beside ownCloud, there are a couple of other top open sources personal cloud software available like NExtCloud and more… Please see our list of best open source personal cloud storage software, free.
Coming to the main topic of this tutorial which is how to install the Own cloud 10 on Ubuntu 16.04 server. Let’s have a look…
The installation process is same for all Debian Owncloud installation or for Ubuntu 14.04, and Ubuntu 17.04
OwnCloud 10.0.7 installation on Ubuntu 16.0.4 Server
In this tutorial, we will install and configure an own Cloud instance on an Ubuntu 16.04 server.
Steps to follow during the OwnCloud installation on Ubuntu:
- sudo privilege on Ubuntu
- Install LAMP server
- ownCloud Installation
- MySQL Database Configuration
- ownCloud Configuration
- Finalize and test the uploading
sudo privilege on Ubuntu
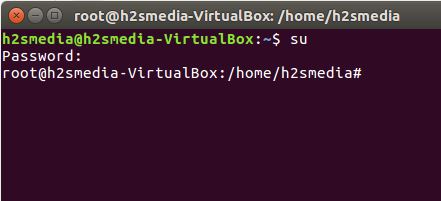
You should have a root access on your Ubuntu server to install the Owncloud… To switch to root user run the following command:
su root
Install LAMP server
If your Ubuntu server already has the Apache web server, MySQL, and PHP packages then you can directly move to next step otherwise see our step by step guide to install and configure the LAMP on Ubuntu:
How To Install Lamp Stack (Apache, PHP, and MySQL) on Ubuntu 16.04 Server
OwnCloud Installation
Here, we are using repository key to add packages for Ubuntu 17.04 and Ubuntu 16.04 but if you want to install it on Ubuntu 14.04 then just replace the Ubuntu_17.04 with Ubuntu_14.04 rest of all procedure is same.
We are showing two methods to install owncloud personal cloud storage on your Ubuntu server. You can choose any one of them which worked for you…
#First Method using the repository
For Ubuntu 17.04
To install the Owncloud by adding the repository key to apt. Run the following shell commands as root to trust the repository:
wget -nv https://download.owncloud.org/download/repositories/production/Ubuntu_17.04/Release.key -O Release.key
apt-key add - < Release.key
Run the following shell commands as root to add the repository and install from there.
echo 'deb http://download.owncloud.org/download/repositories/production/Ubuntu_17.04/ /' > /etc/apt/sources.list.d/owncloud.list
apt-get update
apt-get install owncloud-files
For Ubuntu 16.04
On Ubuntu 16.04 by adding repository key to apt to install the OwnCloud run the following shell commands as root to trust the repository:
wget -nv https://download.owncloud.org/download/repositories/production/Ubuntu_16.10/Release.key -O Release.key
apt-key add - < Release.key
Run the following shell commands as root to add the repository and install from there.
echo 'deb http://download.owncloud.org/download/repositories/production/Ubuntu_16.10/ /' > /etc/apt/sources.list.d/owncloud.list
apt-get update
apt-get install owncloud-files
Note: If the above First method successfully installed the OwnCloud then move directly to the Database setup and you do not need to follow the Second method...
#Second Method Direct download and manually setup and configure step by step
Step 1: Go to the ownCloud Download Page and download the version of Owncloud you want to install, here in this tutorial we are installing the Owncloud 10.
or just open terminal and type the following command to download the version 10 of Owncloud…
wget https://download.owncloud.org/community/owncloud-10.0.7.tar.bz2
Note: If you want to install any other version then replace the owncloud-x.y.z.zip (for zipped download ) and owncloud-x.y.z.tar.bz2 (for tarball download) with that… For example for Owncloud 10 — it will be owncloud-10.0.7.tar.bz2 or owncloud-10.0.7.zip . You can see the versions from https://owncloud.org/download/
Step 2: Verify the PGP signature
wget https://download.owncloud.org/community/owncloud-10.0.7.tar.bz2.asc
wget https://owncloud.org/owncloud.asc
gpg --import owncloud.asc
gpg --verify owncloud-10.0.7.tar.bz2 .asc owncloud-10.0.7.tar.bz2
Step 3: Now extract the downloaded own cloud files
If you are using the tarball version then use the following command otherwise the next unzip command.
tar -xjf owncloud-10.0.7.tar.bz2
For Owncloud zipped folder extraction…
unzip owncloud-10.0.7.zip
Step 4: After extracting, we need to copy it in our web directory for that run the following command
cp -r owncloud /var/www
Step 5: Configure the Apache Web Server for Owncloud
We need to configure our Apache web server to work with the OwnCloud and for that, we need to create the Owncloud configuration file inside the /etc/apache2/sites-available. Follow the below commands:
touch /etc/apache2/sites-available/owncloud.conf
nano /etc/apache2/sites-available/owncloud.conf
Add the following lines in the Owncloud configuration file
Alias /owncloud "/var/www/owncloud/"
<Directory /var/www/owncloud/>
Options +FollowSymlinks
AllowOverride All
<IfModule mod_dav.c>
Dav off
</IfModule>
SetEnv HOME /var/www/owncloud
SetEnv HTTP_HOME /var/www/owncloud
</Directory>
Press Ctrl+X after that ‘Y’ and then hit enter button to save the file.
Step 6: After above step, create a symlink of configuration file in /etc/apache2/sites-enabled… Run the command:
ln -s /etc/apache2/sites-available/owncloud.conf /etc/apache2/sites-enabled/owncloud.conf
After creating a link enable this Apache mod_rewrite module…
a2enmod rewrite
Step 7: Now restart Apache
service apache2 restart
Step 8: Change the ownership of your ownCloud directories to your HTTP user…
chown -R www-data:www-data /var/www/owncloud/
Step 9: Open your browser and point it to https://localhost/owncloud
Owncloud installation Errors
If everything is not OK and you will get some errors like given here then run the respective given commands…
Error 1:

Can’t write into config directory!
This can usually be fixed by <a href=”https://doc.owncloud.org/server/10.0/go.php?to=admin-dir_permissions” target=”_blank”rel”noreferer”>giving the webserver write access to the config directory</a>
If you are getting the above error run the following script… Replace the ocpath to you owncloud folder, in case it is different other leave it as it is…
#!/bin/bash
ocpath='/var/www/owncloud'
htuser='www-data'
htgroup='www-data'
rootuser='root'

printf "Creating possible missing Directories\n"
mkdir -p $ocpath/data
mkdir -p $ocpath/assets
mkdir -p $ocpath/updater

printf "chmod Files and Directories\n"
find ${ocpath}/ -type f -print0 | xargs -0 chmod 0640
find ${ocpath}/ -type d -print0 | xargs -0 chmod 0750

printf "chown Directories\n"
chown -R ${rootuser}:${htgroup} ${ocpath}/
chown -R ${htuser}:${htgroup} ${ocpath}/apps/
chown -R ${htuser}:${htgroup} ${ocpath}/assets/
chown -R ${htuser}:${htgroup} ${ocpath}/config/
chown -R ${htuser}:${htgroup} ${ocpath}/data/
chown -R ${htuser}:${htgroup} ${ocpath}/themes/
chown -R ${htuser}:${htgroup} ${ocpath}/updater/

chmod +x ${ocpath}/occ

printf "chmod/chown .htaccess\n"
if [ -f ${ocpath}/.htaccess ]
 then
 chmod 0644 ${ocpath}/.htaccess
 chown ${rootuser}:${htgroup} ${ocpath}/.htaccess
fi
if [ -f ${ocpath}/data/.htaccess ]
 then
 chmod 0644 ${ocpath}/data/.htaccess
 chown ${rootuser}:${htgroup} ${ocpath}/data/.htaccess
fi
Error 2: PHP module zip not installed.
If you are getting an error:
PHP module zip not installed.
Please ask your server administrator to install the module.et=”_blank” rel=”noreferrer”>giving the webserver write access to the config directory</a>.
Then installed the PHP module
apt-get install php7.0-zip
Owncloud MySQL Database Configuration and setup
Step 1: In the terminal run the following to log into MySQL with the administrative privilege…
sudo mysql -u root -p
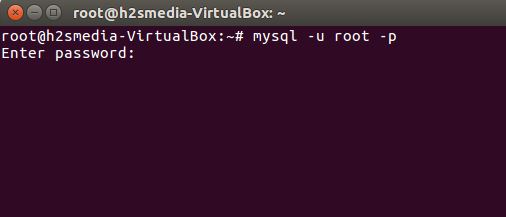
The MySQL will ask for a password which you set for it during its installation…
Step 2: Create a database for your Owncloud, you can give any name you want, here we are giving it an Owncloud…
CREATE DATABASE owncloud;
Step 3: Create a user for the database; again we are using the how2shout you can give whatever you want…
CREATE USER how2shout@localhost;
Step 4: Grant all permission of database to your user and also create a password for it… We are giving admin@123 as password but you can set some secure password for your Owncloud user…
GRANT ALL ON owncloud.* to 'owncloud'@'localhost' IDENTIFIED BY 'admin@123';

FLUSH PRIVILEGES;

Exit
Step 5: Check your newly created MySQL user by login into it… Replace how2shout with your newly created user for Owncloud database.
mysql -u how2shout -p
Step 6: You can now check the current user of MYSQL using which database and for that run the following command:
SELECT current_user();
You will output like:
+--------------------+
| current_user() |
+--------------------+
| how2shout@localhost |
+--------------------+
1 row in set (0.00 sec)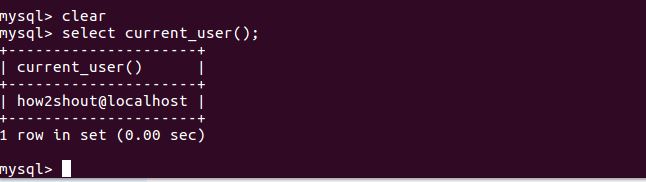
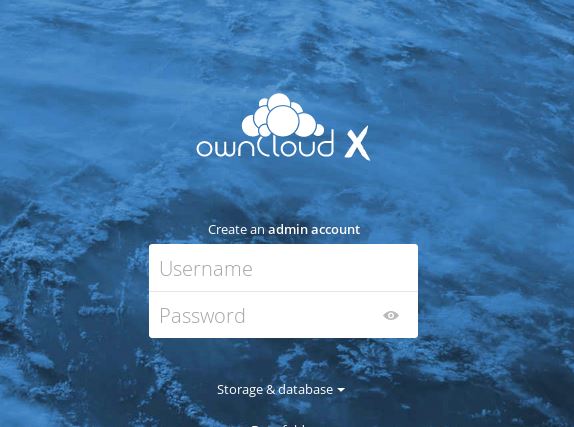
Final Step of Owncloud Installation on Ubuntu
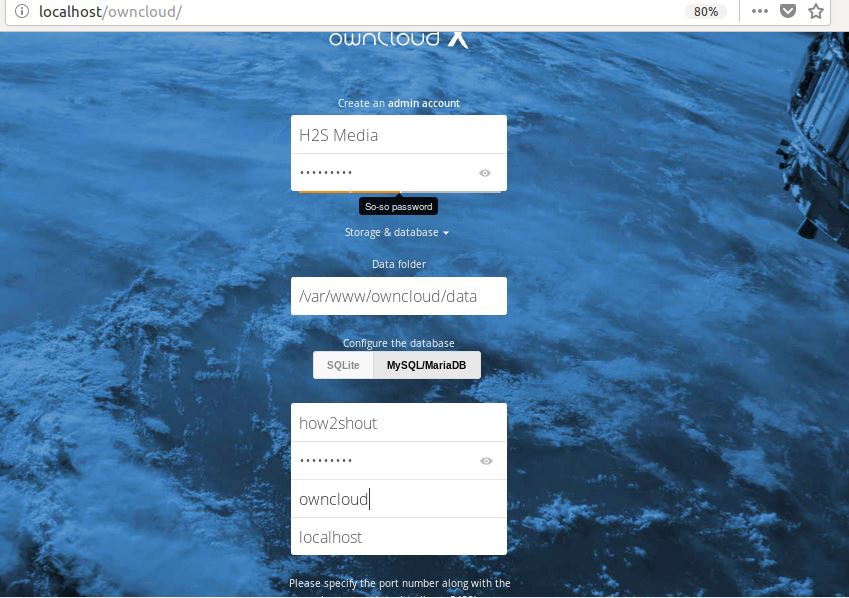
Step 1: Open the browser and point it to http://localhost/owncloud
Set your administrator account username and password along Database username and password we created above…
For example, here in this tutorial:
For creating an admin account, we are giving following details:
Username: H2S Media
Password:******
Database:
Username: how2shout
password:admin@123
Database name: owncloud
Note: You have to enter your details those you have created while performing the Owncloud installation….
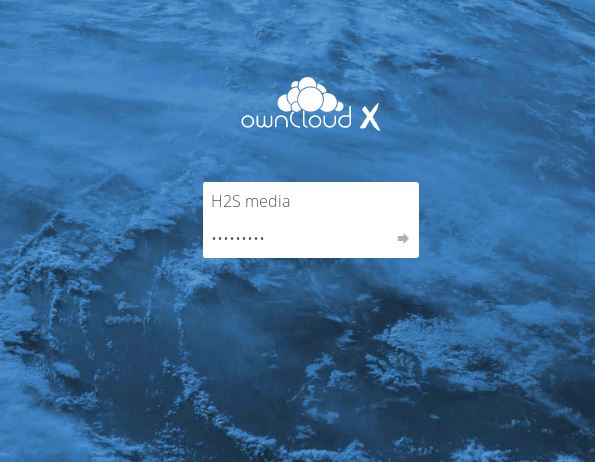
Step 2: In few seconds the Owncloud will be set up and ask you to enter login into the Owncloud as administrator:
I hope this tutorial help you in somehow, if you need any kind of help or have any confusion please let us know, the comment box is all your !!
ALSO SEE:
- Install Plex Media Server on Ubuntu Step By Step
- How to Install Ubuntu on Windows 10 using Virtualbox Virtual Machine
- Install Wine on Ubuntu or Linux Mint using Terminal To Run Window Apps
- How to install Kodi on Windows 10 PC and Android devices, easily


Quality articles is the key to invite the people to pay a quick visit the web site, that’s what this website is providing.
Hi everybody, here every person is sharing these know-how, thus it’s
nice to read this website, and I used to pay a
visit this blog all the time.
Superb blog! Do you have any tips for aspiring writers?
I’m hoping to start my own blog soon but I’m a little lost on everything.
Would you advise starting with a free platform like WordPress or go for a
paid option? There are so many options out there that I’m completely overwhelmed ..
Any suggestions? Thanks!
I am sure this article will drive a lot of users, its really really great Keep up the good work!
Hi there mates, how is everything, and what you wish
for to say concerning this post, in my view its genuinely remarkable designed
for me.
I read this article completely on the topic of the resemblance of
hottest and previous technologies, it’s amazing article.
Very nice article, just what I needed.
It’s wonderful that you are getting ideas from this article as well as from our discussion made here.
I read this paragraph fully regarding the resemblance of most
up-to-date and previous technologies, it’s awesome article.
What you posted was very reasonable. But, think on this, what
if you wrote a catchier title? I am not saying your information isn’t good.,
but suppose you added something that makes people
want more? I mean How to install Owncloud 10 on Ubuntu 16.0.4 Server | H2S Media is a little
boring. You ought to peek at Yahoo’s home page and note
how they create article headlines to get people interested.
You might try adding a video or a related
picture or two to grab readers excited about everything’ve got to say.
In my opinion, it would bring your blog a little livelier.
Great site you have got here.. It’s hard to find quality writing like yours these days.
I really appreciate individuals like you! Take care!!
Excellent, what a webpage it is! This web site gives valuable facts
to us, keep it up.
If you are going for finest contents like myself, only
pay a visit this site everyday since it provides quality contents,
thanks
There is visibly a bundle to identify about this. I feel you made various nice points
in features also.