CloudCross multi-cloud client is an open source project meant to enable synchronization files and folders on Linux operating system. It can sync files and folders between the local system and cloud platforms. The user can tell the CloudCross the particular which he wants to include or exclude different from getting back up or sync. It gives an advantage on which file/folder should on local or cloud storage.
The CloudCross is developed purely on QT without the use of any third party any third party libraries. The cloud storage it supports are CloudMail, Google Drive, OneDrive, Dropbox, and Yandex Disk.
Other features of the ClouCross are such as two-way conversion of documents created on MS-office, Libre, Open Office format to Google Docs; manage and creation of new versions of files on Google Drive, upload and download of files to cloud and creation of links to download files.
The CloudCross can be installed on Ubuntu, Redhat, Gentoo & Arch. Here we are using the Ubuntu for other OS installation you can see the official page for the repository installation. Link
There is CloudCross GUI available so whatever we have to do is by using the command line terminal.
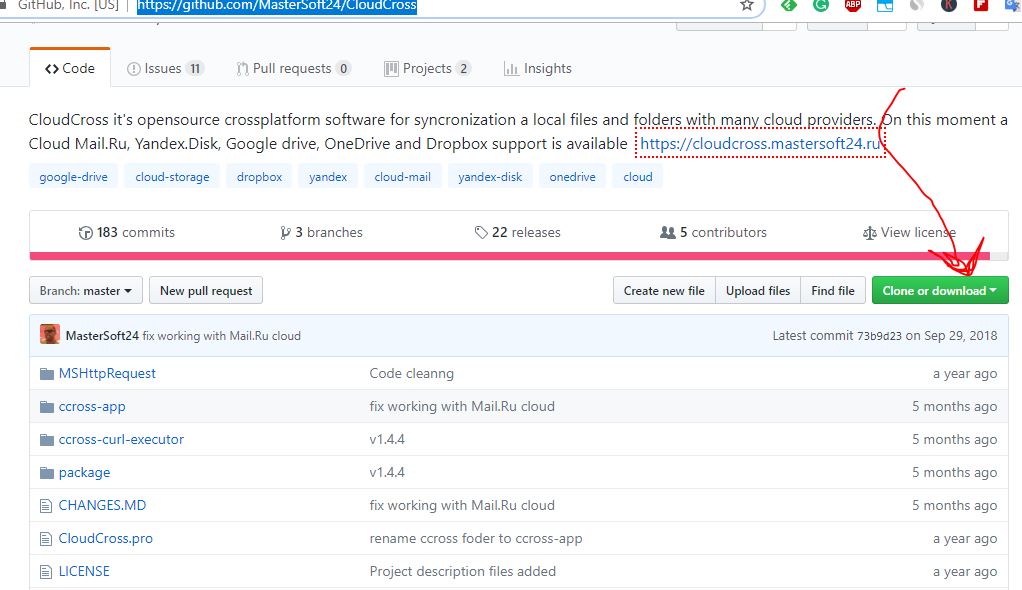
CloudCross Github project page is also available for downloading the project; if anybody wants to install or developed further.
Install and setup CloudCross Multi-cloud client for Linux
Step 1: Access your Ubuntu system
Step 2: Open the Command Terminal (CTRL+ALT+T)
Step 3: CloudCross depends on qtbase5 so we need to install along with other dependencies.
As per your platform run the below command for the installation:
For Ubuntu/Debian/Linux Mint
sudo apt-get install build-essential qt5-default qtbase5-dev qt5-qmake libcurl4-openssl-dev
For RPM Packager (Redhat, CentOS, Fedora, Alt Linux)
yum groupinstall 'Development Tools'

yum install qt5-qtbase qt5-qtbase-devel curl-devel
For Arch Linux
pacman -S base-devel qt5-base curl
Step 4: Download CloudCross for Redhat, CentOS, Fedora, Alt Linux, Ubuntu/Debian/Linux Mint or any other Linux.
The CloudCross project is available on Github. Here is the link to download the compressed ZIP file of CloudCross.
Step 5: After downloading, switch to Downloads directory using below command.
cd Downloads
Step 6: Inside the Downloads, you will see the ZIP file with a name CloudCross-mastert.zip
Use this command to unzip the CloudCross compressed folder:
unzip CloudCross-master.zip
Step 7: Enter into the Unpack or extracted folder of the CloudCross.
The command is
cd CloudCross-master

Step 8: Create a build directory where we compile the CloudCross.
For doing this use the below command:
mkdir build
Step 9: Enter in the build directory
cd build
Step 10: Make the CloudCross ready for compiling.
Use the below commands:
sudo apt-get install qmake
qmake ../CloudCross.pro
make
The output of the above command:
h2s@h2s-VirtualBox:~/Downloads/CloudCross-master$ cd build
h2s@h2s-VirtualBox:~/Downloads/CloudCross-master/build$ qmake ../CloudCross.pro
h2s@h2s-VirtualBox:~/Downloads/CloudCross-master/build$ make
cd MSHttpRequest/ && ( test -e Makefile || /usr/lib/qt5/bin/qmake -o Makefile /home/h2s/Downloads/CloudCross-master/MSHttpRequest/MSHttpRequest.pro ) && make -f Makefile
make[1]: Entering directory '/home/h2s/Downloads/CloudCross-master/build/MSHttpRequest'
g++ -c -pipe -O2 -std=gnu++11 -Wall -W -D_REENTRANT -fPIC -DQT_DEPRECATED_WARNINGS
-DQT_NO_DEBUG -DQT_NETWORK_LIB -DQT_CORE_LIB -I../../MSHttpRequest -I.
-isystem /usr/include/x86_64-linux-gnu/qt5 -isystem /usr/include/x86_64-linux-gnu/qt5/QtNetwork
-isystem /usr/include/x86_64-linux-gnu/qt5/QtCore -I. -I/usr/lib/x86_64-linux-gnu/qt5/mkspecs
/linux-g++ -o main.o ../../MSHttpRequest/main.cpp
g++ -c -pipe -O2 -std=gnu++11 -Wall -W -D_REENTRANT -fPIC -DQT_DEPRECATED_WARNINGS
-DQT_NO_DEBUG -DQT_NETWORK_LIB -DQT_CORE_LIB -I../../MSHttpRequest -I.
-isystem /usr/include/x86_64-linux-gnu/qt5 -isystem /usr/include/x86_64-linux-gnu/qt5/QtNetwork
-isystem /usr/include/x86_64-linux-gnu/qt5/QtCore -I.
-I/usr/lib/x86_64-linux-gnu/qt5/mkspecs/linux-g++ -o mshttprequest.o
 ../../MSHttpRequest/mshttprequest.cpp
Step 12: After the above command run the below two commands:
sudo cp "./ccross-app/ccross" "/usr/bin"
sudo cp "./ccross-curl-executor/ccross-curl" "/usr/bin"
Step 11: Now we connect different cloud services with CloudCross.
As we know, the CloudCross is a multi-cloud client so we can use it connect such as OneDrive, Google Drive, Dropbox or Yandex Disk of Cloud Mail.ru. We just need to open the Command terminal and enter the ccross -a option along with a syntax –provider [name].
See this example. Suppose we want to connect the Google Drive so the command will be
ccross -a --provider google
As you add the cloud provider a link will show as output in your command terminal. Copy that and open in the browser.
Output link in our case
h2s@h2s-VirtualBox:~/Downloads/CloudCross-master/build$ ccross -a --provider google -------------------------------------Please go to this URL and confirm application credentialshttps://accounts.google.com /ServiceLogin?passive=1209600&continue =https://accounts.google.com/o/oauth2/v2/auth?response_type%3Dcode%26redirect_uri%3D http://127.0.0.1:1973 %26client_id%3D834415955748-oq0p2m5dro2bvh3bu0o5bp19ok3qrs3f .apps.googleusercontent.com%26access_type%3Doffline%26scope%3D https://www.googleapis.com/auth/drive%2Bhttps://www.googleapis.com/auth/userinfo. email%2Bhttps://www.googleapis.com/auth/userinfo.profile%2Bhttps://docs.google.com/ feeds/%2Bhttps://docs.googleusercontent.com/%2Bhttps://spreadsheets. google.com/feeds/%26state%3D1%26approval_prompt%3Dforce%26from_login%3D1%26as%3DDz3gIG vQ634pCd0Ts2WqSA&followup=https://accounts.google.com/o/oauth2/v2/auth?response_type% 3Dcode%26redirect_uri%3Dhttp://127.0.0.1:1973%26client_id%3D834415955748-oq0p2m5dr o2bvh3bu0o5bp19ok3qrs3f.apps.googleusercontent.com%26access_type%3Doffline%26scope% 3Dhttps://www.googleapis.com/auth/drive%2Bhttps://www.googleapis.com/auth/userinfo .email%2Bhttps://www.googleapis.com/auth/userinfo.profile%2Bhttps://docs.google.com /feeds/%2Bhttps://docs.googleusercontent.com/%2Bhttps://spreadsheets.google.com /feeds/%26state%3D1%26approval_prompt%3Dforce%26from_login%3D1%26as%3DDz3gIGv Q634pCd0Ts2WqSA<mpl=nosignup&oauth=1&sarp=1&scc=1 Token was successfully accepted and saved. To start working with the program run ccross without any options for start full synchronize.
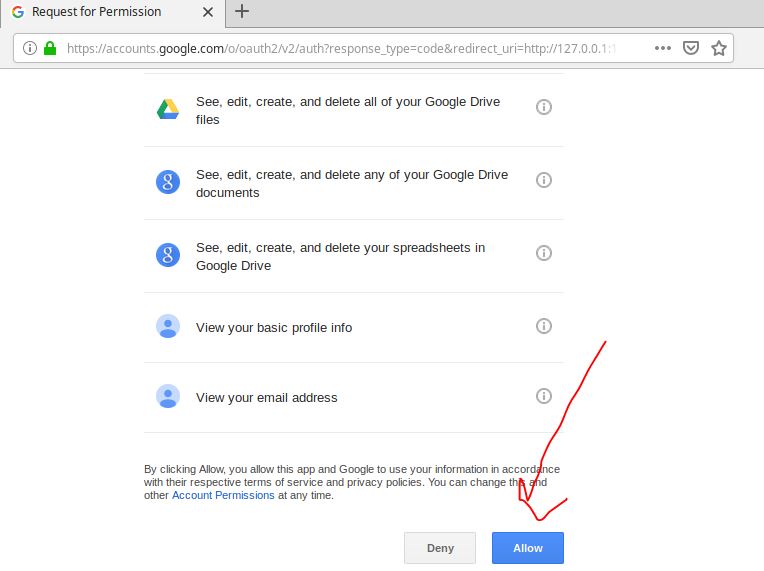
Step 12: Open the link in the browser
As we open the link in the browser it will ask for the credentials to log in and access the Cloud service on our behalf. Enter the Username and password and then allow the CloudCross to access your Cloud drive.
Step 13: How to synchronize a folder between PC and Cloud Drive using CloudCross
Now to start synchronization of folder resides on your PC with cloud drive using CloudCross. First, enter into that directory and run a command ccross without any option. It will automatically upload/download everything resides in that folder to Cloud. If you are using multiple cloud services then we need to specify the service name after the ccross command.

Step 14: For more help on the command syntax for CloudCross you can use:
ccross --help
You can also see the official command usage page of CloudCross: Here is the page link.
Output of the help Command:
h2s@h2s-VirtualBox:~/Downloads$ ccross --help
CloudCross v1.4.4 for Linux
is a opensource program for sync local files with a many cloud storages.

Options:
-h [ --help ] Produce help message
-v [ --version ] Display CloudCross version
-a [ --auth ] Request authorization token
-p [ --path ] arg Path to sync directory
--dry-run Only detect which files need to be uploaded/downloaded,
without actually performing them.
-s [ --list ] Print remote cloud file list
--use-include Use .include file. Without this option by default use .exclude file.
If these files does'nt exists, they are ignore
--prefer arg Define sync strategy. It can be a one of "remote" or "local". By default
it's "local"
--no-hidden Not sync hidden files and folders
--no-new-rev Do not create new revisions of files, overwrite their instead
--convert-doc Convert office document to Google Doc format when upload
and convert him back when download
--force arg Forcing upload or download files. It can be a one of "upload" or "download".
This option overrides --prefer option value.
--provider arg Set cloud provider for current sync operation. On this moment this option
can be
a "google", "yandex", "mailru", "onedrive" or "dropbox". Default provider is Google Drive
--login arg Set login for access to cloud provider.
Now it used only for Cloud Mail.ru
--password arg Set password for access to cloud provider.
Now it used only for Cloud Mail.ru
--http-proxy arg Use http proxy server for connection to cloud provider.
<arg> must be in a ip_address_or_host_name:port_number format
--socks5-proxy arg Use socks5 proxy server for connection to cloud provider.
<arg> must be in a ip_address_or_host_name:port_number format
--cloud-space Showing total and free space of cloud

--filter-type Filter type for .include and .exclude files. Can be set to "regexp" or "wildcard". Ignored if it set in files
--single-thread Run as single threaded
--low-memory Reduce memory utilization during reading a remote file list. Using of this option may do increase of synchronization time
--empty-trash Delete all files from cloud trash bin.
--no-sync If this option is set synchronization mechanism will be disabled and remote file list not be a readed. Local files will be uploaded without consideration of existence of this files on remote. Use with carefully
h2s@h2s-VirtualBox:~/Downloads$
In this way, we can use access the Google drive on Linux including other cloud services for synchronization using CloudCross multi-cloud client. Remember the CloudCross GUI interface available, it is purely a command base syncing tool for Linux platforms.
Other Useful Resources:
- How to add multiple accounts to Google Backup and Sync to get more storage for free
- How to install & use the Google Backup and Sync on Ubuntu
- Google drive on Linux mint 18/19: How to install & setup guide
Related Posts
Connect & Manage AWS lightsail Windows server using WAC
Top 8 technology buzzwords that you should know in 2023
Can you make a PDF shareable link? How?
What is Open source IoT stack?
Rufus for linux? Not available, Use these best alternatives
Top 10 Free Open Source Blogging Platforms or CMS in 2023