Tutorial to know, how to install ADB on windows 10,8 or 7 including command line to install the ADB on Linux.
It is 2018, and almost everybody has access to a smartphone. Android devices are having a maximum market share, for its presence on almost all the smartphones, which are present in the people’s pockets. Though most tasks can be done with the help of the small pocket-sized computers, a lot of complex tasks can also be easily done, with the help of the ADB-android, or Android Debug Bridge.
ADB is a tool, which can help your Android device, communicate with your computer, to do a number of tasks on your device, directly from the command line, with the help of some simple arguments. The possibility of ADB is almost unlimited, and Google is pushing its boundaries, by adding a number of useful commands to the ADB, to satisfy the need of the power users, who want to use their Android smartphone like a pro.
From copying files to from your Android device to installing and uninstalling apps on your smartphone, ADB allows you to do almost everything with some not so difficult commands. I will also give some great commands to use with ADB, lest you need them. To get a complete list of commands, you can easily search it on the internet. If you want a separate article dedicated to just ADB commands, give your opinion, in the comment section down below.
Without further delay, let’s move on to the ways of installing ADB on Windows and Linux, and I hope, it will surely fulfill the appetite of all the users out there.
The process to Install ADB on Windows 10, 7, or 8.
Remeber the process of ADB installation on Windows 10, Windows 8 and Windows 7 is same…

Download the ADB installer package from here.
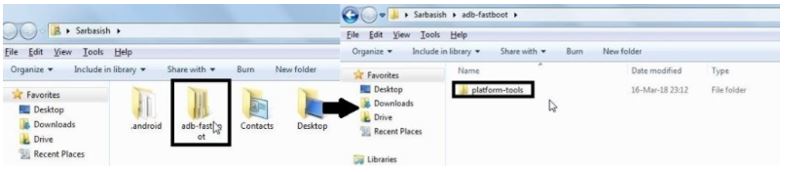
Unzip the files to some location, and copy the contents of the zip file in a new folder named “adb-fastboot” to your home directory, which is “Sarbasish” in my case.
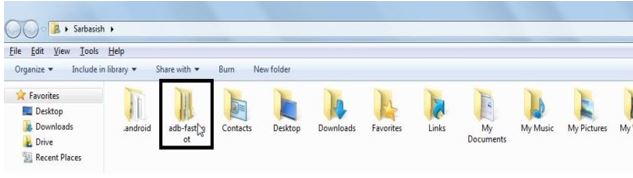
The folder “adb-fastboot” will contain the folder named “platform-tools”, and that will contain the important ADB commands.
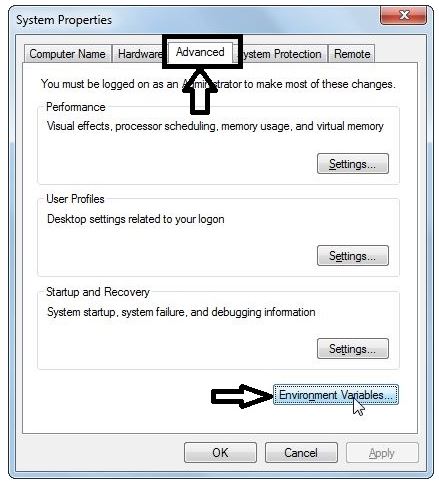
Now open “Environmental Variables”. It can be accessible by going to the Control Panel > System > Change Settings (on the right side).
On Windows 10, just click on “Start”, type “cpl”, and hit enter, to open the Control Panel.

Go to “Advanced”, and then “Environmental Variables”.
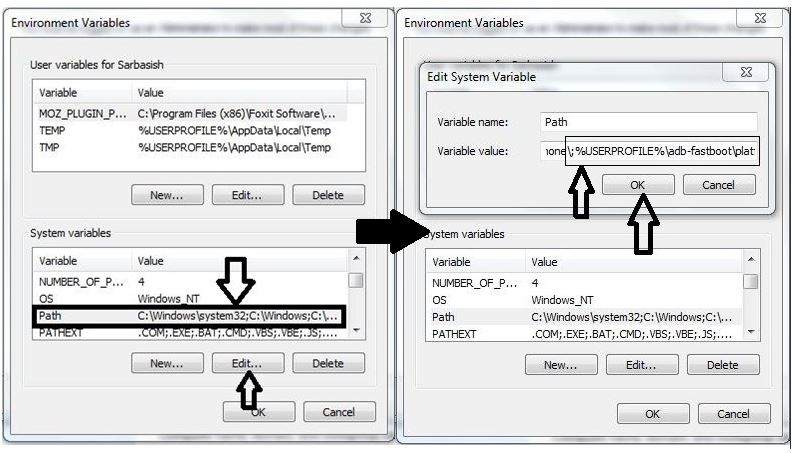
In the “System Variables” section, find out “Path” variable, and append “;%USERPROFILE%\adb-fastboot\platform-tools” to the end, as shown below. Don’t forget to put the “;” before you type the rest, as it can lead to numerous problems in future.
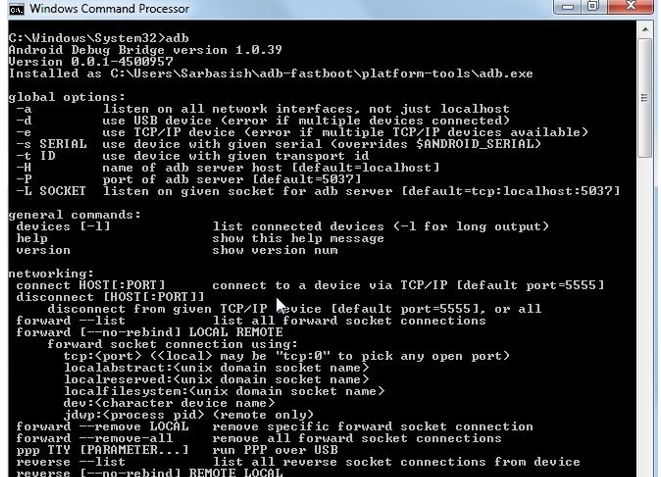
In order to ensure, everything is working perfectly, just open your command prompt, and type “adb”. It is installed correctly if you get the screen shown down below.
Using without modifying the “Environmental Variables”
If you do not want to change anything in the “Environmental Variables”, you can use the ADB commands in portable mode.
Just keep the “platform-tools” directory on any place on your hard drive, or flash drive to access the commands, by using command prompt from the path, where the folder/directory is stored.
The problem is that, in case of long paths, you will have to type the whole paths, as your working directory should not be changed, else the ADB commands will not run on your system.
Install ADB on Linux command line for Linux Mint / Ubuntu or other Linux distros.
Installation of ADB on Linux system is just a slice of pie. I prefer the Linux terminal, instead of the GUI, as it offers more features.
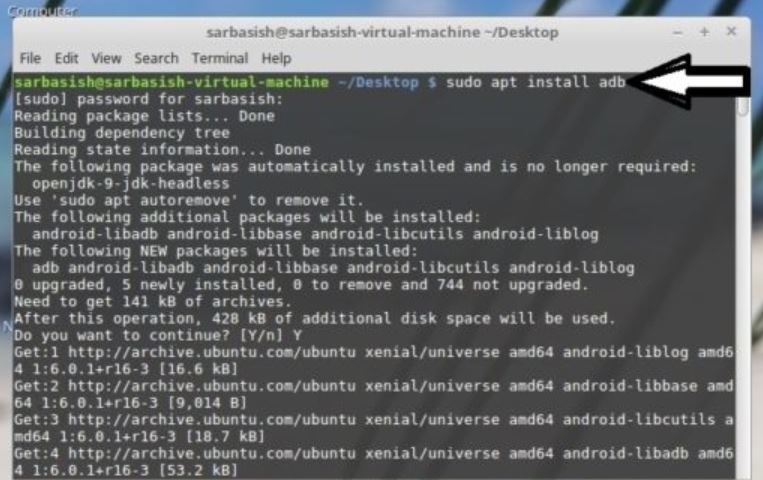
Just type “sudo apt install adb”, by opening a Terminal, on your Linux.
You will be asked to enter the user password. Type the password, and hit the enter key. Don’t worry, as the password will not appear on the screen. It is a security feature on Linux Terminal. You will get a screen something like this.
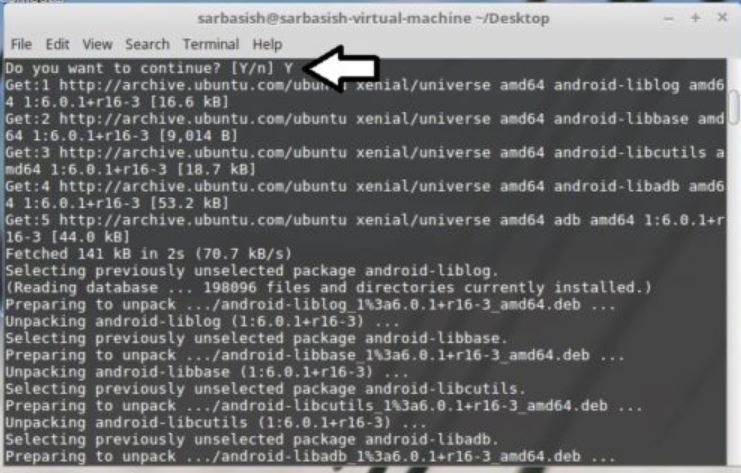
Now, you will be asked for a permission at the middle of the operation. Just press “Y”, and hit the enter key again.
You are done with the installation of ADB on Linux, after a couple of seconds.
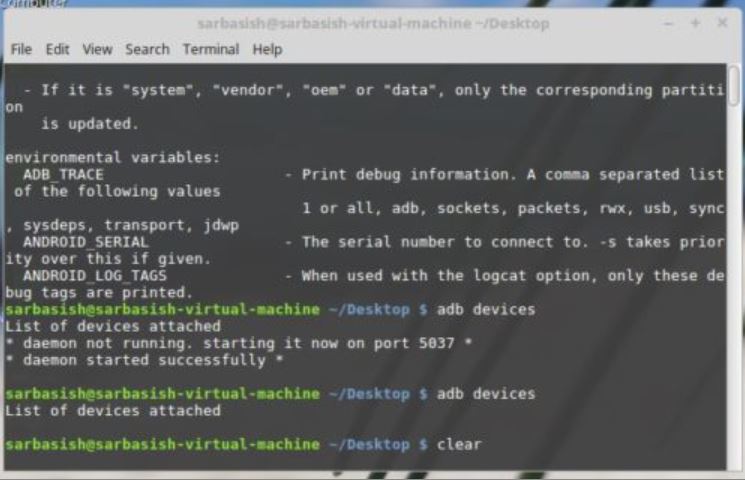
To ensure everything is installed correctly, type “adb”, and hit the enter key. If a screen like this appears, ADB is installed properly, and you are good to go.
You are done with the tasks to install ADB on your computer. Now you can do a number of expert tasks on your mobile, from your computer, just by typing some commands. Now, some settings need to be changed on your Android device, so that it becomes ready to accept ADB commands. Pick up your device, and follow the steps given here.
Enabling Android Developer Options and USB Debugging
Step 1: It is the time to enable “Developer Options” on your smartphone, it is the time to enable it first.
Step 2: Just go to Device Settings>About Device. Now tap on the “Build Number” 7 times, and you will get the message “You are now a developer!”
Step 3: Now you can access “Developer Options” from your device settings.

Step 4: Open Developer options, and find out the option saying “USB debugging” Turn it on. It actually says the Android system to grant commands from the ADB. A warning message will come, for the purpose of formality. Just tap on “OK”.
You are done.
To test, whether your device is working properly, with ADB, just get hands on your USB cable, and use it to connect your computer to your smartphone.
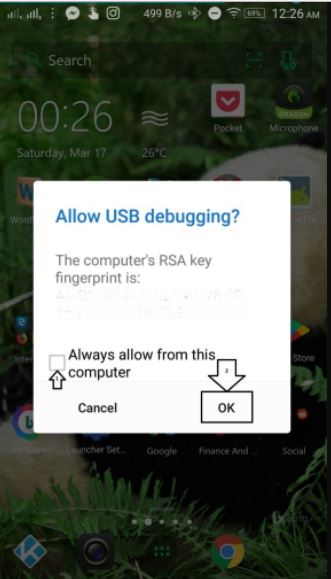
You may get the following message, whether to allow USB debugging, on the connected computer. Just tap on OK, and if you want to connect your Android device regularly to that computer, tap on the checkbox saying “Always allow from this computer”, before tapping the “OK”.
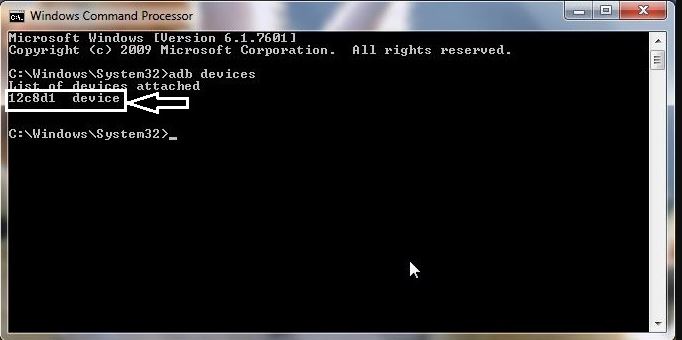
Open Command Prompt on Windows or Terminal on Linux, and type “adb devices”. Don’t call me a poor guy for having a single device. The devices will be listed in a way shown here.
In case, you cannot find your device, on the list, you might have to download the ADB drivers for your Android device, from the OEM’s website. Most smartphones even come with the ADB drivers for Windows, but not all.
Some useful ADB commands
adb devices
List down all the all the Android devices, connected to your computer.
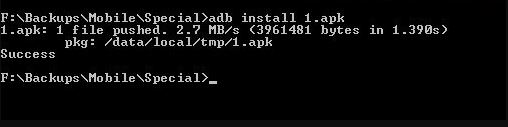
adb install <package_name.apk>
It will install the desired APK file on your Android device. Enter the command, without the brackets.
Example: adb install 1.apk
adb uninstall <package_name>
This is not as easy as the “install” command, as you will have to specify the package name, instead of the apk name. In most cases, Android packages come with names like com.developername.appname.
Thus, it is a little tricky. Though, you can always get the package name of a particular app, by just Googling it.
adb push <local_URL> <remote_URL>
Entering the command without the brackets will copy files from your computer to your Android device. Replace local_URL with the URL of the file on your computer, and remote_URL, with the URL, where you want to paste it.
adb pull <remote_URL> <local_URL>
Just does the opposite of “push”. But not specifying the local_url, will copy the files to the current directory.
adb shell
It opens a Linux shell, which is actually running on your Android device. You will find similarity, of this command if you have used SSH clients like PuTTY or KiTTY in the past.
adb reboot
Reboots your Android device
adb reboot-bootloader
Reboots your Android device to bootloader mode. (Not recommended for novice users)
adb reboot recovery
Reboots your device to recovery mode. (Not recommended for novice users)
Hope this small information on how to install ADB on Windows 10,8,7 or Linux via command line helped you a lot. If you are facing any issues, don’t hesitate to comment it down below.
ALSO SEE:
- How to Remotely Control Android Smartphone From PC Using Airdroid
- Install Wine on Ubuntu or Linux Mint using Terminal To Run Window Apps
- How to download and install Mobdro on your Android device securely
- 10 Best Free Terminal Emulator APP for Android
- 6 Best Linux Penetration Testing Distributions for Ethical hacking
Related Posts
How to Install 7-Zip on Windows 11 or 10 with Single Command
Install Google Earth on Windows 11 or 10 Using a Single Command
How to install Gaming Services on Windows 11
How to Install Telnet Client on Windows 11 Using PowerShell
How to Install ASK CLI on Windows 11 or 10
How do you install FlutterFire CLI on Windows 11 or 10?