There are several tools available for Linux to capture screenshots, edit and annotate them, but I am here to discuss the best 10 screenshot capturing tools for Linux so that you don’t need to spend time trying out all the available options.
From explaining some little thing to our friends or colleagues, to keeping the evidence of some important thing we come across in our digital lives, we all take screenshots once in a while, and sometimes, we even need to take screenshots back-to-back for certain requirements. Most operating systems we come across has some inbuilt tools to capture screenshots, but sometimes we need something more than just what the inbuilt tool has to offer. Depending upon the platform, we can all download some programs to capture screenshots in exactly the way we want, but choosing the best one isn’t going to be a piece of the pie.
So if you are on Linux, which is a complex platform for most users, you will also need a decent screenshot capturing tool for your requirements. Talking about Linux, which is open-source, each distribution, aka. distro, come with its own screenshot capturing tool, and you might not be satisfied with the default one. In most cases, the default screenshot capturing tool will not offer all the functionalities you need from it, and that is the point when you need a better one.
So let’s get started with the best 10 screenshot capturing tools available for Linux.
Flameshot
The first one in my list of top screenshot capturing tools for Linux is Flameshot, which comes with all the tools, you need from a screenshot taking tool. With Flameshot, you can instantly edit and annotate the screenshot, and save the same to a location so that you can access it easily whenever you need it. If you are worried about how to use Flameshot, it is very easy to use. Just click on the Flameshot icon and choose the area of the screen that you want to capture. After you select the area, you will get the annotation and other necessary options.
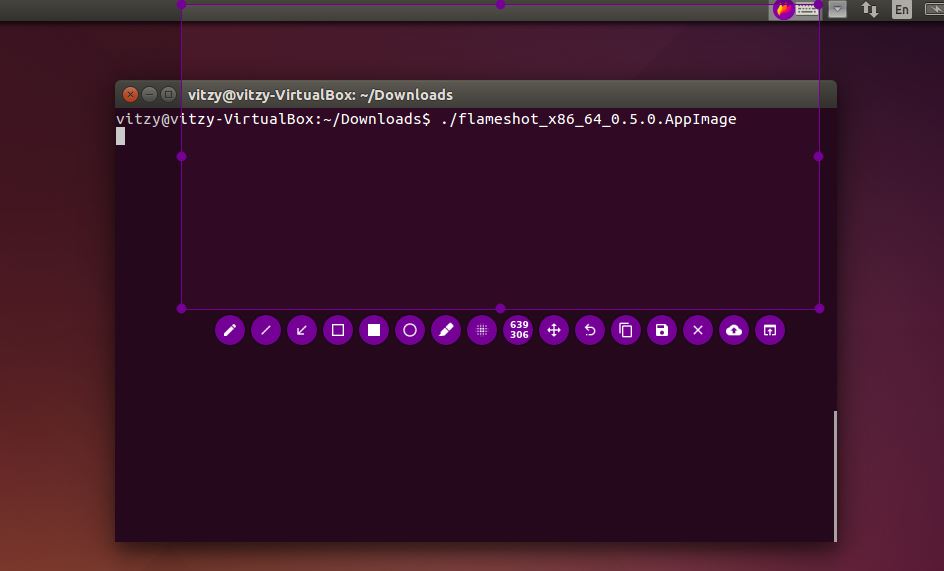
Flameshot Linux is very easy to use, and there are even the necessary options to upload the captured screenshot to Imgur or open the captured screenshot with some other application for additional options to edit the same. You can access the Linux Flameshot shortcut easily from the taskbar, and it can also be configured to run at startup, as well. Flameshot is very easy to install, as well. So just install it, and get started with the amazing screenshot tool.
How to install Flameshot on Ubuntu or Linux Mint:
sudo apt-get install flameshot
Shutter for Linux
Shutter for Linux is yet another screenshot tool, which is worth using, for the full-fledged user interface that it has to offer. The shutter is a Linux screenshot tool that offers almost all the functionalities that you will ever need. There isn’t any Linux Shutter hotkey, however, you can start taking a screenshot on Linux, either from the taskbar or from within the Shutter window, whichever is helpful for you. After the screenshot is taken, it can automatically be saved to a pre-configured destination, or you can even upload the same to your chosen destination.
After you take a screenshot using Shutter, you can even edit the same or annotate it using several options and tools that are available within the program. So, with the Shutter app, you will hardly need a separate application to edit the screenshots taken by you. Shutter app can be downloaded both from the Software Center on Ubuntu or from the official repository, using the following command given below.
Command to Install Shutter Linux:
sudo apt-get install shutter
Kazam screenshot tool
Well, if you are looking for a full-fledged tool for both screenshots and screencasting functionality, Kazam is going to be the handiest tool for you. Packed with both the useful functionalities, the minimal user interface of Kazam will not confuse even the newbies, in any way. How to use Kazam! Just start the program, choose your appropriate job and get started. Choose the area of the screen that you want to capture or cast, and leave the rest to Kazam. It is that easy. The Kazam broadcast feature is also quite useful, and you can even choose the audio source for easy broadcasting, just like pro-level programs.
Unlike other screenshot tools available for Linux, Kazam doesn’t have additional functionalities, like the ability to edit and annotate screenshots, or other things. But the absence of additional features is not, in any way, a deal breaker. If you are just looking for a screenshot and screencasting tool for Linux, you can go for Kazam without thinking twice. There are a plethora of applications you can get, for editing and annotating screenshots. Just use the following command to install Kazam.
sudo apt-get install kazam
[alert-announce]Note: Shutter Linux is not active anymore…[/alert-announce]
Deepin Scrot
Deepin is another distribution of Linux, just like your favourite ones like Ubuntu, Linux Mint, etc. Deepin Scrot is the default screen capture tool on the Deepin Linux distribution, and you can even download Deepin Scrot Debian file on your favourite Linux distribution. Just like most other screenshot tools, Deepin Scrot also allows you to capture your screen in different ways, like the active window, fullscreen capture, or capture a certain region of the screen, without being heavy on your operating system.
Even though it is the default screenshot tool on the Deepin Linux distribution, it offers more functionalities than GNOME Screenshot, even after being lighter than that at the same time. Deepin Scrot installation process is also quite easy, and you can download it both from the apt repository, and from the Deepin Scrot website. Deepin Scrot also offers you to add arrows and carry out other tasks on the screenshot, right after it is taken. Just trigger Deepin Scrot, and you are ready to take a screenshot.
Deepin Screenshot installation command:
sudo apt install deepin-screenshot
Spectacle tool
The next great screenshot taking tool for Linux is Spectacle. It might not be the most beautiful screenshot taking a tool with a great user interface, but you will hardly face problems using the program to take screenshots. Just choose the type of screenshot that you want to take, and click on the appropriate option. After the screenshot is taken, you can save it to a file, copy it to the clipboard, or do other things with the captured screenshot. With Spectacle app, you can take a screenshot of the complete window, rectangular region, active window, or the window, where the cursor is present.
Besides working with the captured screenshot offline, Spectacle will also help you in sharing the captured screenshot through various online services like Imgur, NextCloud, or share the same through email, or post it to Twitter. There are unlimited possibilities with Spectacle, and you can unveil them by installing it on your system. Spectacle app doesn’t always run in the background to consume additional resources, which has both good and bad implications, but that isn’t a deal breaker in any way.
Command to install Spectacle on Linux Ubuntu:
sudo apt install spectacle
ScreenCloud
If the after-capture tasks are also important for you, ScreenCloud is the most perfect tool for you. With ScreenCloud your task is not just limited to capturing screenshot in any way you, but it is something more than just that. ScreenCloud features a number of ways to share your screenshot to several online services, which is useful for a lot of users. The number of services where you can export screenshots through ScreenCloud is way more than most other services. There is hardly a ScreenCloud alternative that you can find.
ScreenCloud also offers you with several other handy functionalities, like the ability to edit the screenshot after it is captured, which is equally useful. ScreenCloud is cross-platform, which is great, if you have access to multiple systems, and want to sync your tasks across various platforms. To make things easier for you, just open an account on ScreenCloud, login to it, and get your tasks on a different device right where you left it off. SceenCloud also has hotkey support so that you can map your keys to take screenshots in the most convenient way.
GIMP
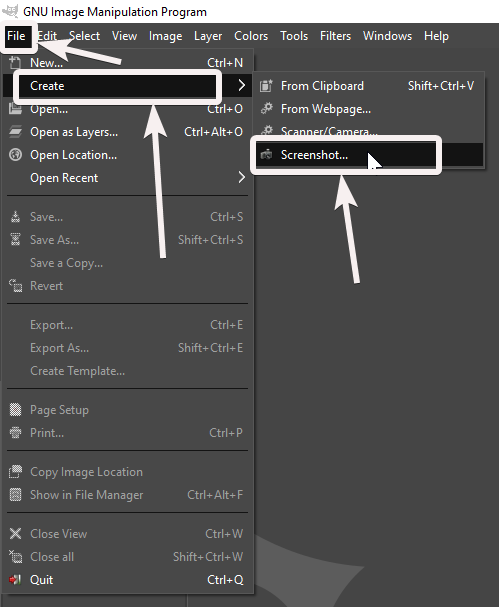
Most Linux users already know about GIMP, which is an open-source image manipulation software that comes pre-installed with most Linux distributions. GIMP also has the option to capture screenshots and edit the same instantly on GIMP. The screenshot capture tool on GIMP might not be as convenient as other dedicated screenshot taking tools for Linux, but it will be wrong to keep away GIMP in the list of screenshot taking tools for Linux. GIMP will also not run in the background to help you capture a screenshot by just clicking on it, however, it can be useful under different circumstances.
It is easy to capture screenshots using GIMP. Click on the ‘File’ menu, and move your mouse pointer to ‘Create’. Now click on ‘Screenshot…’ under the ‘Create’ list. Now choose the appropriate option to use GIMP for screenshot capturing on your Linux operating system. You can capture the complete screen, a window, and you can even delay the screenshot by certain seconds.
How to use GIMP to take Screenshot on Linux:
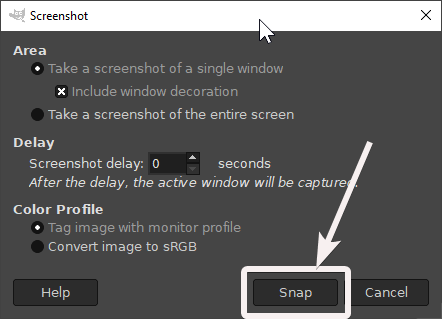
GIMP can also convert the image to sRGB, which can be useful to edit the screenshot as per your requirements.
Command to install for Debian and Ubuntu based systems:
sudo apt install gimp
GNOME Screenshot
The simplest screenshot taking tool, which comes with all the GNOME-based versions of Linux is the GNOME Screenshot, which offers a minimalistic user interface with no drama at all. Just hit the PrntScr button, which is the Linux screenshot shortcut key, and GNOME Screenshot GUI will pop-up with the different options to capture the screenshot. Just like most other screenshot tools, GNOME Screenshot will offer you the option to capture the full screen, some part of the screen or active window, along with a delay of a few seconds as per your requirements.
The GNOME Screenshot shortcut key is the default PrntScr button, and once the screenshot is captured, it will be added to the clipboard so that you can paste it, wherever you want. There is also a GNOME Screenshot command line tool, which will open the screenshot taking tool in front of you. There aren’t any GNOME Screenshot settings that you can configure, which isn’t disappointing, only for the simplicity it has to offer. GNOME Screenshot is the most appropriate tool if you often capture screenshots back-to-back.
Lookit
The last one in my list of best screenshot tools for Linux is Lookit. Though the last one in my list, you can use Lookit, if you are looking for a minimal screenshot taking a tool, which is light-weight at the same time. Lookit is very easy to use, and it is open-source, as well. You can capture a screenshot with the help of the Lookit taskbar icon on your Linux distribution. Lookit can even handle your tasks of uploading your captured screenshot to different online services, directly from within the program.
Lookit can help you capture screenshots of the complete window, a selected region or fullscreen, whichever is useful for you. As Lookit is open-source, you can even modify the source-code for Lookit to fulfil your specific requirements, if you have coding skills good enough to change the source or add some handy options to existing code. Lookit isn’t available in the official repository or Ubuntu Software Center, however, you can download the same from GitHub.
So that was the list. You might not like all the screenshot tools for Linux, I mentioned here, but all are great. Most of them might not be as good and comprehensive as the ones available for Windows, but you can get accustomed to the new screenshot tools by using it for a while. Apart from this top 10 screenshot tools for Linux, there are even some, which are good, but I kept them out of the list as the development of most of them are stopped, and you might face a hard time downloading and installing them.
Hope the information was useful for you. Do you know any other great screenshot taking tool for Linux? Feel free to write the name of the software in the comment section down below.


Do any of these applications deal with multiple images at once, allow you to put them in order, and produce a single file (e.g. PDF) with one image per ‘page’?