
Live chat and surveys can be used to answer the different consumer’s questions, to provide support & services. In this tutorial, we are going to show you how to add live chat in WordPress. Most free online software or plugins have some limitations with their free versions. But Getsitecontrol gives a complete set of user engagement tools free of cost. From live chat to online surveys, Promo Messages, contact, social media tools and more can be managed by using one single dashboard.
Also See:
Step 1: Open your WordPress dashboard > go to > Add Plugins search for Getsitecontrol and install it.
Step 2: After installing and activating the plugin. Click on Getsitecontrol option and signup in the plugin.
Step 3: Now click on Manage the widget option and Getsitecontrol widget dashboard will open. The dashboard is a simple and user-friendly form where you can create a different widget such as Chat widget, subscribe widget, survey widget, contact widget, promo widget, share widget and follow widget.
After installing the plugin, you will see a dashboard. Now to add a live chat widget in WordPress perform the following steps:
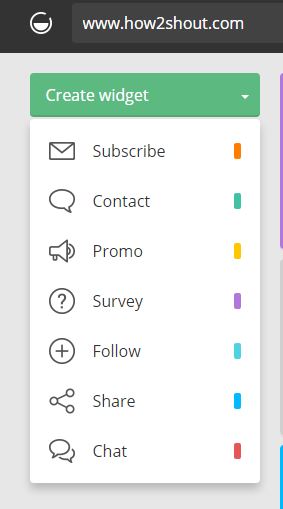
Step 1: On the dashboard of Getsitecontrol you will see an option Create Widget. It is a drop down menu from where you can select different widgets you want to enable on your website. Right now, we are going to create a chat widget. To create chat widget, just select the chat option from the chat widget.
Step 2: The next step is to configure the chat widget according to your need. You will get four options: Appearance, Content, Behavior, and Targeting.
Appearance: In this tab, you can customize the looks, position, color and font of the chat widget to suit the website theme.

Content: In the content section the text that’s going to be displayed during the chat time to the users can be edited.

Behavior: Now this is something every user wants i.e control the behavior of the widget. From this section, you can control widget frequency so that you can monitor how many times it will appear to any user and when.

Targeting: By default, all visitors can see the published widget but if you want to customize it on the basis of location, browser, IP address, device and more then you have to go for pro plan.
In this way, you can add live chat to your website to talk to your website visitors in real-time. Also, follow the same steps to add a subscription, survey, Promo Messages and other widgets.

Related Posts
How to transfer a Blogger (Blogspot) site from one account to another
4 Best tools to install WordPress Local on Windows without Xampp
Instant WordPress: One click install of WordPress locally on Windows
Top 10 Ways To Protect WordPress Login From Unauthorized Access
How to share WordPress draft content with specific users
How to use Portable UwAmp Wamp Server on Windows 10/7