Netcat which is also written as “NC” in short often referred to as the “Swiss Army Knife” of networking tools. It is mainly used by system administrators and network engineers along with security professionals to perform various activities such as debugging network services, port scanning, transferring files, and more… This network utility is free to download and install and uses TCP or UDP protocols.
Some of the key features of Netcat are a straightforward command-line interface, support for multiple protocols, port scanning, file transfer using TCP or UDP connections, remote shell access, proxying, and tunneling.
Let’s see the commands to install NetCat on Amazon Linux 2023…
Step 1: Connect Al2023 Instance:
Well, we need the Amazon Linux 2023 instance terminal access to execute the commands, therefore either use a browser-based SSH client from EC2 Dashboard or use the local terminal, SSH, and private key of your AL2023 instance to connect to it, here is the command syntax for that:
ssh -i key.pem AWS-user@public-ip
Replace key.pem with your private key and AWS-user with Instace used and public-IP with AL2023 instance’s Ipv4 or IPv6 address.
Step 2: Update Package List:
After having access to the command terminal, update the package repository of Amazon Linux by running the system update command:
sudo dnf updateStep 3: Install Netcat on Amazon Linux 2023
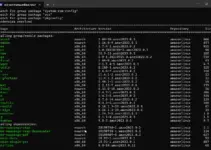
The Netcat package already exists in the default repository of Amazon Linux 2023, therefore, nothing else needs to be done except running the given DNF command that will install the NC package to install NetCat along with the required dependencies.
sudo dnf install nc
Step 4: Verify NC version:
Although running the previous command will install the Netcat on our system, however, to confirm it on our system along with its version, we can execute the given command:
nc -versionStep 5: Test Netcat:
Once this networking tool is on your system, we use it to perform network related tasks. Let’s see some examples:
In our first example, we create a server/client connection in which one system will act as a server while other system will connect to it as clients. Also, the systems cat perform the chatting.
Create a TCP server on a specific port:
nc -l v <port>
Example:
nc -lv 1234Connect to a TCP server:
nc <server-ip> <port>
Example:
nc 192.168.1.9 1234After establishing a connection between both systems we can message each other…

Transfer a file using Netcat:
On the sending end:
nc -lv <port> < file_to_sendExample:
nc -lv 1234 < file.scapOn the receiving end:
nc -zv ip-address or domain port > file_name
Example:
nc -zv 192.168.1.11 1234 > file.scap
To learn more about the usage of NetCat check out its help section by typing – nc --help
Conclusion:
The installation of Netcat is quite straightforward and so does its usage. However, still, new users need to spend some time understanding Netcat and getting mastered in its usage. We have just shown a few examples, but there is a lot more you can do with this powerful networking tool.
Other Articles:
- How to install Nodejs 18.x on Amazon Linux 2023
- How to install Nodejs 20.x on Amazon Linux 2023
- Install HomeBrew on Amazon Linux 2023
- Python’s Boto3 library Installation on Amazon Linux 2023