
There was a time when adding graphics elements in presentations used to make them look out of the world. But today, with improvement in technology, and to provide better infographics, videos are widely used in presentations to give them a unique look. Adding videos in presentations is nothing new, and such a thing is also supported by older versions of Microsoft Office, justifying it. But the way videos are added to the new versions of Microsoft PowerPoint has changed a lot for something better. It is no longer a problem to add videos in presentations and regret adding it, later on.
In the older versions of Microsoft PowerPoint, you could neither delete the source video nor move it to a different location on your storage device. Doing that will screw your presentation up, and you will no longer be able to display the video, though photos and images will remain unharmed. It means it used to be big trouble to carry presentations from your home to office or show the presentation on a separate system. What actually used to happen is that the presentation used to contain a link to the video, which was played while clicked on, or automatically.
But with the later version of Microsoft PowerPoint, the videos get embedded in the presentation itself, and you can do anything with the source without harming the presentation in any way.
But in some cases, you might need to extract those videos or other multimedia elements from the presentation if the source files are no longer available to you, or for similar other reasons. That is easily possible, and I will share the trick here.
So let’s get started with how you can extract videos and other multimedia elements from a presentation.
The steps to follow
Step 1: For safety, I would recommend you to create a copy of the presentation and then proceed with this trick to prevent harming the presentation in any way. But if you are a techie and know what you are doing, you can skip this step.
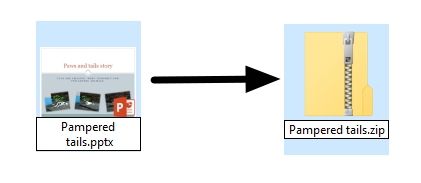
Step 2: Now rename the PowerPoint presentation to change the extension from ‘pptx’ to ‘zip’.
For example, if you are having a presentation with the name ‘Pampered tails.pptx’, rename it to ‘Pampered tails.zip’
Step 3: Now open it with your Windows Explorer or any other program that is capable of running compressed files. You will see the following directory structure.
Step 4: Open the folder that comes with the name ‘ppt’.

Step 5: Now open the folder that has the name ‘media’.
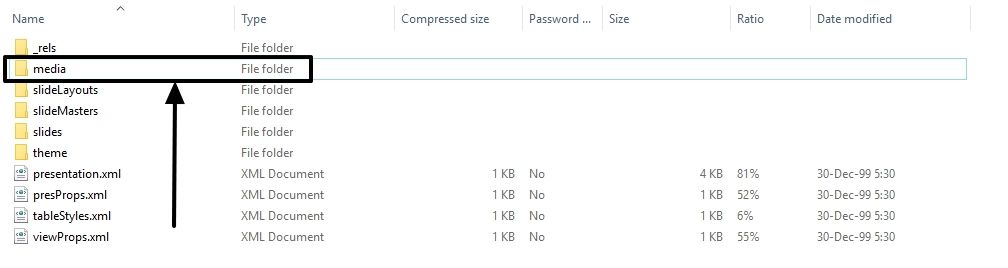
Step 6: You can find all the media files available within the presentation, in this folder.

Step 7: Just extract all of them or extract the selected ones out of them for further activities. The media files here will come with the names ‘media1’, ‘media2’, for video files, ‘image1’, ‘image2’ for audio files and so on. As the default file names are not retained after getting added to the presentations, you will have to check all of them to find the one that you actually need.
You are always free to change the name of the files once you find the one that you need.
This tutorial is surely going to be very handy for you if you work a lot with PowerPoint presentations.
This trick works only for PowerPoint presentations with the new or pptx extension as pptx is actually a compressed file that contains all the elements separately for more flexibility. All the new Microsoft office extensions like xlsx, docx come with this provision, though you might not need the same feature for those extensions, as well.
Hope the small information was helpful for you. Are you still facing troubles? Feel free to comment it down below.
Related Posts
How to Electronically sign documents for free using Adobe Reader for PC and mobile
How to do hanging indents on Google Slides presentation on the web
How to embed a YouTube video in a Google Slides presentation
How to create a link for any document to share it?
6 Ways to get likable Netflix Show recommendations you would love to watch
How to Download and save Picutres of a Google Docs document