Let’s use the command prompt or PowerShell on Windows 10 or 11 to install Jupyter Notebook Python IDE for creating documents to share our live code.
Jupyter Notebook is quite easy to install with Anaconda because it comes by default with it. However, Anaconda is a complete python distribution that requires a good amount of space. Also, you may not require it whole when you just want a single tool, for example, Jupyter Notebook IDE. Jupyter is a powerful Integrated development environment used by Python programmers or Data scientists to create and share their work.
It is an open-source web-based application and in this article, we will go step by step to guide you on how to run Jupyter on Windows without Anaconda, including installing the Python programming language and setting up a virtual environment.
After following this tutorial, your Windows 10 or 11 laptop/desktop will have a fully functional Jupyter Notebook environment and Desktop shortcut to easily start it.
Installing Jupyter on Windows 11 or 10 via Command prompt
The given steps are applicable to use on both Win 11 and 10 operating systems, here we will use the Winget package manager.
1. Open CMD or Powershell
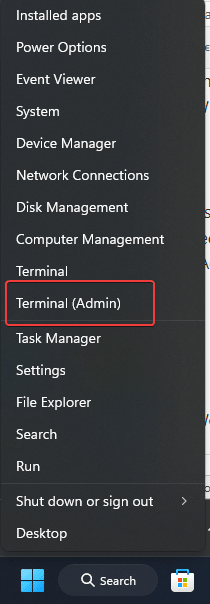
As in this guide, we are only about to use the command for installing all required packages to satisfy the requirements needed by Jupyter; therefore right click on your Windows Start button to select PowerShell (Admin) or Terminal (Admin).
Note: Make sure you open CMD or Powershell with Admin rights only.

2. Install Python’s latest version
Well, we can manually download the python’s executable file from its official website. However, we don’t need to do that when we have the Windows’ Winget package manager.
Winget comes by default on all the latest versions of Win 10 and 11. However, to confirm, in your Terminal or Powershell, just type:
winget
You will see options available to use with the package manager tool. Now, to search for the latest version of Python type the given command:
You will see all the available versions as well using:
winget search python.python

To get the extreme latest version of Python 3, for example in our case it was 3.11, we have to mention that:
syntax:
winget install python.python.version-number
Usage:
winget install python.python.3.11
Close the CMD or PowerShell whatever you are using and reopen it again under Admin rights. This ensures python is properly added to our path. It is necessary to use its package manager “PIP“.
3. Check the PIP version
To confirm Python’s latest version has been added to our system’s path. Let’s check the version of the installed PIP. Here is the command to use:
pip -V

3. Use PIP to install Jupyter Notebook
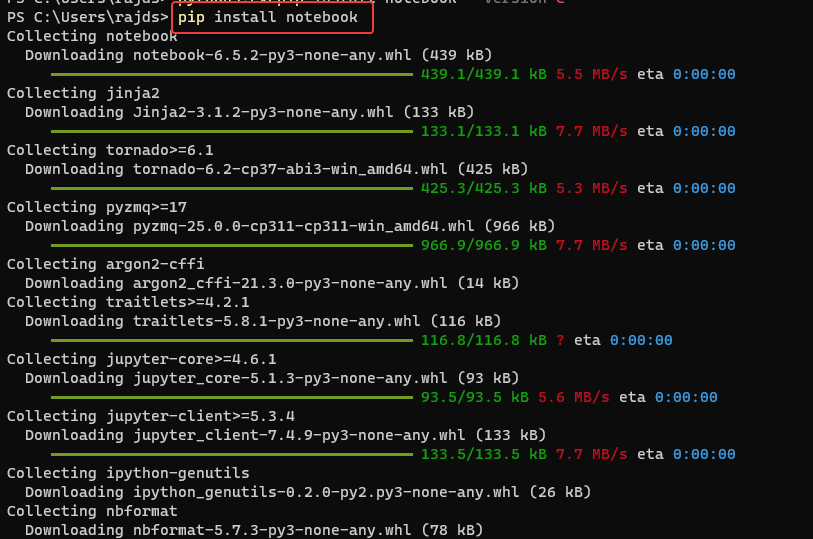
Now, on your command prompt or PowerShell use the PIP, python’s package manager to install Jupyter Notebook using a single command.
pip install notebook
Depending upon your internet connection the command will take some time to download all the necessary packages we require to set up Jupyter on Windows. Once it is done, move to the next step.

4. Check if Jupyter notebook is working on Windows
This is possible Jupyter may not be working after completing the installation, well we have to confirm that. On your command prompt, type the given command. It will fire up the web server and all the required packages we need to run and access the web interface of Notebook on Windows.
jupyter notebook
The above command will automatically open your browser and redirect to you an interface showing the system’s directories.

5. Create a Desktop shortcut
Well, we have this web-based Python IDE on our Windows system in running condition. However, to open it we need to open CMD and run the command given in the previous step. To make things instant, let’s create a Jupyter Desktop Shortcut so that we can run it with a click of the mouse.
Step 1: Right-click on your Windows Desktop and select the “New” and then “Shortcut” options.

Step 2: The shortcut window will open to create a new one. There paste the below-given path. This will open the Powershell and then execute jupyter notebook command in it.
C:\Windows\System32\WindowsPowerShell\v1.0\powershell.exe jupyter notebook

Step 3: Give some name to your shortcut, here we are assigning – Jupyter Notebook. You can give whatever you would like. After that hit the Finish Button.

Step 4: To identify your shortcut easily, let’s download the Jupyter icon. Visit icons.com and click on the ICO tab after that download the icon. Save the icon somewhere so you won’t delete it accidentally.

Step 5: Right-click on the created shortcut and select the Properties option.

Step 6: Click on the Change icon button and then Browse to select the icon you have downloaded. After that press the Ok button to save the changes.

Additional info: By Default, Jupyter will show the files of the directory in which the shortcut is created. To change that and tell it, open and list files of your Python project. Again right-click it on the Shortcut, select the properties, and in the Start-in column enter the path of your Python project directory.

6. Upgrading Jupyter Notebook
In the future, if you want to use the command line to install any available upgrade for Jupyter on Windows, then again use the PIP, here is the example:
pip install -U jupyter
Conclusion:
This was the quick tutorial and steps to install Jupyter on Windows without Anaconda using the command prompt or PowerShell. Well, this is one way but there are other ways to start using this open-source platform and you are always free to look for them. Moreover, those who have chocolatey, another window package manager, can go for that to install Python as well.
Looking for: How to install Anaconda on WSL Windows 10 using Ubuntu Linux App
FAQ
Do we have a Winget alternative to install Python on Windows?
Yes, if you don’t want to use Winget, then install Chocolatey on Windows. It is another free package manager to install various free and open-source packages using the command line.
Does Jupyter Notebook work on Windows?
We can install Jupyter Notebook on Windows 10 or 11 using Python, alternatively, the Anaconda Navigator GUI interface can be used. For those who are looking for a command prompt way, we already have discussed that in this article.
Is Anaconda the only way to install Jupyter?
No, Anaconda is an additional option, we can install Jupyter Notebook using Python’s PIP package manager directory on Windows, macOS, or Linux systems. Alternatively, one can copy the RAW code from Github.
Should I use JupyterLab or Notebook?
The notebook is best to go if you are a data science beginner because of its easy-to-understand interface, file browser, and code editor. However, those who are at the advanced level can look or switch to JupyterLab.
Other Articles:


What do you do if step number 4 “jupyter notebook” fails (in cmd)?
You say what to do if it works, but what if it doesn’t?
–