VirtualBox guest additions is a feature of Oracle VirtualBox virtualization platform that meant to make the seamless working of the guest operating system with the host that could be Windows, Ubuntu, Linux Mint, CentOS, Deepin etc. After activating the Guest editions, the user can drag and drop any kind of files and folder between guest and host, copy-past text or anything bidirectionally and also the drivers will start supporting Guest such as Displays’ to adapt the host’s display resoltuion. This not only enhance the productivity but also the user experience. Well, without this the advance users could set up a shared folder to access something from the host using guest and vice-versa but the novel user would end up with frustration.
Install VirtualBox Guest additions on Windows or Linux
Here we know how to perform the installation of Guest additions of Virtualbox on Windows and Linux platforms… The procedure of doing this will be the same for both.
Step 1: Open VirtualBox.
Step 2: Run the Windows 10/7 or Linux operating installed as Guest on VirtualBox where you want to install Guest Additions.
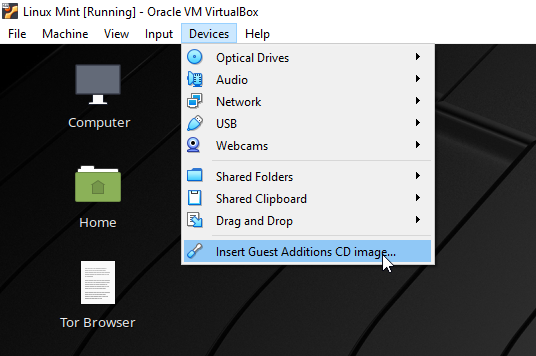
Step 3: After that click on the Device option given in the running of Guest operating system Window’s menu.
Step 4: Select the Insert Guest Additions CD image…
Step 5: No matter you are using Windows 10 or Linux Distros such as Ubuntu or Linux Mint, the moment you select the Guest additions option, a virtual disc containing the installation file will automatically get mounted and pop up a message to Run or install the same.
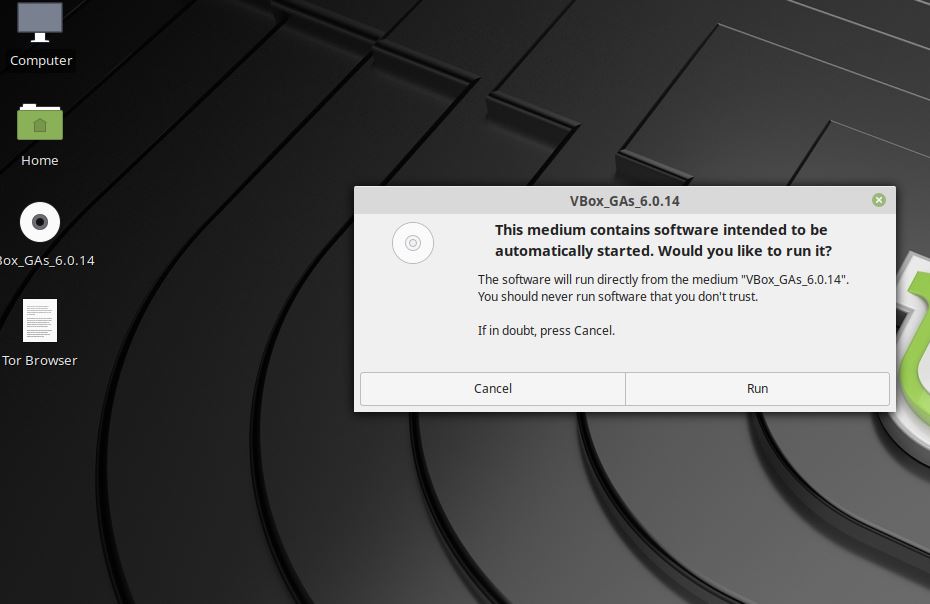
Step 6: Click on the install/run button run the script.
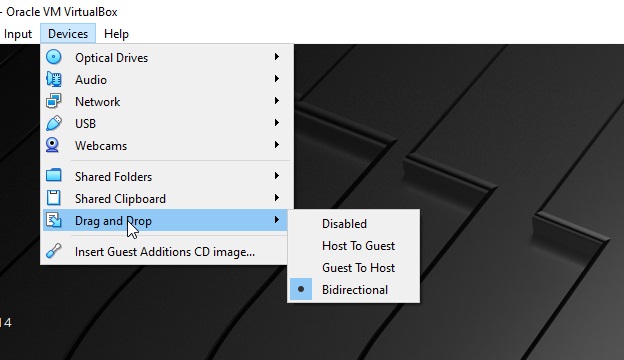
Step 7: Once it gets installed, again go to Devices option of Guest OS running Virtual window and select the Shared Clip-> Bidirectional and also same Bidirectional option in the Drag n Drop menu.
Step 8: Restart the Guest operating system to make the changes into effect.
Related Posts
How to enable Virtualbox nested VTX/Amd-V on Windows 10/11 or Linux
Windows XP ISO installation on Windows 11 using VirtualBox
Convert VMware Workstation Pro Virtual machine to use in VirtualBox
How to install MX Linux on VirtualBox VM
VirtualBox Vs Vmware Virtualization software Comparison
How to install Windows 95 Virtual machine on VirtualBox