Taking screenshots really make the things easier to keep an evidence, or just to keep a record of something important in your life. Taking a screenshot is a piece of cake on Windows computer or on an Android smartphone. But with technology advancing at the speed of light, you might need to take a long screenshot in iPhone, Windows, Android, or any other device, which you are having in hand. While most platforms don’t offer an inbuilt tool for taking scrolling screenshot, it can be possible with a third-party tool on Windows.
The MIUI on Xiaomi phones is the only user interface, which comes with an option to take scrolling screenshots. You can read this article to know how. But if you are on Windows, you will need a small piece of a program called PicPick to take scrolling screenshots. Apart from taking scrolling screenshots, the small piece of software is also capable of doing a number of other small tasks. You can know more about its capabilities in this article.
The PicPick scrolling window feature can be used to take any type of long screenshot on Windows. Taking scrolling screenshots make it easy to capture a complete webpage, long chat, or anything else, which can’t be captured in a single screenshot. This scrolling screenshot software work on Windows 10, 8.1 and Windows 7.
So let’s find how to take scrolling screenshot on Windows using below given steps.
Scrolling screenshot Windows 10,8 & 7
The steps you should follow
- Download and install PicPick from this link.
- Open the software, and let it run in the background.
- Right-click on the taskbar icon of PicPick.
- Move your pointer to ‘Screen Capture’.
- A new menu will open, click on the option saying ‘Scrolling Window’.

- Now just click on that window, where you want to take a scrolling screenshot.
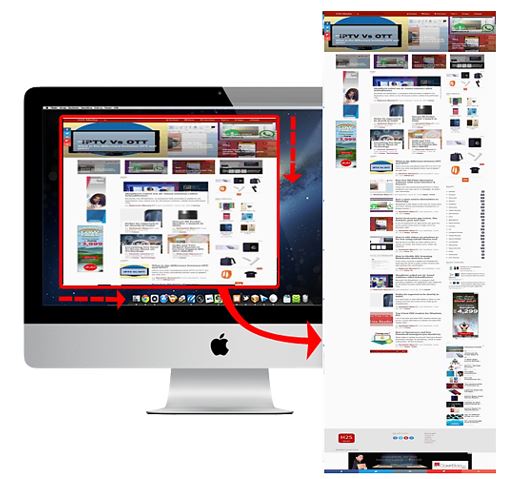
- I am taking the screenshot of the how2shout.com homepage here.

- On clicking on the window, the process of taking the scrolling screenshot will begin.
- The page will automatically scroll down, and the final screenshot will be exported to the default storage location of your hard drive.
- The output image of scrolling screenshot which we have taken using the above-mentioned software of our website; will look somewhat like this.

- Note: While taking a scrolling screenshot with PicPick, you should be on the top of the page to capture the full page.
PicPick automatically scrolls down through the page, and in case you are at the middle, anything at the top of it will automatically be cropped out. You can also be in the middle if you want to take the scrolling screenshot from that point of the page.
Taking scrolling screenshot is one of the best ways to capture the complete thing avoiding the mess of capturing multiple screenshots and stitching them together. Even after working that hard, you won’t get the desired outcome. But you can get impeccable performance and quality by taking scrolling screenshot with PicPick. Nobody will be able to understand, you actually took a scrolling screenshot.
Once I find a way to take long scrolling screenshot on Android, I will surely cover it in a new article. But PicPick is the best software to take long scrolling screenshots on Windows 10, and on the previous Windows versions.
I know you will thank me later for this worthy tutorial. Please give your feedback about the tool and the tutorial, in the comment section down below.
You might also like to see:
- How to link Instagram to Facebook Business Page or Fan Page
- 6 Best Open source Personal Cloud Software to Setup Cloud storage
- Hibernate missing from power options windows 10: How to get and enable it


Great and very helpful +useful article
Lenovo Yoga 730-15 Win 10
Downloaded and installed and runs but the “Windows Scrolling” starts where I click the screen but then only goes to the bottom of the screen… not the bottom of the page like in your example. I even tried rebooted my machine.
Any ideas?
Amazing. It works for me on Windows 7 using Chrome. Thank you Thank you!!
In the picture at point 5 you showed ”Screen Capture”, where should open a new menu for ”Scrolling Window” it does not hapening. When I try to use shortcut for scrolling screnshot, it appears on top left corner the Auto Scrool option, but when I click on it, it jumps few centimeters and stopes by self, doesnt allowing taking longer screenshot. I talk about your app, downloaded from that purple ”link” at the point 1.