We all want to blur our photo background to create a DSLR like depth-of-field in our smartphone photography. If you are looking for the best photo blur apps then we already have created a list of 10 Best Bokeh Effect Camera App for Android. The Snapseed and Afterfoucs are the two best camera apps to get a blur effect in your images. In this tutorial, we will tell you how to give a blurry background effect using the Afterfocus App which is available to download free for Android and iOS (iPhone) smartphones.
What is AfterFocus App?
The Afterfocus is a mobile blur background app for photo editing. The specialty of this app and also for what it is known for is its advanced ability to create DSLR-style like background blur effect by differentiating the focus and background area. It also offered filter effects
Difference between — Free AfterFoucs app vs AfterFocus Pro App?
The functionality and features of both free and pro Afterfocus app are same. The only difference is that the free version shows the advertisement while the Pro version is ads-free.
Step By Step AfterFoucs Android Tutorial to Apply Blur background and Bokeh effect
Here, we are using the OnePlus 5 Android smartphone for creating the background blur effect but the steps and method are the same for iPhone users too.
Step1: Download the Afterfocus app oo your smartphone. For Android smartphone use the Google Play store and use the iTunes app store for iPhone.
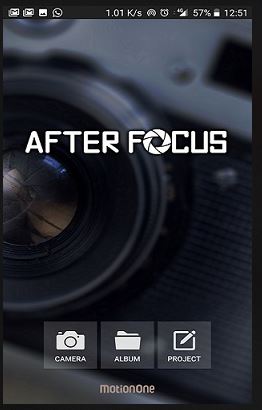
Step 2: After installing the app, run it and you will see a screen as shown in the screenshot. Where you will find three options:
- Camera: This option will directly capture an image using the phone camera app and import to the Afterfocus for editing.
- ALBUM: The album option will allow importing the images from the picture gallery.
- Project: If you have saved some editing of an image in the middle you will find or reopen that using this option.
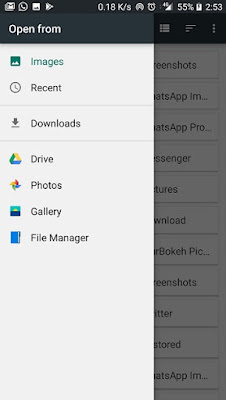
Step 2: Now, we are going to import an image into the app using the ALBUM option. You can choose or import the photo you want to edit from the Gallery, Google Drive, Photos or File manager.
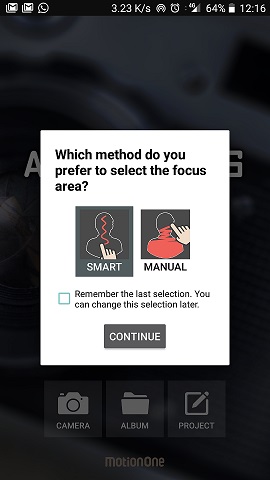
Step 3: After selecting an image, the app will pop-up to select the method for selecting a focus area.
Select the Smart focus area selection method. In this method, we just need to draw some line using fingers and Afterfocus automatically recognize the foreground and background which we need to blur.
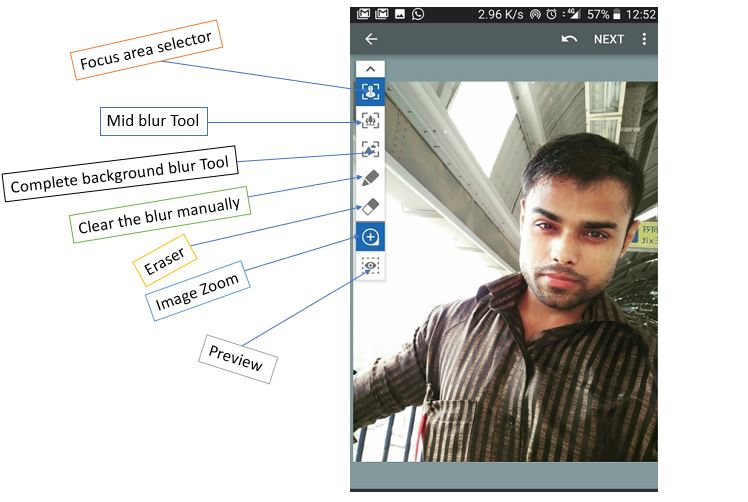
Step 4: Once your picture imported successfully, you will find some tools on the right side of the screen.
- Focus selector or foreground tool: This tool allows you to draw lines to indicate the app about the subject which needs to be in focus.
- Mid Blur Tool: This tool will draw the line for soft mid blur.
- BG: It is a complete blur background tool and later in this tutorial we will use it to create extreme depth of field.
- Pencil tool: This tool will help us to clear blur which accidentally appears in the focus part of the photo.
- Eraser: Will erase the applied focus and background blur tools effects.
- Image Zoom: Use to zoom the image to perform the effects on the edges.
- Preview: Have the preview before moving further.
Select the foreground and background
Step 5: To tell the Afterfocus app about the area which we need to focus on, we select the first tool also called focus selector or foreground selector.
Select this tool and draw lines around your image as shown in the below-given screenshot. As we are using the smart focus mode, so just draw a few lines which help the app to automatically recognize the focus area.
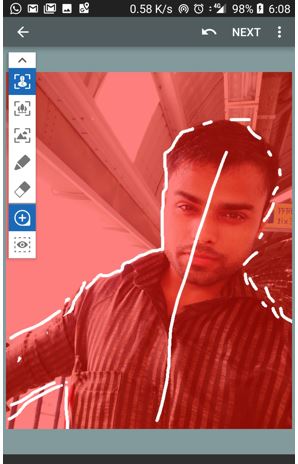
Step 6: In this step, we will select the background that needs to be a blur. Select the third tool which is background blur it uses the black colours line. To separate the focus area, draw the line at the background of the image as shown in the screenshot. Remember, the red area is our focus area.
If you have drawn wrong lines then you can use the eraser tool to erase them. Use two fingers for pinch-zoom to select the area at the edges.
Once you selected both the areas, tap on the NEXT button is given above of the app.

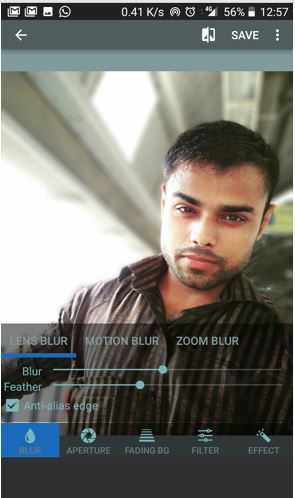
Step 7: Finally, we have separated the focus area and background area. Now, its time to add some effects.
AfterFocus App offers three types of blur: Lens Blur, Motion Blur, and Zoom Blur.
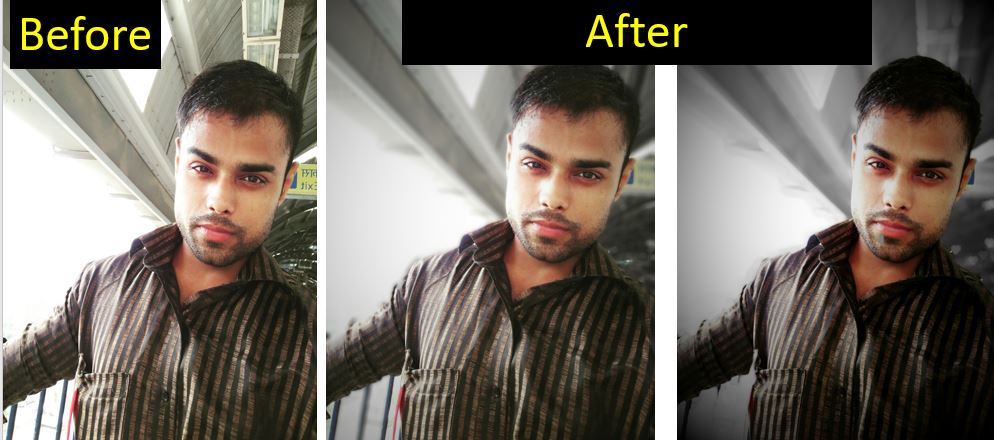
- The Lens Blur gives you standard blur ground effect which you can see at the below-given image in this step.
- The Motion blur provides an effect of motion in the blur.
- The last one Zoom Blur gives an illusion of a zooming effect in the background blur.
We are using right now the Lens blur option. Under each blur option, you will see two other options: Blur and Feather.
Blur: The Blur option uses to increase the intensity of the background blur.
Feather: If you have some edges of your focus subject those do not appear sharp or feels separate from the background, you can use Feather. It will smooth the edges.
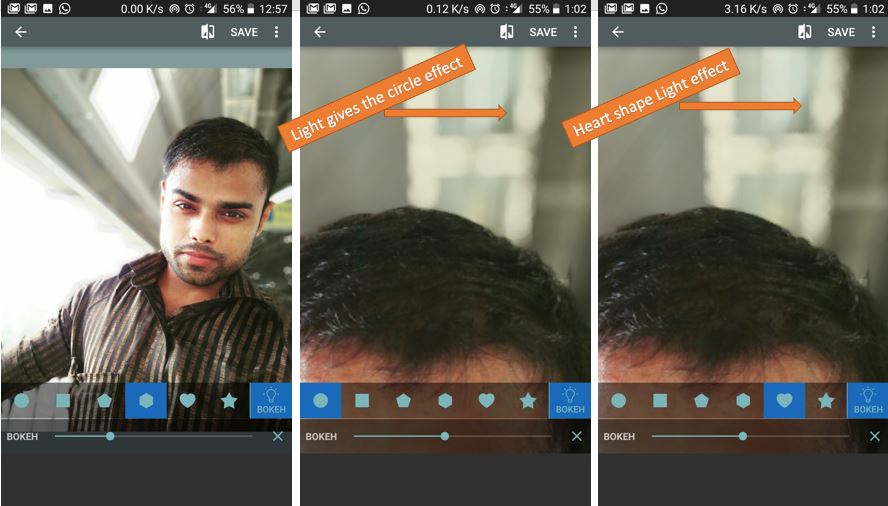
Step 8: The second effect is the Aperture under which you can set the Bokeh effect for your image. You will get the different type of pre-defined bokeh effects such as circle, pentagon, heart and more. In the given screenshot, you can see the image background light after applying the heart bokeh effect, shows the heart shape. You can also set the intensity of the bokeh using the slider.
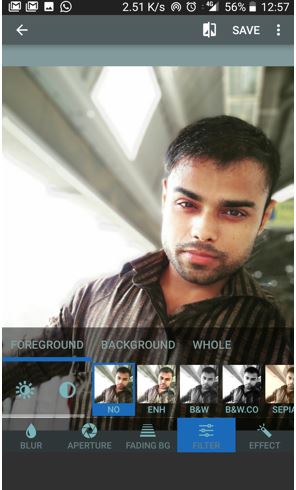
Step 9: AfterFocus App offers from basic effects to professional effects which allow applying the different filter for background and foreground. You can also adjust the brightness and contrast using this option.
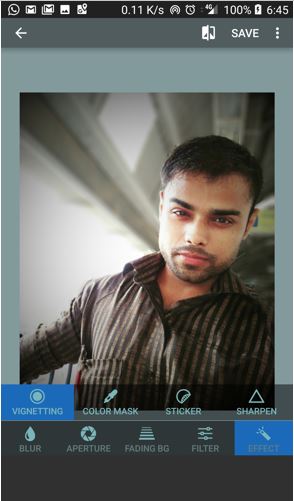
Step 10: The last option in the Afterfocus app is Effect.
You will get four effects under this option: Vignetting, Color Mask, Sticker, and Sharpen. You can use them according to your requirement. The Vignetting will apply some shadows around the background as you can see in the sample image given below.
The Color Mask will separate the background and foreground colour. Sticker allows to some funny things and the Sharpen tool will enhance the clarity.
When everything is done, just tap on save button and the image will save in your gallery inside the folder name “Afterfocus“.


Great guide! Achieving a DSLR-like depth-of-field effect on smartphone photos is a common goal. I recommend checking out PicsArt photo editing android app. It offers a range of creative tools that can enhance your photos further.
Amazing info for image editing.