Nowadays with the modern computer motherboards and operating systems, most users prefer using UEFI to boot into Windows, as it offers a lot of excess functionalities and better performance compared to that of old and Legacy BIOS. Both UEFI and BIOS are two different motherboard firmware, and UEFI is the new one, which is supported by most operating systems and modern computer motherboards available out there. But you have to configure your computer, or basically your Windows startup using UEFI instead of BIOS. To make an operating system startup using BIOS, you need an MBR partition, whereas, for starting up your computer using UEFI, you need a GPT partition table or a GPT disk.
If you want to install your latest operating system on your computer and want to make it start up using UEFI instead of BIOS, you will have to create the installer in a certain way, so that it will support startup using UEFI. If you are already having the ISO image of your favourite operating system which supports UEFI boot, I will talk, how you can create a bootable USB flash drive with the operating system ISO, and make it start up using UEFI. Before making your motherboard start your operating system using UEFI, you might need to make some changes in the BIOS or UEFI to support non-CSM boot devices.
So without any further delay, let’s get started with the advantages of using UEFI boot, after which, I will talk about how you can check whether your computer is configured to boot from UEFI or BIOS. Finally, I will talk about how you can configure your operating system to boot from UEFI.
Advantages of UEFI boot
Let’s have a look at the advantages of UEFI over the BIOS.
- With UEFI, you can have more than 4 primary partitions, which is the maximum limit for BIOS, and you can do that using GUID partition tables. However, Windows limits you to a maximum of 128 primary partitions, which is also a big number most users can’t reach, while creating primary partitions.
- Operating systems that are configured to boot using UEFI, are faster and perform better than those that are configured to boot using BIOS. A number of optimizations have made it possible to make UEFI systems boot faster, and deliver a better performance.
- With UEFI, you can easily handle hard drives and SSDs, which are larger than 2 TB of size. As BIOS cannot handle, such big storage devices, most users will need to switch to UEFI, to deal with such a large amount of storage.
- UEFI has support for the secure startup, which is the secure Boot for Windows. Secure startup ensures, the operating system hasn’t been tampered in any way, and is not affected by any malware so that the complete startup process takes place seamlessly.
- The last but not the least is, UEFI features a very easy and simple to use interface, when the user can easily change the settings, unlike BIOS, whether the user will have to use the keyboard for the purpose of navigation, and the complete user interface is not that user-friendly.
So, those are the major improvements of UEFI over BIOS that will matter to most people out there. Besides Windows 10, you can even configure to run Ubuntu, and a few other Linux distributions to run from UEFI. However, if you are running an older version of Windows like Windows XP, or any other operating system, you can not configure booting into your operating system from UEFI. In those old operating systems, the BIOS is the only option to boot into your operating system.
Checking, whether your operating system is configured to run from UEFI
- Now, it is the time that you should check whether your operating system is configured to start from UEFI or BIOS.
- Open ‘Run’, using the ‘Win + R’ key combination, and type in ‘msinfo32’, before hitting the enter key.
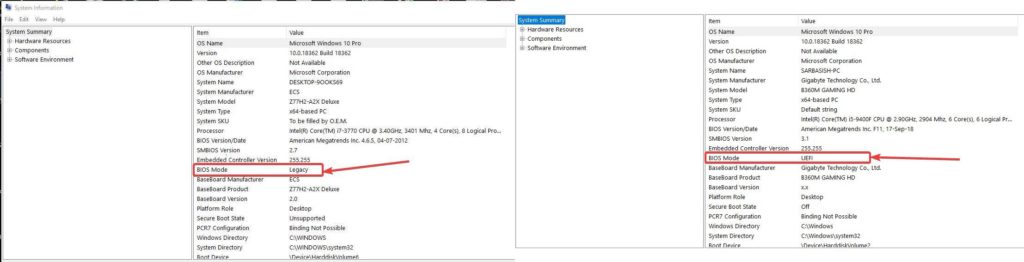
- The system information will open in front of you, and under ‘System Summary’, check the ‘BIOS Mode’.
- If it is set to ‘Legacy’, your operating system is configured to run from BIOS, and if it is ‘UEFI’, your computer is already configured to run from UEFI. You don’t have to do any other tasks,
Configuring OS installer to run from UEFI
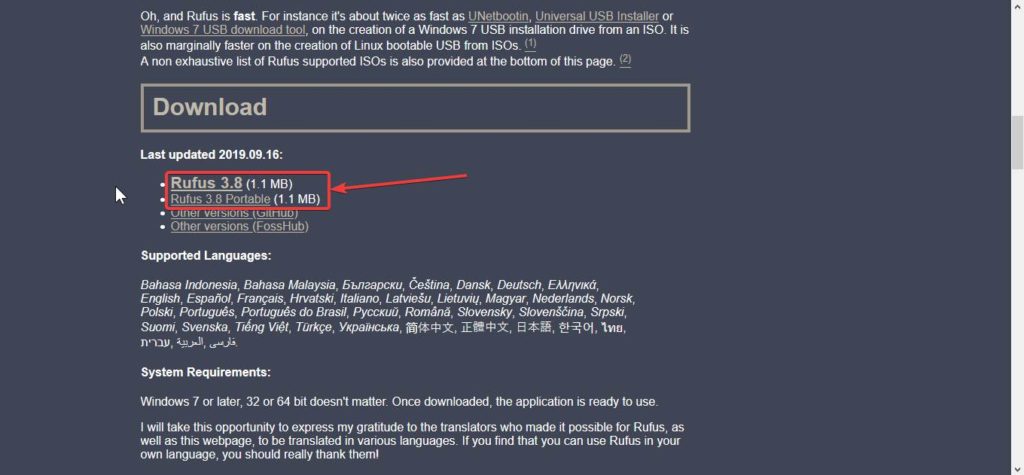
- Download the portable version of Rufus from the following link to run Rufus on your computer.
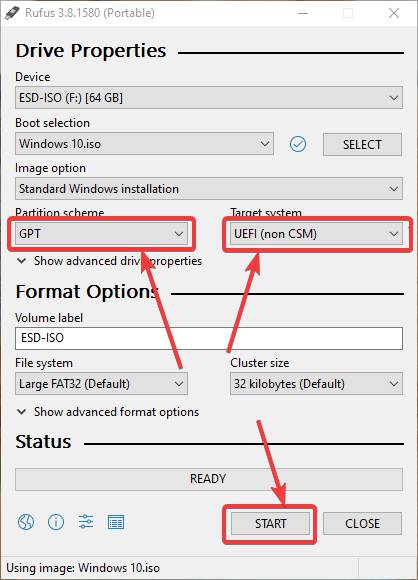
- Before you start Rufus, plug in the USB flash drive, so that it can be recognized by your computer, and subsequently by Rufus. Now, after you open Rufus, click on the ‘SELECT’ button to choose the operating system ISO with the help of which, you want to create a bootable USB drive.

- In the drop-down menu, which should say ‘MBR’, under the ‘Partition scheme’ choose ‘GPT’, and under the ‘Target system’, It will automatically change to ‘UEFI (non-CSM)’. Finally, click on ‘Start’, to start creating the bootable USB drive, and this will take some time depending upon the size of the operating system and the speed of the USB flash drive.
- Now that your flash drive is ready, you will have to go to the BIOS or UEFI, to change some important settings, so that your motherboard is configured to welcome UEFI startup operating systems, and help it get the most out of a UEFI firmware.
Changing the UEFI settings is not the same for all motherboards, and thus, I will recommend you to read the motherboard manual or ask your computer service person, if you want to know how to change these settings.
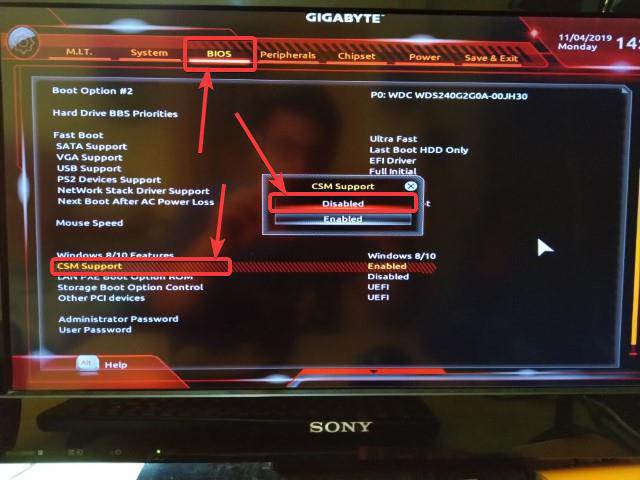
I am just showing you, how we can change the settings on a Gigabyte motherboard, and the process is not going to be a lot different on other motherboards, as well.
- Open the UEFI settings, either by pressing the ‘Delete’ or ‘F2’ button on your keyboard at the time of your computer startup. Your motherboard might have a different shortcut key to access the BIOS or UEFI, though, the chances of that are quite low.
- Under CSM support in the BIOS tab, select ‘Disabled’.After you have done that, simply save the settings and come out of the BIOS or UEFI setup.
Now, you can start the installation of your new operating system in UEFI mode, and can start enjoying better performance, and faster speeds, which you can never get with BIOS. after you have disabled CSM support, you might not be able to boot into your old operating system, as that is a CSM operating system, and the support for that has been disabled.
So that was all about how you can install your operating system and configure it to start up from UEFI. Did you face any problems, or have any questions in mind? Feel free to comment on the same below.


Thanks…..this information has been useful for me.