Setting up the Windows virtual machine on Linux gives you the flexibility of getting the benefits of both Operating systems on a single PC. If you want to learn the Linux but also don’t want to give up easy to use Windows 7, Windows 8 or Windows 10 OS then either you can install the Linux on Windows or Windows on Linux. Creating free virtual machines with help of some virtual software like Vmware or Oracle VirtualBox is called virtualization. The virtualization environment created by such kind of software is by emulating hardware and make it available for the operating system we about to install on it. We called it a Guest operating system and primary OS of the computer system known as Host.
So, let’s see how to install and create Windows 10/8/7 Virtual Machine on Linux
For performing this tutorial we are using the Ubuntu 18.01 Linux but you can perform these steps with any other Linux too. The only thing which might get change is the way of VirtualBox installation. Rest of the method to create free Windows 7/8/10 machine on Linux will be the same.
Step 1: Install VirtualBox on Ubuntu Linux host
First of all, we install the Oracle VirtualBox which is an open source & free software for creating a virtual machine on both Linux (link) and Windows (Link) machines. You can download it by using the given links, however, for Ubuntu, here, we are using the command line terminal to install. Please use the below commands:
Sudo apt-get install virtualbox
Step 2: Run the Linux VirtualBox
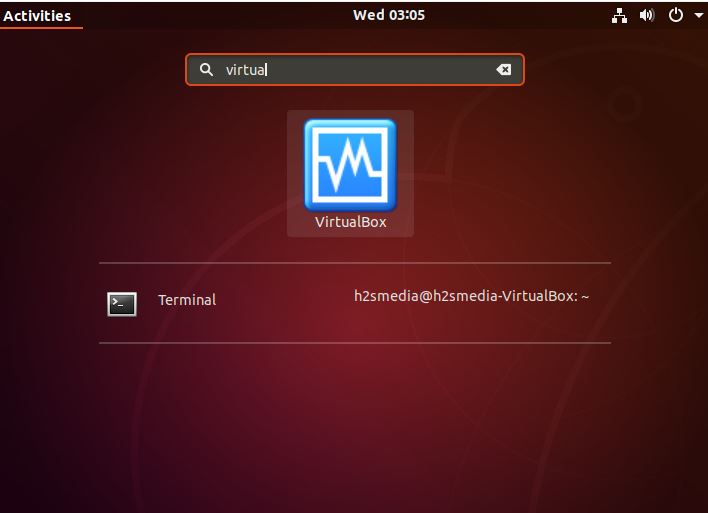
The above single command will install the VirtualBox on Ubuntu. Now search for the installed VirtualBox and run it
Step 3: Create your first free Windows Virtual Machine on Linux
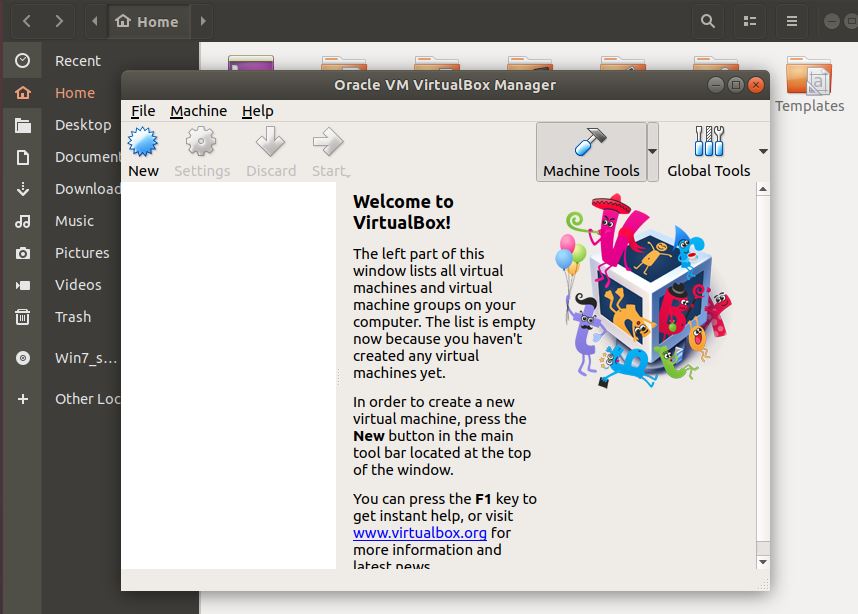
1. Click on the New Button of the Virtualbox Linux.
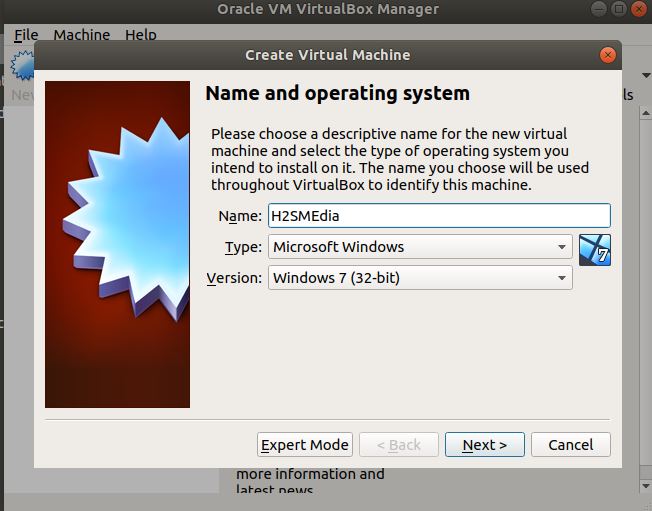
2. GIve some name to your Windows Virtual machine and select the Type of operating system include the version (32-bit or 64-bit).
Step 4 Assign the Memory to your Windows virtual machine
The availability of the memory (RAM) depends on the host system. Click on the Next button after selecting the RAM.
Step 5: Hard disk configuration
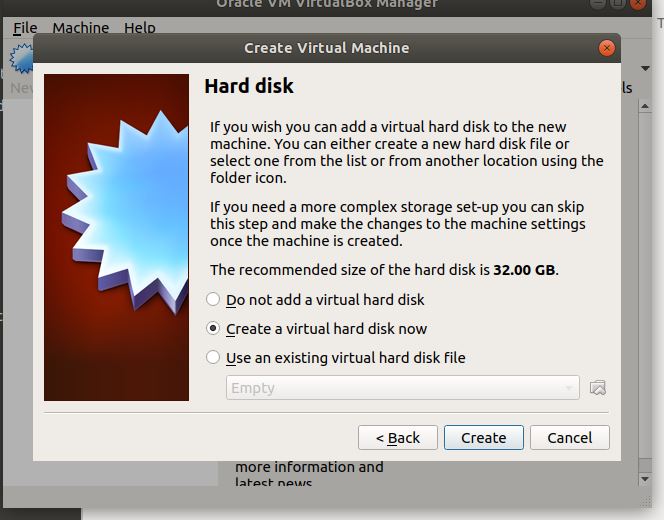
After adding the RAM, it is time to configure the hard disk for your Windows Virtual machine. Select the Create a Virtual hard disk now option and click on the Create button.
Step 6: File location and size
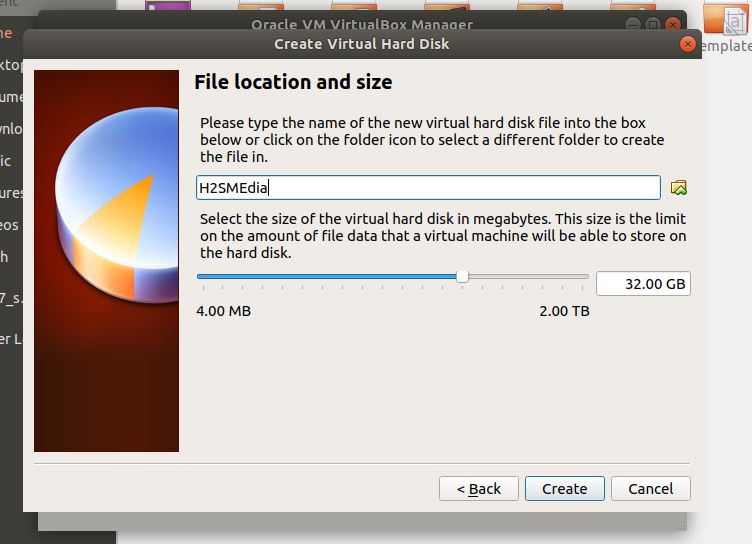
In this step, we need to give some name to our virtual hard disk and also need to assign the amount of hard disk storage you want to give to your virtual machine. For example, the amount which I have given is the 32GB but you can increase or decrease it as per your requirement. Also, by default, the virtual machine will consume the space of your primary partition, in case you want to instruct the Virtualbox to store all virtual files somewhere else, I mean in some other partition then click on the folder icon given in front of the name box and choose the destination.
Finally, click on the Create button.
Step 7: Choose the Windows 7,8 or 10 ISO image to install.
After the above step, you pushed back to the main screen of the Virtualbox from where select the created Virtual machine and then click on the Settings option.
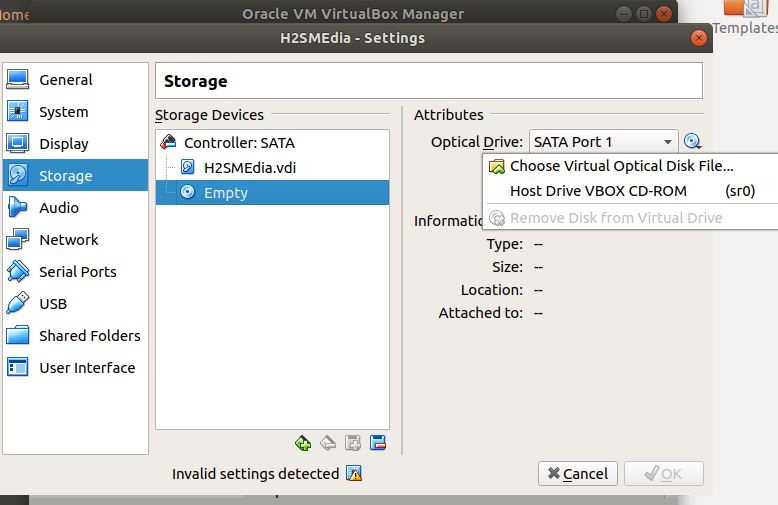
From the settings option go to Storage-> Click on the Empty CD icon and then from the right side panel click on the CD icon. If you have the Windows ISO image then click on the click on Choose Virtual Optical Disk File and select the Windows 7/8/10 ISO image. However, if you have CD disk then put it into your computer’s optical drive and select the Host drive option.
After selecting the ISO image get back to the VirtualBox main screen and click on the START button.
Again click on the start button.
Finally, the VirtualBox will boot the Windows operating system and follow the rest of the Windows installation process on Linux host Virtual machine which is same as on any physical system.
Other Useful resources:
- Install OwnCloud on Virtual Machine- Appliance setup guide
- Connect Synology NAS directly to pc without router & external DHCP
- Install Ubuntu Minimal Server 18.04 “Bionic Beaver”: Just 64 MB
- How To install Portable Virtualbox on USB to Run Virtual Machines Anywhere
- Run Windows 95 app on a Windows, Mac or Linux
- How To Install Rockstor NAS On Ubuntu/Debian in Virtual Machine






In step 3.2.: are you installing HS2MEdia on a Windows 7 operating system instead of Linux?
No, the H2SMedia is just a name given to the Windows virtual machine. In the same way, you can give your own name or whatever you want to use for that particular virtual machine you installing; so that it would be easy to remember and identify it in future if there are multiple virtual machines on Virtualbox.
🙂
Well followed your instructions few year laters. There are some changes made by Oracle. But, your instructions were very clear and easy to understand. Thank you
Why is Type and Version identified as Microsoft Windows and Windows 7 (32 bit) respectively? Shouldn’t it be referring to the host operating system, Linux/Ubunutu? Am somewhat confused as many of the other procedures I found on the web haven’t worked for me. Was hoping your procedures would solve my problem. I appreciate your response.
Sorry for misplacing my Reply which should address “H2S Media Team FEBRUARY 26, 2019” Reply to my original post.
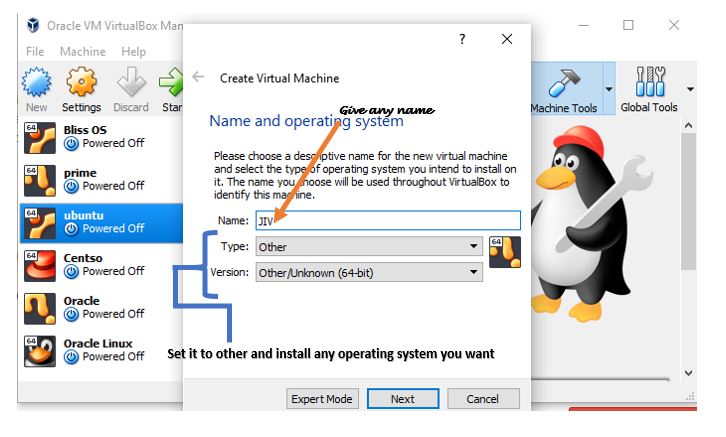
No, the “Type” refers to which operating system you are about to install on Virtualbox, it hasn’t any relation to host operating system. A guest operating system is independent to host operating, means doesn’t matter what is host OS; you can install Windows, FreeBSD, Linux Mint guest OS on VirtualBox that installed on Ubuntu, MacOS or Windows host operating systems.
IF you are confused with this then simply select “Other” in the version box. Just like in the given screenshot…
i like penguins. they make me want to sing and dance.
I made a virtual Mac inside my virtual Windows inside my Linux host.
Now I control the universe.
Kneel before me!