MongoDB is a free and open-source scalable document-oriented NoSQL database with index intersection that enables ad hoc queries. Users can also use different extensions such as security, integration and analysis to use MongoDB for large applications. Authentication with LDAP, x.509 and Kerberos and encryption based on TLS (Transport Layer Security) are supported. There are also user-specific roles, auditing functions for compliance and forensic analyzes as well as ready-made components to ensure trustworthy systems.
In this tutorial, we will see the installation of MongoDB on Ubuntu 20.04 LTS without adding any repo. Also, one can follow the same steps for Ubuntu 18.04 LTS or 19.04/19.10 as well.
requirements:
- Ubuntu 20.04 LTS focal fossa server or desktop.
- A non-root user with
sudoaccess
1. Update System
Before moving to the MongoDB installation step, let’s update the existing packages of Ubuntu 20.04
sudo apt update
2. Command to install MongoDB on Ubuntu 20.04
Just like 18.04 LTS, the MongoDB is also available in the official repository of Ubuntu 20.04 to install with an up to date version. Thus, no need to add any third party. A single command for it will install Mongo-tools, Mongodb, Mongodb-clients Mongodb-server, and Mongodb-server-core components along with other dependencies.
sudo apt install mongodb
OutPut for the above command:
The following additional packages will be installed:
libboost-filesystem1.71.0 libboost-iostreams1.71.0 libboost-program-options1.71.0 libgoogle-perftools4 libpcrecpp0v5
libtcmalloc-minimal4 libyaml-cpp0.6 mongo-tools mongodb-clients mongodb-server mongodb-server-core
The following NEW packages will be installed:
libboost-filesystem1.71.0 libboost-iostreams1.71.0 libboost-program-options1.71.0 libgoogle-perftools4 libpcrecpp0v5
libtcmalloc-minimal4 libyaml-cpp0.6 mongo-tools mongodb mongodb-clients mongodb-server mongodb-server-core
0 upgraded, 12 newly installed, 0 to remove and 0 not upgraded.
Need to get 56.8 MB of archives.
After this operation, 234 MB of additional disk space will be used.
Do you want to continue? [Y/n] n
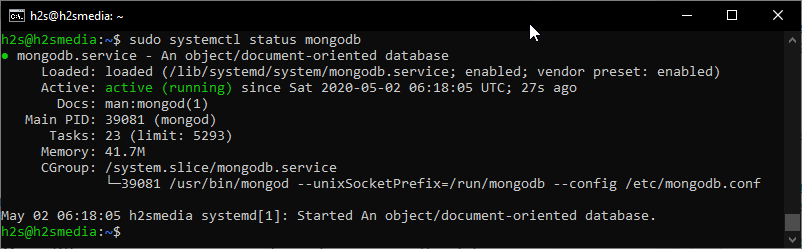
3. Check the Status of MongoDB
After the installation, the MongoDB automatically get started, however, if not then you can use the command:
systemctl strart mongodb
To check whether the MongoDB server is running properly or not we can use the status command:
systemctl status mongodb
4. Command to Manage MongoDB
Here are a few core commands that one would need to manage this database such as start, restart, stop the server along with others.
To stop the MongoDB server
sudo systemctl stop mongodb
To start it again.
sudo systemctl start mongodb
To restart the server after some modifications.
sudo systemctl restart mongodb
In order to disable the MongoDB automatic start with the server which happens by default.
sudo systemctl disable mongodb
To again enable the automatic start of the server with the system boot up.
sudo systemctl enable mongodb
To start using it, just type:
mongo
Complete Uninstall MongoDB
In case you don’t want MongoDB on your Ubuntu 20.04 system anymore, simply remove it using the below commands:
sudo service mongodb stop
sudo apt remove mongodb
sudo apt purge mongodb*
sudo rm -r /var/log/mongodb
sudo rm -r /var/lib/mongodb
sudo apt autoremove
Closing notes:
So, this wall quick tutorial on MongoDB installation for Ubuntu 20.04 servers, you can also see the same for MYSQL on Ubuntu 20.04 and other related tutorials.


Hi, i can’t seem to get this up following your steps above. The version I would like to install is v 4.0+ but following your steps, i got version v3.6.8
Great article! Working 🙂
There are some spelling mistakes in “3. Check the Status of MongoDB”:
“systemctl strart mongodb”
“systemctl status mongdb”
Thanks, for pointing it out…