
What is MongoDB?
MongoDB is a database based on distributed file storage. By the C ++ written language. Designed to provide scalable, high-performance data storage solutions for web applications.
MongoDB is a product between a relational database and a non-relational database. It is the most versatile and most relational database in a non-relational database. The data structure it supports is very loose and is similar to JSON and BSON format, so it can store more complex data types. The biggest feature of Mongo is that it supports a very powerful query language. Its syntax is similar to the object-oriented query language. It can realize almost all the functions of relational database single-table query, and also supports indexing data. MongoDB supports 64-bit LTS (long-term support) Ubuntu releases such as 18.04 (LTS),16.04 LTS (xenial), 14.04 LTS (trusty), 12.04 LTS (precise) and so on.
It features high performance, easy deployment, and ease of use, making it easy to store data. The main features are:
- For collection storage, easy to store data of object types.
- The mode is free.
- Support dynamic query, full indexing, including internal objects and queries.
- Support for replication and failure recovery.
- Use efficient binary data storage, including large objects (such as video).
- Automatically handle fragmentation to support scalability at the cloud level.
- Support RUBY, PYTHON, JAVA, C++, PHP, C# and many other languages.
- The file storage format is BSON (a JSON extension).
- Accessible via the web.
How to Install and Configure MongoDB on Ubuntu 19.04/18.04
The steps mentioned here are performed on Ubuntu 19.04, however, they are the same for other Ubuntu versions such as 18.04, 16.04, 15.04, 14.04…
Step 1: Open command terminal
First, on Ubuntu system open command terminal to issue the commands for the MongoDB installation given in the upcoming steps. To access the terminal either right-click on the Ubuntu Desktop screen and select Open Terminal option or simply use the shortcut CTRL+ALT+T.
Step 2: Import the MongoDB public GPG Key
To ensure the authenticity of the packages received from third-party, the Ubuntu package management tool i.e dpkg and apt needs GPG keys. Here, distributors sign packages are receiving from the MongoDB, so, needs to import the official GPG key provided by the Mongo, first.
sudo apt-key adv --keyserver hkp://keyserver.ubuntu.com:80 --recv 9DA31620334BD75D9DCB49F368818C72E52529D4
Step 3: Create a source list for MongoDB
For Ubuntu 19.04 or 18.04 use the following source:
echo "deb [ arch=amd64 ] https://repo.mongodb.org/apt/ubuntu bionic/mongodb-org/4.0 multiverse" | sudo tee /etc/apt/sources.list.d/mongodb-org-4.0.list
For Ubuntu 16.04 (Xenial) LTS:
echo "deb [ arch=amd64,arm64 ] https://repo.mongodb.org/apt/ubuntu xenial/mongodb-org/4.0 multiverse" | sudo tee /etc/apt/sources.list.d/mongodb-org-4.0.list
For Ubuntu 14.04 (Trusty) LTS:
echo "deb [ arch=amd64 ] https://repo.mongodb.org/apt/ubuntu trusty/mongodb-org/4.0 multiverse" | sudo tee /etc/apt/sources.list.d/mongodb-org-4.0.list
Step 4: Update the local System’s package database
After adding the sources respective to your Ubuntu version, issue the system update command to let the system know newly added source list.
sudo apt-get update
Step 5: Install MongoDB complete packages
The following command will install all the available packages such as mongodb server, shell and other tools inclusively.
sudo apt-get install -y mongodb-org
Note: In future to update to any new stable version of MongoDB just fire sudo apt-get update command. In case, if you don’t want any particular package of MongoDB to update to the latest version in future. Then we can hold that using below commands:
For example, let’s say you don’t want mongo server package to update but rest of all, the command for that sudo apt-mark hold mongodb-org-server
In the same way for other packages
sudo apt-mark hold mongodb-org
sudo apt-mark hold mongodb-org-shell
sudo apt-mark hold mongodb-org-mongos
sudo apt-mark hold mongodb-org-tools
To uphold the packages just replace the hold text in the above command with unhold.
Step 6: Start MongoDB
To run the MongoDB server run the following command:
sudo service mongod start
To start automatically MongoDB with system start/restart/crash use the below two commands:
systemctl start mongod
systemctl enable mongod
Step 7: Create MongoDB- root user
Select Database
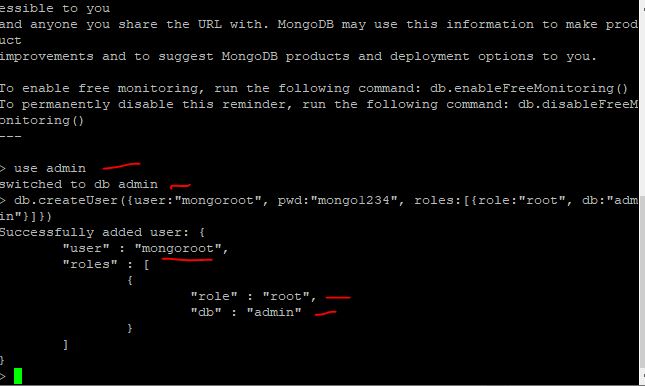
use admin
Create a user and password with root access for the admin database. The user with root role can access, delete or modify any MongoDB database.
Note: Change the yellow highlighted text with your own username & password which you want to assign with root role.
db.createUser({user:”mongoroot“, pwd:”mongo1234“, roles:[{role:”root”, db:”admin”}]})
The output of the above command:
Successfully added user: {
"user" : "mongoroot",
"roles" : [
{
"role" : "root",
"db" : "admin"
}
]
}
(optional step) After creating a root user, we can create a different level of user with different roles. Here is the Mongodb user management roles list:
read
readWrite
dbAdmin
userAdmin
clusterAdmin
readAnyDatabase
readWriteAnyDatabase
userAdminAnyDatabase
dbAdminAnyDatabase
For example, if you want to create a new database suppose with readWrite role then:
First, we create a database, simple type:
use h2s
h2s, is our database name.
Now, let see whether our database created successfully or not:
show dbs
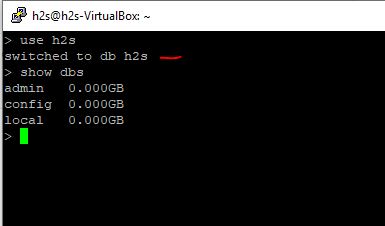
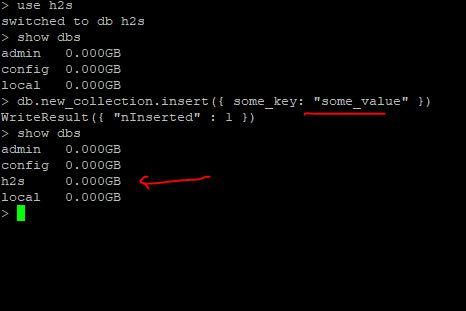
In the above screenshot, you will see our created database is not showing, it is because there is no entry in it. Use the below command to add a demo entry:
db.new_collection.insert({ some_key: "some_value" })
Now again use the command:
show dbs
this time you will see you created a database in the list.
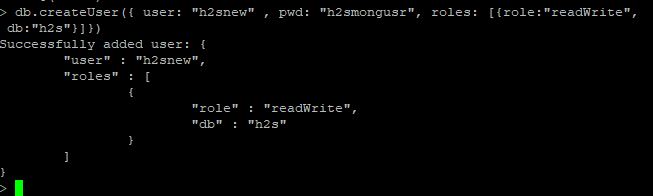
The database is created, lets’ add a user in it with the readWrite role. It means the user can only read or write the entries in that particular database, it assigned for.
The command is:
db.createUser({ user: "h2snew" , pwd: "h2smongusr", roles: [{role:"readWrite", db:"h2s"}]})
In the above command, highlighted text are the values that you should replace with yours.
Step 8: Secure MongoDB by enabling authentication
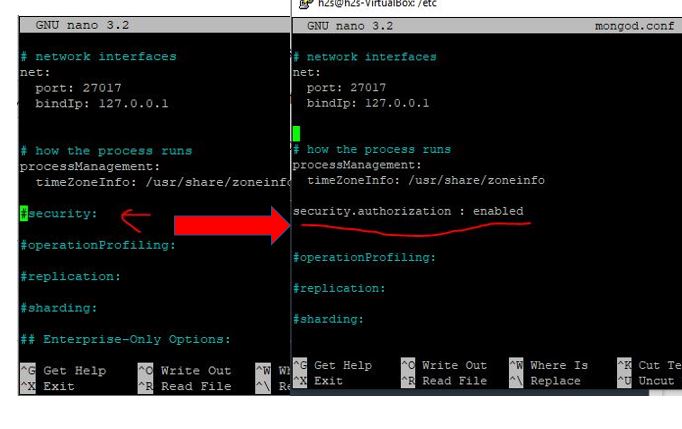
To enable authentication for MongoDB Databases to make them secure against any mishandling or unwilling deletion, we enable the authentication on MongoDB. For that first, go to Mongod.conf file and edit it.
sudo nano /etc/mongod.conf
Now find a text: #security and replace that with security. authentication: enabled
After replacing the text, press Ctrl+X and type Y and press Enter key.
Now restart MongoDB server using below command:
sudo service mongodb restart
After that check whether the authentication has been enabled or not.
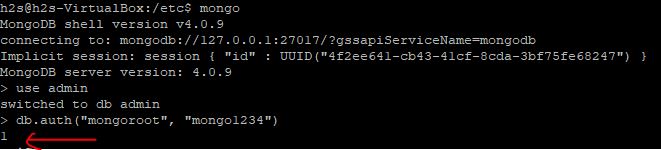
Here we are selecting the admin database:
use admin
db.auth("mongoroot", "mongo1234")
Note: Replace the yellow highlighted text with your username and password for admin database.
If the output gives you:
1
then the authentication is enabled and in case, it is not then the output will be:
Error: Authentication failed.
0
Other commands you may need for mongoDB
To update mOngoDB to its latest version
sudo apt-get update
Command to Stop MongoDB
sudo service mongod stop
Command to Restart MongoDB
sudo service mongod restart
Steps/Commands to uninstall MongoDB
Stop MongoDB services
sudo service mongod stop
Remove MongoDB packages
sudo apt-get purge mongodb-org*
Remove MongoDB databases and log files.
sudo rm -r /var/log/mongodb
sudo rm -r /var/lib/mongodb
So, in this way, we can install, configure, managed and uninstall MongoDB server or Database on Ubuntu 19.04/18.04/16.04/14.04 or Linux Mint.
Other Useful Resources:
- Oracle database system: Everything you need to know about it…
- How to Create a Database in PHPMyAdmin
- Centos server vs Ubuntu server? Difference between these two Linux
- Top 8 free/open source MySQL GUI Tools for Windows and Linux
- 7 Top free & open source web hosting control panel (Cpanel)


Hi Rajkumar,
Nice tutorial, however, please correct the access control section. The value in the /etc/mongod.conf (under #security) should be:
security:
authorization: enabled
Thank you
Thanks for pointing out it…