We all come across hundreds of articles either online or in newspapers and magazines. Many articles come with a magnified first letter, giving the article an antique look, and if not that, at least a premium and appreciable look. While dropped caps are rare today, it is worth learning how to put one, if you write a lot of articles, especially if you want to give your article a unique and premium look. The art of putting magnified first letter in articles is termed dropping a cap in the digital world. You can put such a magnified letter to make your article look more appealing and make it visually different from the rest.
Almost all the word processing applications out there comes with the provision, but dropping a cap on Microsoft Word is the easiest ever and you can do that with just one or two clicks. Microsoft Word is the most widely used word processing programs, which is another reason, I am choosing Microsoft Word for the tutorial. There is nothing like enabling some feature or so to drop a cap. You can also customize the dropped cap as per your requirements to make your article look more appealing, at least visually.
So let’s get started with how to drop a cap on Microsoft Word.
Applying a dropped cap
Open Microsoft Word and start typing your document. Alternatively, you can even open a document already prepared by you sometime before.
Click on the ‘Insert’ tab. Click on ‘Drop Cap’ and finally click on ‘Dropped’.

Your first text will get enlarged giving your document a premium look like the one in the screenshot.

If you are not happy with the formatting, you can even keep the dropped cap on the margin. This will deliver the look like the one in the screenshot below.

I know the first one was better. You can even change the drop cap settings to make things look more beautiful, or as per your requirements.
Changing the drop cap settings
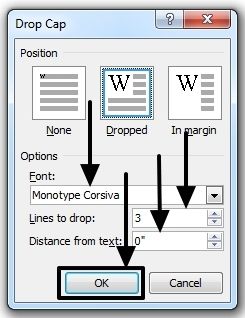
Click on the ‘Drop Cap’ icon under the ‘Insert’ tab and click on ‘Drop Cap Options…’.

Here you can change the font for the magnified letter. Changing the Drop Cap font will make the dropped cap look different from the rest of the text. Changing the font of the dropped cap different from the rest of the text will give it the following look.

Apart from that, you can change the number of lines to drop. By default, it will be 3. You can change it to any other numeric value. Increasing the number of lines to drop will make the dropped cap letter bigger and will take the vertical space of the number of lines entered by you.
You can even move the text away from the dropped cap by certain inches by changing the value associated with ‘Distance from text’.
Once you are done changing everything, just click on ‘OK’.

Here is the pictorial representation of changing the ‘Lines to drop’ from 3 to 2.

Increasing the distance from text from 0 to 0.5 will deliver the following output.

This tutorial might not be helpful for everybody out there, but can certainly be beneficial for users who print a lot of documents, have the hobby of writing stories or poems in their leisure time. Putting a drop cap renovates the look of the complete article in a mesmerizing way most users will definitely appreciate.
Hope the small information was helpful for you. Do you have anything to say? Feel free to comment it down below.
Other Useful Resources:
- How to get a Microsoft Excel Worksheet within Microsoft Word to handle data more efficiently
- Install WPS office in Kali Linux using command terminal
- Download and install WPS office on Ubuntu via command terminal?
- How to use Microsoft Word’s hidden feature a document size by one page
Related Posts
How to dynamically adjust column width in Microsoft Excel based on cell contents
How to open Microsoft Word and other Windows apps using a shortcut keys
Microsoft’s Smart AI Attendee is Here to Take Your Place in the Office Meetings
Download Visual studio code portable for Windows 11/10 or Linux
Bing Chat Ads arе Sеnding Usеrs to Malwarе Infеctеd Wеbsitеs
Microsoft partners with Snap to bring sponsorship links to its ‘My AI’ chatbot feature