When external hard drives are gaining more popularity for the ability to store huge volumes of data, SSDs or solid state drives are also gaining popularity among a big class of users for the speed and convenience it has to offer. SSDs are lightning fast and it is a convenient option to boot from an SSD or run some heavy programs directly from it without waiting for an eternity to start the same. But SSDs are not convenient among users to store huge volumes of data for their prices per gigabyte at the first place. While cloud storage services are always a great choice for users to store documents and photos, but it is still not that convenient for everyday uses.
Most popular cloud storage services like Google Drive, Dropbox, OneDrive make it easy to sync files between a PC and the cloud storage for easy and hassle-free access, but that still might be a trouble for users having a limited capacity SSD. In such a situation, using an external hard drive is the only convenient option but that isn’t as convenient every time, as syncing files directly between a PC and the cloud storage. But if you rely heavily on cloud storage services, using an SSD to sync huge volumes of data can be an extra pain, and it is where CloudMounter come to play.
With CloudMounter, you can access your cloud storage on your PC with the aid of Windows Explorer through a mapped network drive in your Windows Explorer. It is pretty convenient to use and is quite simple to set up.
So let’s get started with how to set up CloudMounter on a Windows 10 computer. The process is pretty similar for other Windows editions, as well.
If you want to do the same on a Linux computer, you can do that for free. Read this tutorial to know more.
Map cloud storage as a network drive on Windows 10 or 7
Step 1: Download CloudMounter for Windows from their official website. To explore additional options, you can visit the CloudMounter website. A Mac version is available, as well.
Step 2: Install CloudMounter on your Windows computer just the way you install other Windows programs. Accept the terms and conditions, click on ‘Next’ a number of times, and the installation should be complete.
Step 3: After installation is complete, open the program, and you should find the following screen.
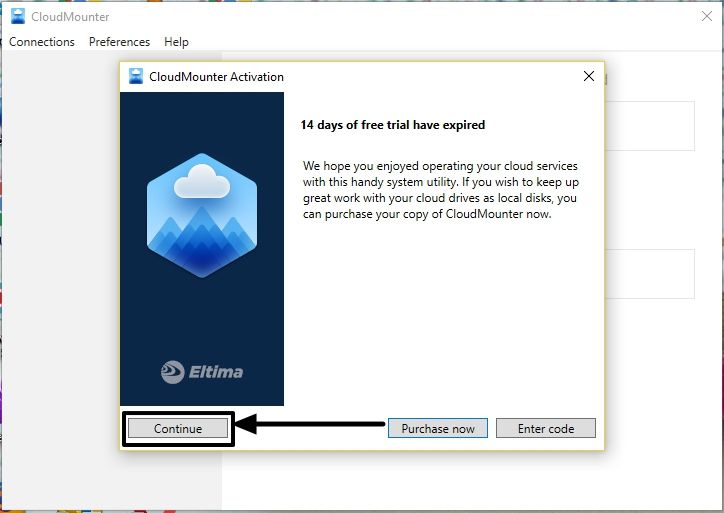
Step 4: You can click on ‘Purchase now’ or ‘Enter code’ to purchase the program or enter the code if you have already purchased it. Just click on ‘Continue’ to keep using the program. CloudMounter comes with a 14-day trial.
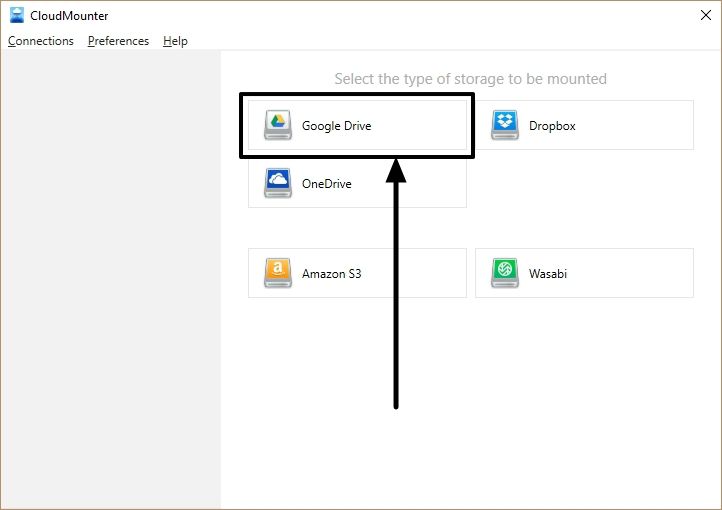
Step 5: You should now find the main screen of CloudMounter.
Step 6: Click on the cloud storage service, which you have subscribed to. I am clicking on ‘Google Drive’ for now.
Step 7: Depending on the Cloud Storage service you have selected, a browser window will open, where you will have to log in with your credentials.
Step 8: Once you are done logging in, you will have to give some permissions to CloudMounter to allow it to access the contents in the cloud storage service.
Step 9: Once everything is done in the browser window, come back to the CloudMounter window, where you have to do some final tasks.

Step 10: Set the name, which should be the default name associated with your cloud storage account. You can even change it if you wish. You can keep the name as ‘Work’, ‘Personal’, ‘Photos’ or whatever suits the account.
Other necessary details like the amount of space you can use, etc. will be shown to you.
Step 11: By default, the drive letter for the mapped drive will be ‘Z’. You can always change it to any other drive letter as per your convenience. I am keeping the drive letter to default ‘Z’. Finally, click on ‘Mount’ to mount the cloud storage drive as a mapped drive.
Step 12: To add a new cloud storage drive, simply click on ‘Add new connection’ and repeat the same steps all over again.
Step 13: You can always change the drive letter or unmount the drive by clicking on ‘Unmount’.
Step 14: Just open ‘My Computer’ or ‘This PC’ to find out Z drive or any other drive letter you have chosen, along with the name set by you.

Just in case you want to change any settings, like the mapped drive letter, the name, or anything else, you will have to unmount the mapped drive at first and then proceed with making the changes.
CloudMounter is thus pretty simple to set up, and the best thing is that you can access all the files the same way you do with normal cloud storage sync, without occupying any space on your SSD or low storage drive.
CloudMounter should always run in the background so that you can get access to the cloud storage drives with the help of Windows Explorer.
You can get a license for personal use on Windows only for $35.39 or almost 2,600 INR after your 15 days trial is finished. Thus, it isn’t that costly as well.
Hope the small information was helpful for you. Do you have anything else to say about the program? Feel free to comment it down below.
Other Resources to see:
- 8 Best Free and Open source NAS or SAN software
- What is the difference between cloud storage and cloud backup?
- 6 Best Open source Personal Cloud Software to Setup Cloud storage
- How to encrypt pen drives, flash drives or external hard drives with a password
Related Posts
11 Best Free and Open source NAS or SAN software
Dropbox has limited its Advanced Plan’s Storage due to crypto mining
Can you make a PDF shareable link? How?
6 Best Open source Personal Cloud Software to Setup Cloud storage
Advantages and disadvantages of OneDrive Storage!
How to install Nextcloud server on Windows 10