NextCloud is a perfect alternative to Owncloud cloud storage software. It has both an open-source community edition plus the enterprise edition, needless to say, is paid. NextCloud also provides a server-client architecture exactly like OwnCloud and why not, it is a fork of it but with wide extension support. Users can install the NextCloud community server edition on their PC or server to create their own personal in-house local cloud storage.
The NextCloud client is available for Windows, Linux, macOS, and smartphone platforms iOS and Android. So, it is cross-platform cloud storage with a modular architecture that’s capabilities can be extended using the plugins or extensions provided by NextCloud. There are more than 200 extensions such as calendars (CalDAV), contacts (CardDAV), URL shortening suite, streaming media (Ampache), bookmarking service, image gallery, RSS feed reader, document viewer tools, browser-based text editor, connection to Dropbox, Google Drive & Amazon S3 and more…
The interface is quite easy to use and friendly. Here in this tutorial, we will see how to install NextCloud on Windows 10 without using XAMMP, WAMP, IIS server, or a Virtualization software like VirtualBox/Vmware player. We will use the Windows 10 WSL (windows subsystem Linux) feature. It allows us to run Linux environment apps natively on Windows 10 with a high degree of performance just like any native Linux server. That’s why NextCloud also runs on it very smoothly without any glitches.
Install NextCloud server on Windows 10 using WSL (windows subsystem Linux) Ubuntu
Step 1: Install the WSL feature on Windows 10.
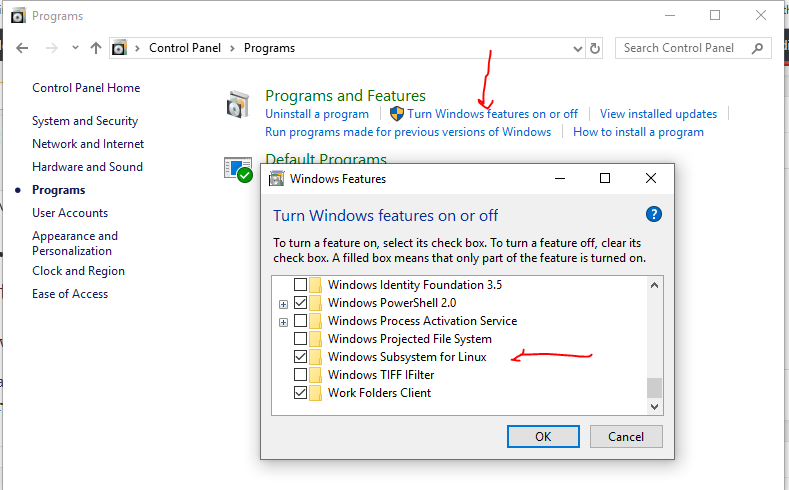
The WSL (Windows subsystem Linux) is already there on Windows 10 and we just need to activate it. For that, the user has to go to Control Panel->Programs->Turn Windows feature On or off. For a more deep tutorial on WSL installation see: Activate Windows 10 subsystem for Linux
Step 2: Get the Linux environment app from the Microsoft store
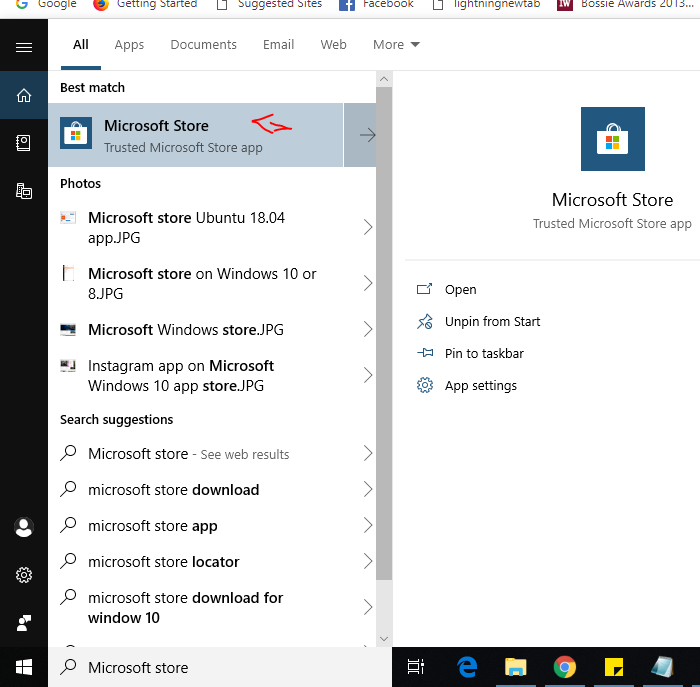
To install NextCloud on Windows 10, first, we need a Linux app from the Microsoft store. Go to the Windows search box and type Microsoft store as it appears, click on it and search for Ubuntu.
The store will show Ubuntu 20.04 or 22.04, select and install any of them as per your choice. When you Launch the Ubuntu Linux environment it will take some time to get set up.
Step 3: Install Apache+PHP+MySQL/MariaDB for NextCloud
Run the following commands to install Apache along with MySQL and PHP 7.2
sudo apt install apache2 sudo apt install mariab-serversudo apt-get install php php-curl php-gd php-fpm php-cli php-opcache php-mbstring php-xml php-zip php-fileinfo php-ldap php-intl php-bz2 php-json libapache2-mod-php php-imagick php-redis php-mysql php-commonsudo a2enconf php*-fpmsudo service apache2 restartStep 3: Download & Install NextCloud server on Windows 10
To download the latest version of NextCloud, we need to visit the official download page
As NextCloud doesn’t offer a repository like Owncloud to directly download the server files, so we have two options either via SNAP or directly from the website.
Unfortunately, the SNAP (Snapcraft) is still not workable on Windows subsystem Linux systems, so we can’t use that. Thus, the option left is via their download page.
Now come to Ubuntu (WSL) window and type wget with the download URL.
wget https://download.nextcloud.com/server/releases/latest.zipStep 4: Extract NextCloud server files
Extract the zipped file of the Next Cloud and then move that to the web directory
sudo apt install unzipSee the downloaded files
lsExtract the files…
unzip downloaded_file name
The downloaded files name was: latest.zip.zip so the command was
unzip latest.zipStep 5: Copy the Nextcloud files to the Apache web directory
After extracting, it’s time to move nextcloud folder to /var/www/html. The command is:
sudo mv nextcloud /var/www/html/nextcloudor
sudo cp -R nextcloud/ /var/www/html/Create a data folder inside the copied folder
sudo mkdir /var/www/html/nextcloud/dataSet the permission to the nextcloud directory
sudo chown -R www-data:www-data /var/www/html/nextcloudsudo chmod -R 755 /var/www/html/nextcloud/Step 6: Create a new configuration file called nextcloud.conf
Now, we will create an Apache configuration file for NextCloud to tell Apache how to let users access our cloud storage. For this purpose, manually create a configuration file named nextcloud.conf.
The command is:
sudo nano /etc/apache2/sites-available/nextcloud.confAfter the above step adds the following lines to the configuration file:
<VirtualHost *:80>

DocumentRoot /var/www/html/nextcloud/

Alias /nextcloud "/var/www/html/nextcloud/"

<Directory /var/www/html/nextcloud/>
Options +FollowSymlinks
AllowOverride All
Require all granted
<IfModule mod_dav.c>
Dav off
</IfModule>
SetEnv HOME /var/www/html/nextcloud
SetEnv HTTP_HOME /var/www/html/nextcloud
</Directory>

ErrorLog ${APACHE_LOG_DIR}/error.log
CustomLog ${APACHE_LOG_DIR}/access.log combined

</VirtualHost>
To save and exit the files first press CTRL+O and then CTRL+X.
Enable the newly created site:
sudo service apache2 reloadsudo a2ensite nextcloud.conf sudo apt updateStep 7: Commands for Additional Apache configurations
Enable the following modules for proper Nextcloud working…
sudo a2enmod rewrite headers env dir setenvif mimeRestart Apache to make the installed modules effective:
sudo service apache2 restartStep 8: Create MySQL/MariaDB database for NextCloud
We have done almost everything related to web server settings for NextCloud and it’s time to create a database plus a user for the same.
The commands are as follows:
sudo mysqlNote: h2smedia is the username and next@123 is the password. You can change them with your choice. Whereas the nextdb is the above-created database name.
Create DB
create database `nextdb`;Create a User with a password
create user 'h2smedia'@'localhost' identified by 'password';Grant all permissions of the Database to the User
GRANT ALL PRIVILEGES ON `nextdb`.* to `h2smedia`@localhost;exit;Step 9 – Setup and Configuring NetCloud server on Windows 10
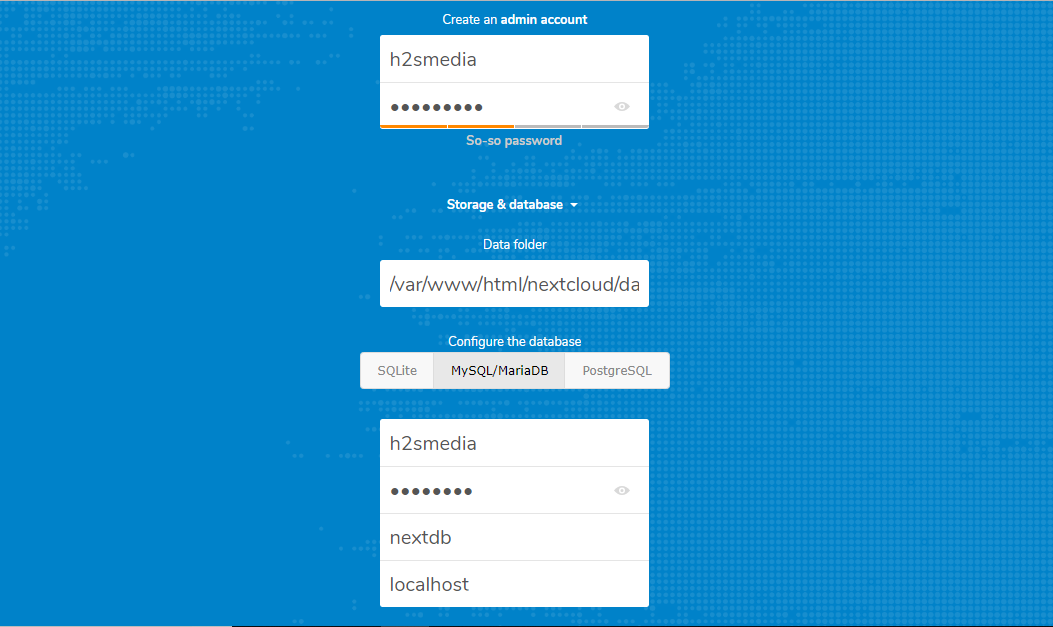
Finally, go to your browser and type http://localhost/nextcloud or http://127.0.01/nextcloud. It will guide you to create an admin account and database setup page of NextCloud.
Enter the username and password which you want to assign to the Admin account for Next cloud. And then below that enter the details of the database we have created above and click on the Finish Setup button. That’s it.
This is the way to install NextCloud server cloud storage in Windows 10 without the installation of any software like WAMP or XAMMP.
Change Data Folder (Optional step)
By default, whatever data we upload to NextCloud will go to its data folder that is at /var/www/html/nextcloud/data, it is in the root directory; so, Ubuntu WSL is in the C drive of Windows 10, therefore NextCloud will consume your C: Drive to store all the uploaded files. However, we can change that.
Here I am going to move the data folder from my C: Drive to G: Drive of the system, so all the uploaded files will consume my G: Drive Space, and C: drive will remain free.
sudo cp -r /var/www/html/nextcloud/ /mnt/drive-nameReplace the drive name with the one where you want to save your all files.
For example, I want it on G drive thus the command in my case was like this:
sudo cp -r /var/www/html/nextcloud/ /mnt/gNow, edit the NextCloud Config file:
sudo nano /var/www/html/nextcloud/config/config.phpFind this line:
'datadirectory' ='/var/www/html/nextcloud/data'.Replace the current directory location with the one where you have copied the data folder.
For example, I have copied it at /mnt/g/data. Thus, I use the same. You can see that in the below screenshot.
After that save it: CTRL+O and exit using CTRL+X.
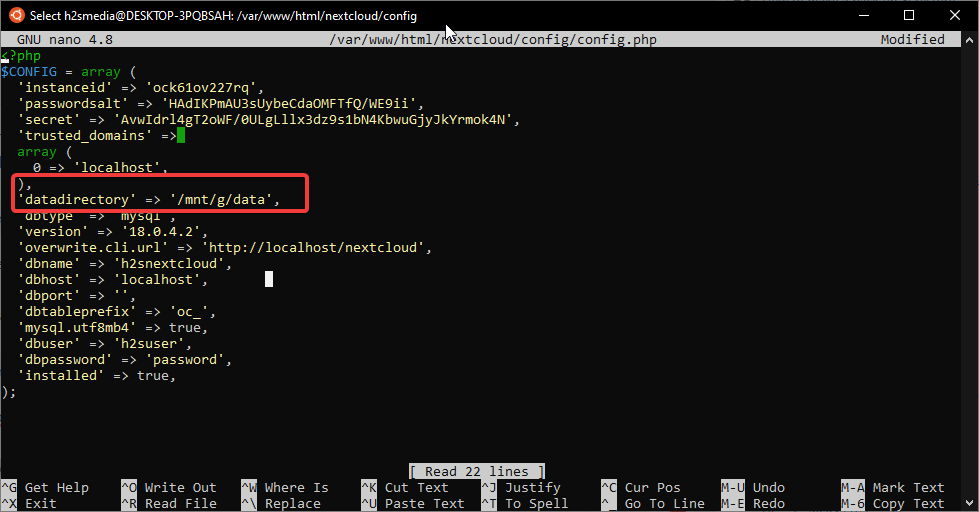
Nextcloud Data directory
Change the permission of your new data location:
sudo chmod 0770 /mnt/g/datasudo chown -R www-data:www-data /mnt/g/dataNote: Replace /mnt/g/data with the location of your folder.
Other Resources to read:


This post saved me from giving up until I got this right when I ran
sudo mysql
The output was as follows
ERROR 2002 (HY000): Can’t connect to local MySQL server through socket ‘/var/run/mysqld/mysqld.sock’ (2 “No such file or directory”)
I have spent hours trying to fix this with no change in the outcome I am very lost if you or anyone have a idea I’m all ears. Thanks.
Actually, we need to start the mysql service. Use the command sudo service mysql start
Sir I promise you I did that more times then I care to count never fixed it, even tried it again with no result. However and I don’t know why I installed Synaptic and Xserver and rolled through php, apache, and mariadb installs in full. Then restarted my PC and the server as well as ran [sudo service mysql start]….. Now it works! I have a question that I feel should be covered in this for good reason. When I restart the PC at any point will commands need to be run to restart the server and if so is there a way to setup a single script icon for it to do so in a batch action? O yes and one more, I plan to move this to a server after testing do I have a option to clone this as it will all be the same info as current?
Hi Jester,
Tim this side, I am also playing around WSL to learn its curves…
What I understand that you want to start MySQL automatically every time during the system boot. However, in WSL it would be a problem but on the real system, it will start automatically without any problem, as far as I know. Still, here is the link to a script for MySQL available on Ubuntu forum you can try it out:
http://manpages.ubuntu.com/manpages/bionic/man1/mysql.server.1.html
Other Question of yours which is cloning of Ubuntu system:
You should not clone the WSL running system because it would not be feasible. As it is a kind of virtual machine and when you try to clone it to other hardware it will create problem. Just copy all the data and packa all the installed service in a package file which later we can run on the new Ubuntu system to install all the packages and services which were there on old one. Below I am giving the commands:
However, if you are using the Ubuntu on some PC or other hardware then you can use the Clonezilla or bare metal backup software those will clone your system and deploy it exactly on new ones.
Coming to the point:
If you want to transfer old machine to a brand new machine but you won’t like to spend hours tuning it to get the same configuration as the one you have used for years?
Let’s transfer your Ubuntu configuration and applications to your new computer in three simple steps.
Note: The same version of Ubuntu should be installed on both machines. The architecture (32/64 bit) can be different.
Step 1: Store the list of installed packages
Run the following command on the source machine to store the installed packages names in ~/pkglist:
Step 2: Transfer your config
Use scp or rsync or even a flash drive to transfer your home directory (~/*, ~/.*), the source list (
/etc/apt/sources.list) and any other files you customized or installed (like apache config under/etcor softwares on/opt) from the source machine to the target one.Step 3: Install packages
On the target machine run the following command in a failsafe terminal session to install your packages:
Let me know if it works for you!!!!
Sorry Been very busy I have many questions about this and would like to try and perfect this method of install. I’m would like to get in to much deeper detail about the goal I have and the outcome that I seem to be getting. However I don’t feel the comments section on this post is the correct place to be posting a book of details and plans but you guys have been very helpful. The main goal here is for a 100% free Nextcloud server that can be run on a windows 10 enterprise pc that is a daily driver I have a NAS/Server but this is for the people that don’t have the ability or money. I would like to know where would be best that this guide can be perfected and hopefully worked on with as may people as possible for the maximum stability. This guide made my idea come alive and I want it to grow in the best way without the troll input that I have seen on some sites please give me the best input you can without hurting your own traffic. Thank you for the help so far!
STEP 3…
Cant install any of them, error said files not found.
Try sudo apt-get install apache2 mysql-server libapache2-mod-php7.2
Does not work
Nevermind…ran sudo apt update
Forgot this Right before installing anything
sudo apt update
Hey Having trouble on Step 6. I get into the GNU nano 2.9.3 and it gives me a [ Error Writing /etc/apache2/sites-avaible/nextcloud.conf: no such file or directory ]
Failed on the first step (sudo apt-get install apache2 mysql-server libapache2-mod-php7.2
) with following errors:
Cannot open /proc/net/unix: No such file or directory
Cannot stat file /proc/1/fd/5: Operation not permitted
Cannot stat file /proc/3/fd/7: Operation not permitted
I found out “/proc is an interface that needs to be implemented by Microsoft, since it needs to be implemented using Windows API calls.”
If /proc is not implemented, how are you managing to install on WSL?
Hey guys,
First thanks for the tutorial. After starting nextcloud (http://127.0.0.1/nextcloud/index.php) I get the following messages:
Error
No database drivers (sqlite, mysql, or postgresql) installed.
PHP module GD not installed.
Please ask your server administrator to install the module.
PHP module cURL not installed.
Please ask your server administrator to install the module.
PHP modules have been installed, but they are still listed as missing?
Please ask your server administrator to restart the web server.
Can you help?
Thx Marcus
On Your Ubuntu WSL, again run these commands one by one and see all of them are installed properly.
sudo apt-get install php7.2-gdsudo apt-get install php7.2-curl
sudo apt-get install php7.2-mysql
If yes, then restart the Apache
sudo service apache2 stopsudo service apache2 start
Also make sure the Mysql service is up and running
sudo service mysql startThis didnt work for me. I endup getting back on the http://localhost/nextcloud/index.php page and even if I did what you said it ends up giving the same result. PLS HELPP
So easy…I could swear that I did this before ;). Thank you
Step 5: sudo mv nextcloud /var/www/html/nextcloud/
it says mv: cannot move ‘nextcloud’ to ‘/var/www/html/nextcloud/’: No such file or directory
What do I do?
Have you found any solution? Im stuck here too~
Try either of these commands
For copy Nextcloud folder
sudo cp -R nextcloud/ /var/www/html/
or
For completely moving it.
sudo mv nextcloud /var/www/html/
For some reason if I did sudo mkdir /var/www/
and then sudo mkdir /var/www/html
then do the sudo mv (or create the nextcloud folder then do it)
It worked…no idea why
I can access local host so how do I access from outside my network?
Yes, I’m a dummy.
You just have to forward your local IP-address of PC in your router for port 80 to access it remotely via the internet.
In the below-given article’s second part, you will see the author has forwarded the router port for FTP server, instead of FTP select the HTTP or 80 port of a router for NextCloud. Note: the interface of your router and location of the options would be different.
https://www.how2shout.com/how-to/setup-ftp-server-windows-10-87-locally-internet.html
Thank you very much for this tutorial.
One very important question: Since I want to use nextcloud from anywhere I definitely want to use an encrypted connection. How can I enable ssl with this type of setup? Many thanks in advance!
Are you planning to use some FUll Qualified domain or naked public Ipaddress? Most SSL certificates are bound to the hostname of the machine and not the IP address. Thus, it is recommended to buy a domain and an SSL certificated from the same place and after that point that domain to your Next cloud IP address using DNS section of DOMAIN.
Can you give here some more information on how to setup with let’s encrypt?
Another question: Is it possible to change the data folder to a different windows drive? As far as I understand, in this tutorial data would be stored on drive c, right?
Yes, it is possible to change the default drive for storing the NextCloud Data.
For example you want to move your Nextcloud data location D: drive
sudo mkdir -p /mnt/d/new
sudo cp -a /var/www/html/nextcloud/data/ . /mnt/d/new
sudo chown -R www-data:www-data /mnt/d/new/data
sudo nano /path/to/nextcloud/config/config.php
Find line:
‘datadirectory’ and change its path with new one i.e /mnt/d/new/data
Thanks a lot!
Unfortunately, after trying this nextcloud says that my folder is not valid and that I should make sure that .ocdata is there, but the file exists.
Before you answered, I tried it with different tutorials but this did also not work, getting permissions to work outside of the ubuntu win10 folder seems to be very difficult. Do you have any tipps to get it work?
Which folder you are trying to access within the WSL, is that folder outside the Windows filesystem? I mean any remote folder.
Thank you for this tutorial, but seems I’m on the same stage as ‘dazzil’.
Folder /mnt/d/nextcloud on the second drive D: from Windows filesystem (both C: and D: )
Error like ‘please use 0770 for folder’
And it’s impossible to make chown and chmod for this D: drive
chown and chmod not reporting about any error. But I’m can’t change permission. All files remain the same user and permission (main user for Ubuntu system).
for example C:
$ ls -lh /var/www/html/nextcloud/version.php
-rwxr-xr-x 1 www-data www-data 382 Nov 3 14:17
/var/www/html/nextcloud/version.php
for D:
sudo chown www-data:www-data /mnt/d/nextcloud/version.php
$ ls -lh /mnt/d/nextcloud/version.php
-rwxrwxrwx 1 user user 382 Nov 22 08:59 /mnt/d/nextcloud/version.php
Hi There!
I followed your guide and my NextCloud server is running nicely!
I managed to access external storage, but I can’t write or delete to the external folders.
Do you guys how could we manage to make it work?
Dear friends,
After doing “sudo apt install mysql” I received this messages:
Reading package lists… Done
Building dependency tree
Reading state information… Done
E: Unable to locate package mysql
I already did “sudo apt update”.
Any ideas?
Thank you!
Use: sudo apt install mysql-server
Noob here, but I’ve made it nearly to step 7, but I’m having issues enabling the newly created site. It appears as though Apache2 cannot start. when I try to just run sudo service apache2 start, I get a permission denied error that looks like a port access issue.
When I run sudo lsof -i:80 I see no response. Any tips???
gwaller@Home-PC:~$ sudo service apache2 reload
* Reloading Apache httpd web server apache2 *
* Apache2 is not running
gwaller@Home-PC:~$ sudo service apache2 start
* Starting Apache httpd web server apache2 (13)Permission denied: AH00072: make_sock: could not bind to address [::]:80
(13)Permission denied: AH00072: make_sock: could not bind to address 0.0.0.0:80
no listening sockets available, shutting down
AH00015: Unable to open logs
Action ‘start’ failed.
The Apache error log may have more information.
*
gwaller@Home-PC:~$ sudo lsof -i:80
gwaller@Home-PC:~$
I have got the same error…
Simply edit apache ports confgiruation file and change Listen 80 to Listen port: 8080
sudo nano /etc/apache2/ports.conf
Then type:
sudo service apache2 stop

sudo service apache2 start
if you get same error; start apache2 again using the above command.
Once it get started. You can access the server at 8080 port.
Now again edit port configuration file ports.conf and change the Listen 8080 to Listen 80
Again
stop and start the server, if get error; fire the Apache2 service start command one or two times given above to flush cache in case is there.
I got it to listen to 8080, but would never go back to 80.
Also in order for it to work with 8080, I also had to add “AcceptFilter http none” to the end of apache2/ports.conf
I was getting a (92)Protocol not available: AH00076: Failed to enable APR_TCP_DEFER_ACCEPT.
Even though I never got it back to port 80, I was able to log in via local web browser to http://127.0.01:8080/nextcloud (specifically calling out to use port 8080).
Is there any issue with leaving it at port 8080?
(Nextcloud is fully up and running and functional)
Step 9, problem loading page
Same
my bad, should be :8080
how to get server to start when the computer boots?
Try this answer’s steps: https://superuser.com/questions/1112007/how-to-run-ubuntu-service-on-windows-at-startup
Be aware that you may have problems in filenames with special characters, when you install Nextcloud on WSL For example, I had a test folder with “&” character and couldn’t delete it even from web interface. If you sync a lot files, the desktop client will complain about them constantly, the client will not upload some random files. That’s probably because some incompatibility with Windows file system and PHP.
I ended up installing Nextcloud on a Virtualbox VM over real Ubuntu Server. All of the filename problems gone.
HOW TO INSTALL SSL?
How would I increase the RAM allocation to the php?
Depending on your php version edit the php.ini file:
sudo nano /etc/php/7.1/apache2/php.iniNote: replace the 7.1 with your current version of php version.
And there find the below values and increase the memory as per your requirement.
memory_limit = 128MTwo questions:
After running the first command in step # 3, I noticed this:
“The following package was automatically installed and is no longer required:
libfreetype6
Use ‘sudo apt autoremove’ to remove it.”
Can I run “sudo apt remove” in any session to remove the app and, am I correct in thinking it’ll remove the package installer for libfreetype6, not apache?
Second question is a problem…four of the packages were unable to be retrieved…
“Err:6 http://security.ubuntu.com/ubuntu bionic-updates/main amd64 apache2-bin amd64 2.4.29-1ubuntu4.6
404 Not Found [IP: 91.189.88.162 80]
Err:7 http://security.ubuntu.com/ubuntu bionic-updates/main amd64 apache2-utils amd64 2.4.29-1ubuntu4.6
404 Not Found [IP: 91.189.88.162 80]
Err:8 http://security.ubuntu.com/ubuntu bionic-updates/main amd64 apache2-data all 2.4.29-1ubuntu4.6
404 Not Found [IP: 91.189.88.162 80]
Err:9 http://security.ubuntu.com/ubuntu bionic-updates/main amd64 apache2 amd64 2.4.29-1ubuntu4.6
404 Not Found [IP: 91.189.88.162 80]
Fetched 320 kB in 3s (124 kB/s)
E: Failed to fetch http://security.ubuntu.com/ubuntu/pool/main/a/apache2/apache2-bin_2.4.29-1ubuntu4.6_amd64.deb 404 Not Found [IP: 91.189.88.162 80]
E: Failed to fetch http://security.ubuntu.com/ubuntu/pool/main/a/apache2/apache2-utils_2.4.29-1ubuntu4.6_amd64.deb 404 Not Found [IP: 91.189.88.162 80]
E: Failed to fetch http://security.ubuntu.com/ubuntu/pool/main/a/apache2/apache2-data_2.4.29-1ubuntu4.6_all.deb 404 Not Found [IP: 91.189.88.162 80]
E: Failed to fetch http://security.ubuntu.com/ubuntu/pool/main/a/apache2/apache2_2.4.29-1ubuntu4.6_amd64.deb 404 Not Found [IP: 91.189.88.162 80]
E: Unable to fetch some archives, maybe run apt-get update or try with –fix-missing?”
Do I need these?
So I tried running the suggested commands, but didn’t work. Instead, gives a permission error, among other things. What’s the chmod permission code I should use?
“doug@PC-NAME:~$ apt-get update
Reading package lists… Done
E: Could not open lock file /var/lib/apt/lists/lock – open (13: Permission denied)
E: Unable to lock directory /var/lib/apt/lists/
W: Problem unlinking the file /var/cache/apt/pkgcache.bin – RemoveCaches (13: Permission denied)
W: Problem unlinking the file /var/cache/apt/srcpkgcache.bin – RemoveCaches (13: Permission denied)
doug@PC-NAME:~$ apt-get update –fix-missing
Reading package lists… Done
E: Could not open lock file /var/lib/apt/lists/lock – open (13: Permission denied)
E: Unable to lock directory /var/lib/apt/lists/
W: Problem unlinking the file /var/cache/apt/pkgcache.bin – RemoveCaches (13: Permission denied)
W: Problem unlinking the file /var/cache/apt/srcpkgcache.bin – RemoveCaches (13: Permission denied)”
Otherwise, great tutorial. I’m hoping this Ubuntu 18 window will stay connected until someone replies.
Cheers,
Doug
How would you go about storing all data on an external hard drive?
I have a Windows machine running all my servers and a NAS on which I keep all the server data.
https://portapps.io/app/nextcloud-portable/
Hi guys, I can’t get past this:
gusto@DESKTOP-3NNBIUH:~$ sudo mv nextcloud /var/www/html/nextcloud/
mv: cannot stat ‘nextcloud’: No such file or directory
Quite frustrating. I’m a complete newbie. Have no idea how to proceed. Can anyone offer some guidance?
Use the command without / at the end.
sudo mv nextcloud /var/www/html/nextcloud
hi i have setup local server of nextcloud on windows 10.
now i want to connect nextcloud app on mobile with the local server on pc. when i tried to connect it gives the error could not connect host
how can i connnect mobile app with local server on windows 10 ?
Is both Nextcloud Windows 10 server and smartphone are not the same network? OR you are trying to connect your local server PC via the internet using the smartphone…
Hi, I have follow the tutorial. But I got a problem that I don’t understand when I go to http://localhost/nextcloud which show me this :
<?php
/**
* @copyright Copyright (c) 2016, ownCloud, Inc.
*
* @author Christoph Wurst
* @author Joas Schilling
* @author Jörn Friedrich Dreyer
* @author Lukas Reschke
* @author Morris Jobke
* @author Robin Appelman
* @author Roeland Jago Douma
* @author Sergio BertolÃn
* @author Thomas Müller
* @author Vincent Petry
*
* @license AGPL-3.0
*
* This code is free software: you can redistribute it and/or modify
* it under the terms of the GNU Affero General Public License, version 3,
* as published by the Free Software Foundation.
*
* This program is distributed in the hope that it will be useful,
* but WITHOUT ANY WARRANTY; without even the implied warranty of
* MERCHANTABILITY or FITNESS FOR A PARTICULAR PURPOSE. See the
* GNU Affero General Public License for more details.
*
* You should have received a copy of the GNU Affero General Public License, version 3,
* along with this program. If not, see
*
*/
require_once __DIR__ . ‘/lib/versioncheck.php’;
try {
require_once __DIR__ . ‘/lib/base.php’;
OC::handleRequest();
} catch (\OC\ServiceUnavailableException $ex) {
\OC::$server->getLogger()->logException($ex, [‘app’ => ‘index’]);
//show the user a detailed error page
OC_Template::printExceptionErrorPage($ex, 503);
} catch (\OC\HintException $ex) {
try {
OC_Template::printErrorPage($ex->getMessage(), $ex->getHint(), 503);
} catch (Exception $ex2) {
try {
\OC::$server->getLogger()->logException($ex, [‘app’ => ‘index’]);
\OC::$server->getLogger()->logException($ex2, [‘app’ => ‘index’]);
} catch (Throwable $e) {
// no way to log it properly – but to avoid a white page of death we try harder and ignore this one here
}
//show the user a detailed error page
OC_Template::printExceptionErrorPage($ex, 500);
}
} catch (\OC\User\LoginException $ex) {
OC_Template::printErrorPage($ex->getMessage(), $ex->getMessage(), 403);
} catch (Exception $ex) {
\OC::$server->getLogger()->logException($ex, [‘app’ => ‘index’]);
//show the user a detailed error page
OC_Template::printExceptionErrorPage($ex, 500);
} catch (Error $ex) {
try {
\OC::$server->getLogger()->logException($ex, [‘app’ => ‘index’]);
} catch (Error $e) {
http_response_code(500);
header(‘Content-Type: text/plain; charset=utf-8’);
print(“Internal Server Error\n\n”);
print(“The server encountered an internal error and was unable to complete your request.\n”);
print(“Please contact the server administrator if this error reappears multiple times, please include the technical details below in your report.\n”);
print(“More details can be found in the webserver log.\n”);
throw $ex;
}
OC_Template::printExceptionErrorPage($ex, 500);
}
Can you help me with this? because I don’t really understand with that problem. My Apache2 and Mysql is running in that time.
Thanks. I’m sorry if my english bad it’s because english is not my daily language.
Hello, try this:
sudo apt-get install php php-curl php-gd php-fpm php-cli php-opcache php-mbstring php-xml php-zip php-fileinfo php-ldap php-intl php-bz2 php-json libapache2-mod-php php-imagick php-redis php-mysql php-commonsudo a2enconf php-fpmsudo systemctl reload apache2Hi. This one of the best tutorial.
Can you also update it with how to install on another path (other than windows drive c)?
I am also curios how to see and use space from the other partitions in Nextcloud (in the meantime I use external storage app and works).
And the last thing that should be included – how to solve errors in settings overview and secure Nextcloud for internet access.
Thank you!
Claudiu
We already have done a tutorial on the NExtCloud installation for Ubuntu 20.04 WSL, where we have also shown the process of changing the directory from C: Drive to another. See that- https://www.how2shout.com/how-to/how-to-install-nextcloud-on-ubuntu-20-04-lts-wsl-windows-10.html
Hello! Noob here, I managed to get it running and everything seems to be fine. Is it possible to use this to login to a nextcloud account on the Nextcloud app?
Yex, you can access your server on the Nextcloud app, however, you have to first forward your system IP in the router for port 80 for accessing it over the internet.
I see, thanks! Do you have any tutorials on how to do this, though? I tried to port forward but I think I did it wrong because accessing my ip leads me to the Apache2 Ubuntu Default Page.
It is because you have port 80 opened by default, also open the Nextcloud port in the router to access it. We don’t have any particular tutorial on this because everybody has some different model of router. If you can tell us what is your router’s model then perhaps I could help with this.
Hi, I seem to be missing something. I have nextcloud working perfectly, but I can’t get any other computers or phones on the same network to connect to nextcloud. I even used the QR code and it says could not find host. Is there a way to make this visible to devices on my network. I tried opening it on port 80 IIS and is says http:127.0.01/nextcloud is invalid. I’m stuck.
stuck at step 3…. ERROR: Conf php-fpm does not exist!
Use this one
sudo a2enconf php*-fpm
ok so that worked! but now at the very next step i get “System has not been booted with systemd as init system (PID 1). Can’t operate.” its the last command in step 3
Use- sudo service apache2 restart
I followed the steps but when trying to connect to the localhost I get “This version of Nextcloud requires at least PHP 7.3 You are currently running 7.2.24-0ubuntu0.18.04.9. Please update your PHP version” I updated the PHP version but still not working. Can anyone help?
Restart Apache and then try again
For me it’s the same issue. Restarting Apache didn’t work,
Good guide, but next time drow better the arrow
Stuck on one of the last steps :\ I get this when trying to create the account:
Error while trying to create admin user: Failed to connect to the database: An exception occurred in the driver: SQLSTATE[HY000] [2002] Permission denied
mysql is running, db exists
having this exact issue as well. I verified i created the user and pass word, privleges were granted to the db, flushed privleges, still getting access denied
Cannot change data folder. I want to use the data folder (via WSL) “/mnt/d/nextcloud/data” and be able to access it via windows explorer “D:\nextcloud\data\user1”. But as soon as I enter data in “http://localhost:8080/nextcloud/index.php”, I am redirected to “http://localhost:8080/nextcloud/index.php/apps/files/” and gives an error ” The data catalog is readable by other users. Change the permissions to 0770 so that other users cannot get a list of files in this directory.” and in “/var/www/html/nextcloud/config/config.php” changes the value of ‘installed’ from “true” to “false”. Please! Tell me what to do.
STEP 6…
Hi there, I’m stock at this step after “sudo service apache2 reload”
I would like ton mention that I copied/paste everything that I needed to wrote into nextcloud.conf
Got this error:
”
* Restarting Apache httpd web server apache2 [fail]
* The apache2 configtest failed.
Output of config test was: apache2: Syntax error on line 225 of /etc/apache2/apache2.conf: Syntax error on line 1 of /etc/apache2/sites-enabled/nextcloud.conf: /etc/apache2/sites-enabled/nextcloud.conf:1: was not closed. Action ‘configtest’ failed. The Apache error log may have more information.
I tried to reinstall everything from scratch and got the same error.
Please recheck the Nextcloud configuration file created for Apache, is everything the same as shown in the article even the format?
Just like to say thank you, worked first time