PostgreSQL is perfect for those who are looking for a powerful open-source relational database management system. It is widely used by administrators for storing and managing data.
So, if you have just installed the latest Amazon Linux 2023 on your AWS EC2 and looking for a guide to install PostgreSQL then here is that.
Prerequisites:
To follow this tutorial you must have Amazon Linux 2023 installed on AWS Ec2 Instance or Docker with Admin user rights. At least 1GB of free Hard disk space, 2GB of RAM, and a single-core CPU.
Step 1: Update AL2023 Packages
On any Linux before installing packages, a user should run a system update command that will ensure all the latest available updates are installed on the system. Plus, this will also refresh the DNF package cache.
So, get access to your terminal or connect to your Amazon Linux instance via SSH and run the following command:
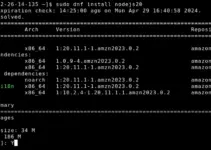
sudo dnf updateStep 2: Install PostgreSQL 15 on Amazon Linux 2023
Well, the best thing currently you don’t need to add any repository to get the PostgreSQL version 15 on your Amazon Linux 2023 because it is available through its system default repo. So, what you have to do is just run the given command. It will install both the client and server parts of the PostgreSQL Database system on your Linux.
sudo dnf install postgresql15.x86_64 postgresql15-server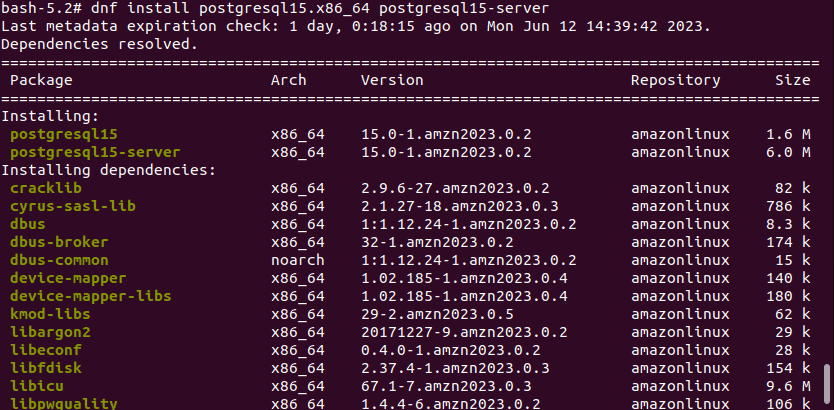
Step 3: Initialize the PostgreSQL Database
Now, before starting and enabling the service of the Database, let’s initialize it. For that use initdb which will create a new PostgreSQL database cluster refers to a collection of databases managed by a single server instance.
sudo postgresql-setup --initdbStep 5: Start and Enable Service
After completing the initialization, let’s start and enable the PostgreSQL server service so that we can use and can start it automatically with the system boot.
sudo systemctl start postgresqlsudo systemctl enable postgresqlTo check the status and confirm the service is running without any errors, here is the command to follow:
sudo systemctl status postgresql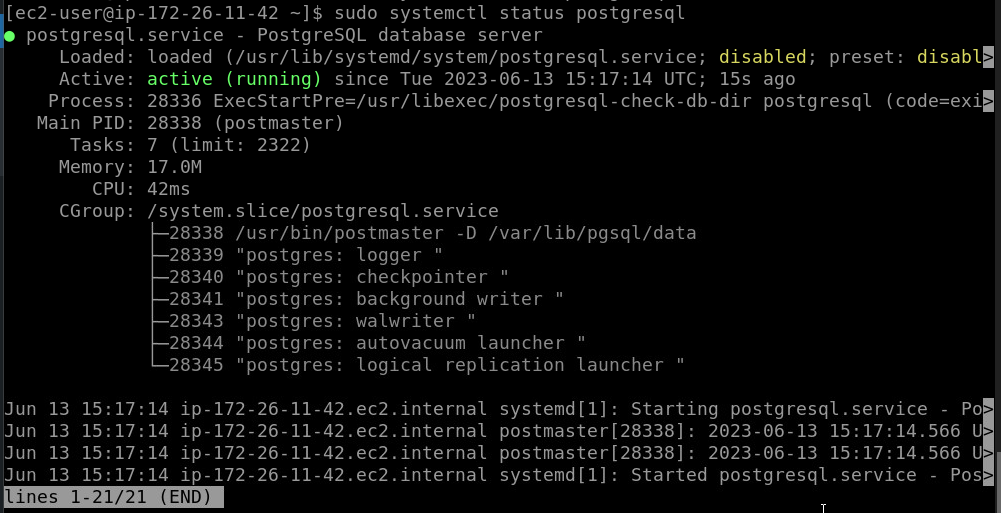
Step 6: Configure PostgreSQL
Few things which a user would like to perform on its newly installed Linux database server.
1. Change the Admin database password
To make sure our PostgreSQL is secured with a strong password, set a password for its system user and default database admin user account using the below-given commands-
Change user password
sudo passwd postgresLogin using Postgres system account-
su - postgresNow, change the Admin database password-
psql -c "ALTER USER postgres WITH PASSWORD 'your-password';"Note: Replace “your-password” in the above command with a secure password that you want to set for the admin database user.
To exit:
exit2. Primary configuration file
So, far we have learned all the key things to make PostgreSQL up and running without any warnings in Amazon Linux. To perform any further configurations, users need to access the primary configuration file of PostgreSQL located at /var/lib/pgsql/data/postgresql.conf.
Let’s first take a backup of the configuration file before performing any addition in case something goes wrong we can get the original settings back easily.
cp /var/lib/pgsql/data/postgresql.conf /var/lib/pgsql/data/postgresql.conf.bakNow, we can edit this file with text editors such as VIM or Nano.
sudo nano /var/lib/pgsql/data/postgresql.confWell, there are several configuration options that you can set in this file, but we will focus on the most important ones.
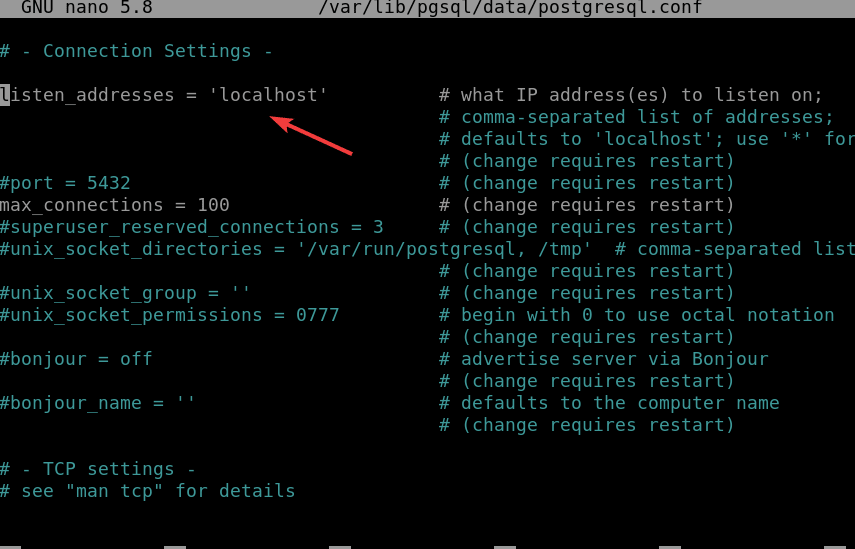
3. Listen to Specific Addresses (optional)
By default, the PostgreSQL server will listen to only localhost. But, if you want it to answer for a specific IP address or range or all addresses, we can do that by changing the value of the listen_addresses option in the configuration file:
Find it and remove the # given in front of the option. After that add the address that you want the server to only listen to.
listen_addresses = 'localhost'or
For all Ip-addresses use:
listen_addresses = '*'To save the changes press Ctrl+O, and hit the Enter key. To exit use Ctrl+X.
4. Authentication (optional)
For Authentication, there is a separate file called “pg_hba.conf” apart from the Primary configuration file in the same directory.
Well, by default; PostgreSQL allows all DB users and hosts locally to connect to the database with a peer or indent method. If you want to change that, we can edit the pg_hba.conf file and set the authentication method to md5.
To edit this file, run the following command:
sudo nano /var/lib/pgsql/data/pg_hba.confFind the line as given below and replace the indent with any other method you want to use such as md5.
# TYPE  DATABASE        USER            ADDRESSMETHOD

# "local" is for Unix domain socket connections only
local                    all              all                peer
# IPv4 local connections:
host                    all              all                127.0.0.1/32          ident
# IPv6 local connections:
host    all           all                                   ::1/128                    ident
# Allow replication connections from localhost, by a user with the
# replication privilege.
local   replication          all                            peer
host    replication     all                              127.0.0.1/32      ident
host replication all ::1/128 identNote: Also to connect remotely using PSQL utility, change 127.0.0.1/32 to 0.0.0.0/0 and ::1/128 to ::0/0
5. How to Create a User & Database
Those who are new to this open-source database can use this section of the tutorial to create a new user and database on PostgreSQL.
- First, connect to the PostgreSQL server as a postgres user by running the following command:
sudo -u postgres psql- Once you’re logged in, you can create a new Database user by running the given syntax:
Replace “your-username” with the user you want to create and password with the whatever you want to set for it.
CREATE USER your-username WITH PASSWORD 'password';- After creating the user, let’s create a new database by running the following command:
CREATE DATABASE database_name;- We have a new PostgreSQL user and Database, let’s grant all the rights of the created Database to our newly created user. So that it can access it to store data.
GRANT ALL PRIVILEGES ON DATABASE database_name TO your-username;- To check whether the database and user are created just run the given command and it will list all the available PostgreSQL users and Databases.
\l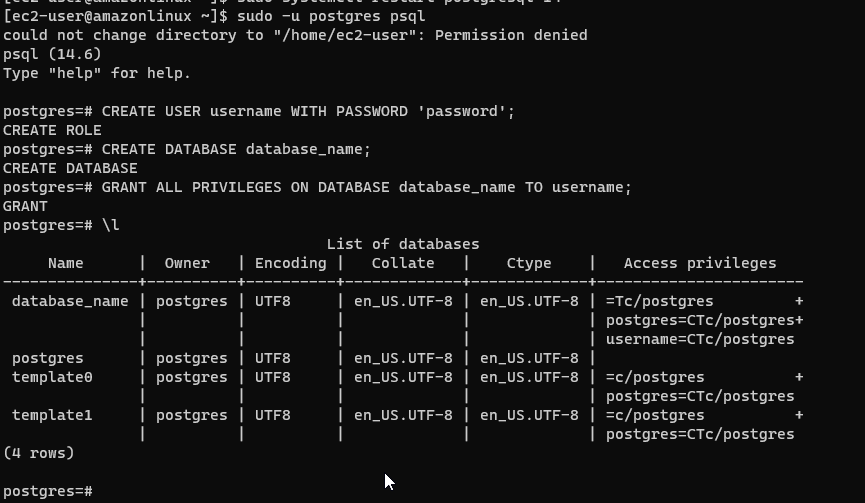
6. Accessing the Database
Accessing the database you have created on the PostgreSQL server can be done using its client command – pslq
Locally or SSH server connection users, use the given syntax to connect the database:
psql -h localhost -U username -d database_nameRemote users after installing the PostgreSQL client can use:
psql -h server-ip-address --U username -d database_nameWhere username is the username we created earlier or you already have and database_name is the name of the database assigned to that particular user.
Other Articles: