Asustor AS6404T review ratings ₹ 99,000
-
Features - 9.5/109.5/10
-
OS Interface - 9/109/10
-
Ease of Usage - 9/109/10
-
Performance - 8.5/108.5/10
-
Speed - 8/108/10
-
Build Quality - 9/109/10
Summary
This is for sure the AS6404T will not going to demean the hope of any NAS user because of data storage capability, easy to use features and a huge list of apps. Also, by providing a relatively strong hardware configuration and good support for 4K video, the AS6404T could be a Sisyphean task for its NAS competitors.
Pros:
- Good Speed
- A wide range of Apps
- ADM 3.0
- Build Quality
Cons:
A bit high in price (MRP)
User Review
( votes)How to Connect and Setup AS6404T
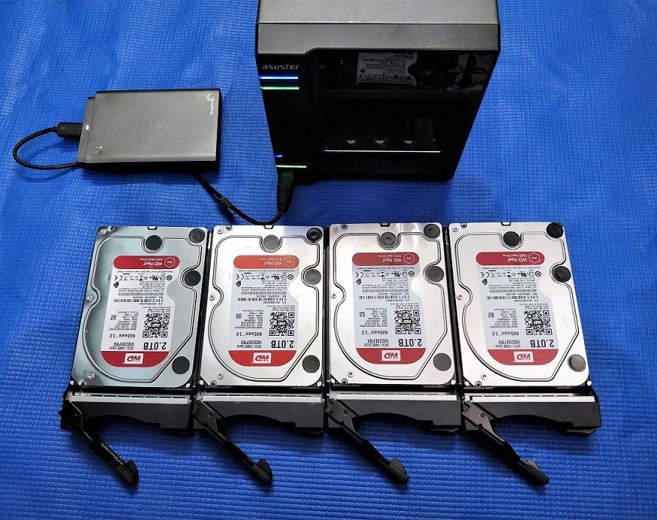
The setup and connect the AS6404T is very simple and easy.
- First, install the drives in the NAS.
- Insert the LAN cable into the NAS box ethernet port given at the backside and another end of the same cable to your router.

- Now go to the server or PC system that also connected to the same router or network.
- As you connect the Asustor NAS box to the router (if DHCP enabled) it will automatically fetch the IP address and will show on the LCD screen given at the front of it. Now simply type that IP address in your computer’s browser with port number 8001. For example, our IP address of NAS was 192.168.4.15 so with a port number it was something like this https://192.168.43.15:8001
- However, if you are getting some problem then simply use the CD disc comes with the NAS box and install the software called “Asustor Control Center“
- After installing the Asustor Control centre, it will search the network for connected Asustor NAS boxes.
- As soon it finds the connected NAS, it will show that on your screen.
- Now to open the web interface of the NAS click on the OPEN option or if you want to mount the storage then simply use CONNECT one.

Asustor AS6404T-56AA NAS ADM Operating system
The operating system of the Asustor known as ADM (Asustor Data Master) which is one of the fluid and easy to use NAS OS, have ever used by me. While writing this Asustor AS6404T review, the latest version on our NAS box was ADM 3.2.5. During the initial initialization, like most of the other operating systems, it also has given us a guided mode to setup NAS for use. The default password and username for ADM OS is admin (in case you used the reset button).

The first screen which appears after login will be something like shown in the below screenshot. All the icons dedicated to different tasks comprised at one place along with apps you installed on the NAS separately. Like in the snapshot you can see I have installed Virtualbox and Linux centre.

At the top main panel, from the right side Admin options such as Personal, Sleep, Restart, Power off and Sign out; including the Search box, Notification and Widget icon can be accessed.

By Default, there would not be any kind of Widget in the Widget area but the user can add them as per requirement. Just click on the + icon to add, such as Storage Manager info, Activity Monitor and logs.

On the left side of the Top panel, all the minimized apps will show by the ADM and also on the extreme left there is a soft button that can be used to minimized or maximised all apps instantly.

Furthermore, the user can sort the applications appears on the screen that made the main interface much more refreshing. Also, for more convenience, the ADM allows the users to drag and drop commonly used files or folders stored on the NAS drive directly to the main interface so that they can be quickly accessed on a daily basis.
![]()
Asustor ADM Apps central
In all consumer to SOHO along with SMBs NAS systems, the apps play an important role to proliferate the usage of NAS box from just a storage component to a server like capability devices. The ADM is not different, it also has a huge pile of different apps from Antiviruses, CMS, developer applications to games; personally, I don’t think we need to install the separate server in small offices to access different server apps. For example, If someone wants to host their own local WordPress intranet website then it can be easily done with one click on ADM. In the same way, if someone is in the testing field then with the help of Virtualbox multiple machines can be used for different testing purposes.
For a multimedia lover, the PLEX kind of media player apps are also available on the ADM. There are more than 240 apps on the ADM and list keeps increasing by the developers which can be seen in the beta section of the App Central.
We have installed a couple of apps including the one about which the users keep searching for is Plex media server. The process of Plex installation on Asustor AS6404T was significantly simple, just one click and done.

To access the Asustor AS6404T plex media server after installation, go to the Installed section of App central and click on the Desktop window icon given just below the Plex icon.

For office productivity apps like Data sync for Google Drive, OneDrive along with office suite such as LibreOffice, Feng Office CE are also there. ADM 3.0 supports the classification of the App into the corresponding group or category so that users don’t face a problem to find out some particular genre of apps.
App Central offers a wide variety of apps that greatly enhance the AS6404T’s experience, application and playability. When an app is installed, it will prompt the user to install the corresponding App, in case required by that. Moreover, it facilitates an option to users which helps them to automatically update installed apps that are not compatible with an upgraded version of ADM.
Storage Manager
On ADM 3.0, users can view all the drives currently connected to the AS6404T through the “Storage Manager”. The user can view the number and status of the hard disks. Left side is divided into the overview, Volume, hard disk, iSCSI, and iSCSI LUN.
On the main interface of the storage administrator, the first thing you should see the overview of storage volumes in a pie chart indicates the hard disk is healthy or not, but with very small info, to delve more about drives we need to go on Volume section.
RAID level it supports is Single, JBOD, RAID 0, RAID 1, RAID 5, RAID 6, and RAID 10. The setting up of any RAID is also rather easy, we simply have to click on any disk and then follow the guided mode.

File Explorer
The File Explorer is the file manager of ADM3.2. It works same like our PC file explorer. All the attached external drives including the folder from the internal hard drives of the NAS will show here. We can perform different operations right from our browser screens such as compression and decompression, folder rename, setting permissions, create share link, shortcuts, mounting CISF folders and more…
The best thing which I liked personally is the Recycle bin folder that gives us a way to get things back if they deleted accidentally.

Backup and Restore
In the design section of this review, we had talked about a One Touch back up button given at front under the USB port. That One Touch backup can configure using the Backup & Restore option. The user can opt, what he/she wants to make the button to perform, I mean what kind of backup: From USB device to NAS or NAS to USB. Furthermore, other options such as Remote Sync, FTP backup, Internal Backup, External Backup and Cloud Back that supports Amazon S3 and other clouds too can be configured from here.

MyArchive
In addition to conventional RAID mode, AS6404T supports cold backup MyArchive technology. It is a way to expand the mobility of data in the NAS. Basically, this function formats one of the NAS hard disks into EXT4, NTFS, or HFS+ file system, taking into account the user ‘s use on Windows system or Mac OS system, the whole setup process is very simple. After formatting, a particular hard drive can be used as a removable drive to transfer the data from NAS to any other system just like any removable USB drive.
The features support AES 256-bit encryption and extra data security layer which decryption via physical USB key. The AS6404T has up to three bays reserved for MyArchive disks.
EZ- Connect
In the past, the use of NAS, through an external network using PC or mobile device data often require complex setup process, allowing ordinary users a headache. Not anymore, in the ADM 3.0 there is an option called EZ- Connect through which we can create a unique Cloud ID, and all set automatically by EZ- Router.

With the help of a unique Cloud ID, the EZ- connect allows users to access the NAS data and control it remotely on any network using Asustor EZ-connect PC client, EZ-connect Web address or via smartphone Apps.
Install ASUSTOR EZ Connect on the PC and enter the Cloud ID to connect to the NAS anytime and anywhere. It also supports the external network to mount the NAS to the PC to form a drive letter, which is more convenient for users to access NAS data.


I also had used the AiDATA app of Asusutor on a mobile phone; simply needed to put Cloud ID and the NAS user account and password to establish the remote connection.
ASUSTOR Portal (HDMI Local Output)
The AS6404T is not just only as a NAS, it also comes with HDMI 2.0 interface that can be turned into a multimedia entertainment centre. This is something I have never experienced before in other NAS systems. When the AS6404T HDMI interface is connected to a display, the user’s home simulated environment, just like some Family Multimedia player, appears. Also, we don’t need to manually set the output; as soon as the HDMI cable connected it will automatically identify and switch to the HDMI output mode. Max. Resolution is 4K.
A variety of applications on the main interface are arranged in the form of large icons. In addition to commonly used multimedia applications such as Netflix and Youtube, users can also install a variety of apps such as social applications, browsers, etc.
In addition to this, the user can use the AiRemote app on the mobile device, which is a virtual remote controller for the ASUSTOR Portal. We didn’t find any glitches or problem while our usage of this portal everything was smooth even the 4K video playback.
Not only the Portal, the user, if wants can play audio or video files directly through the Web interface and the quality of movies or videos would be the same as you play them locally on your system.

Related Posts
11 Best Free and Open source NAS or SAN software
Minisopuru 13-in-1 DisplayLink Laptop Docking Station Review
VOLTME Revo 140 GaN Charger Review: Efficient & High-Speed Charging
SJCAM C300 Action Camera Review – Budget Alternative to GoPro
Fire-Boltt Invincible Plus smartwatch review. A value-for-money smartwatch with a metallic strap
Just Corseca ‘Skyraptor’ Music Eyewear review