Creating database directly in the PHPMyAdmin for MySQL or MariaDB without cPanel easy to use interface is very simple. And here in this PHPMyAdmin-Tutorial will let you how to do that.
The PHPMyAdmin is the open source web-based tool that gives you a Graphical user interface to manage the MySQL server databases. By Default, the MYSQL server works only in the command line and those don’t know much about it may struggle, so in such situations the PHPMyAdmin proves worthy.
You can create and delete MySQL or MariaDB Databases including Databases user directly from the PHPMyAdmin user interface.
The Tutorial of PHPMyAdmin given below will work for all versions to create databases regardless of Linux platforms including cPanel such as Ubuntu, Fedora, CentOS, Red Hat, Debian, Linux Mint and so on. Even the WAMP/XAMPP users can also follow this guide to create Database and users for MySQL in PHPMyAdmin.
Step 1: Open the PHPMyAdmin
The URL for PHPMyAdmin will be different because it depends where you have installed it. So, use that URL and open it in your Browser.
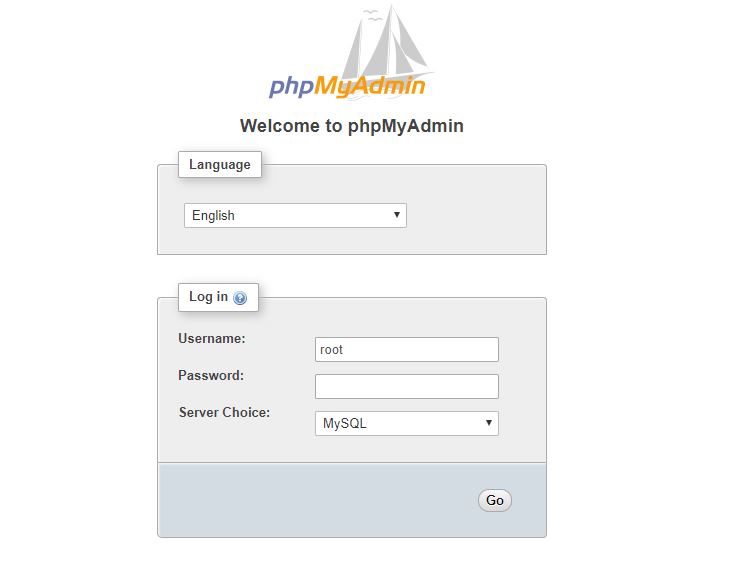
Step 2: Login into PHPMyAdmin
You can log in the PHPMyAdmin with a root which is the default user in MySQL. If you have recently installed the MYSQL and didn’t change its password then by default it is BLANK. Means you just need to type the root in the username section leave the password column and hit the GO button. You can also login with any other DB username & password of your MySQL server apart from the root user.
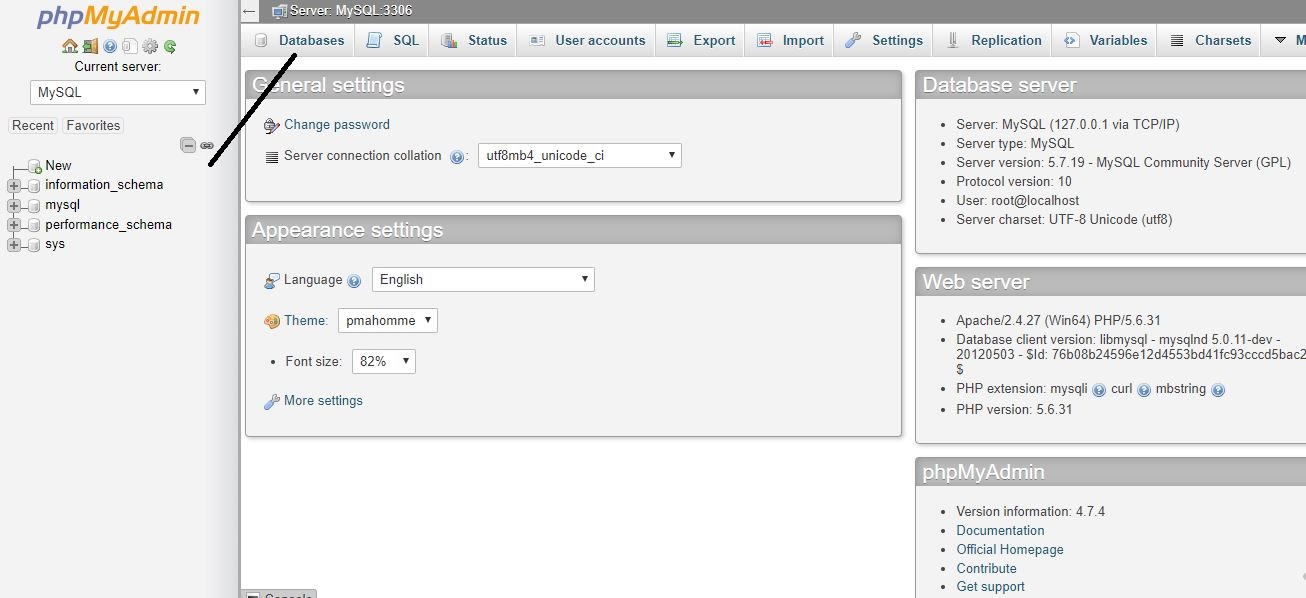
Step 3: Create a Database in PHPMyAdmin with no Privileges
This is the step where we create fresh Database for MYSQL server from PHPMyAdmin tool’s interface. Now you on the PHPMyAdmin, click on the Database option given in the Menu.
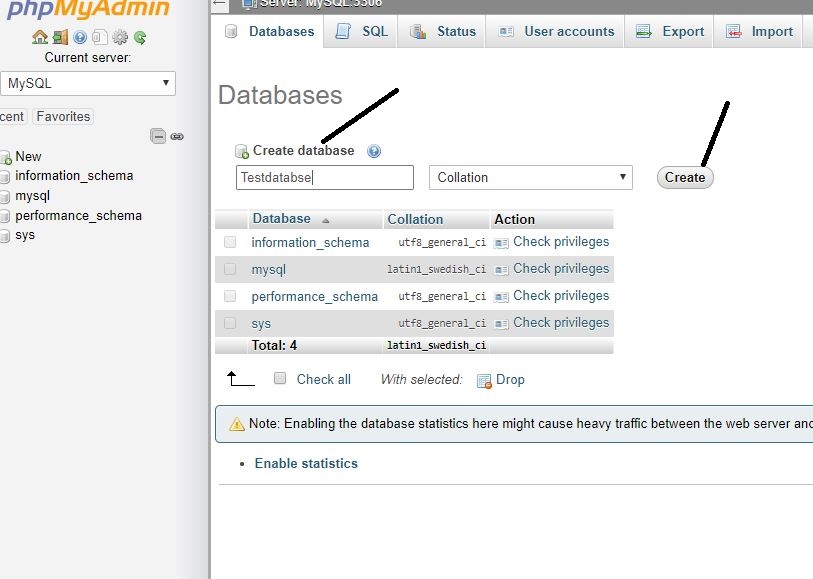
Now give some name to your database and click on the Create button. This will create a Database from PHPMyAdmin in MySQL or MariaDB. Like here we have given: Testdatabse
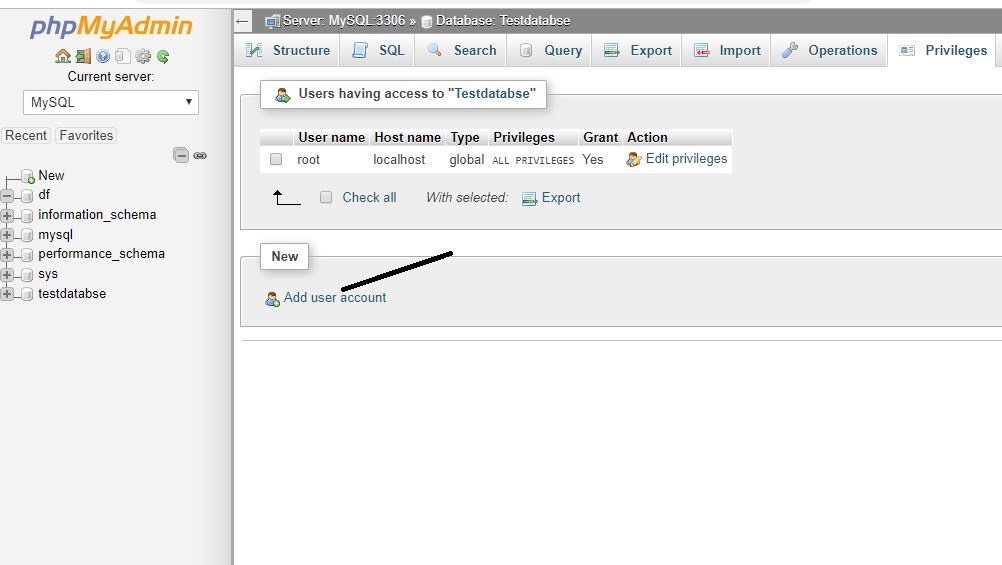
Step 4: Create Database User from PHPMyAdmin to create login a for database
So, in the above step, we successfully have created the Database, now its time to create a user for that. Click on the Privileges option given in the menu of PHPMyAdmin interface.
Click on the Add user account.
In the Add user account section, you need to provide some information about your user.
Under the Login information:
- In the User name: Give some name to your Database user
- Host name: Select the Local from the dropdown box
- Password: Assign some password to your Database user which you are creating here.

Note: If you want to create a Database user without password or login then just click on the drop box given in front of the Password column and select the No Password option.
Note: You can also use the Generate button to create strong and some random password.
Step 5: Database User privileges
Note: If you want to create a Database user without privileges then leave this step and directly click on the GO button.
Check the box given in the front of Grant all privileges on the database. This will give all permission of your newly created database to the user you have created.
Secondly, if you want to give the Global privileges including the administrative rights then you can check the Global privileges option too.
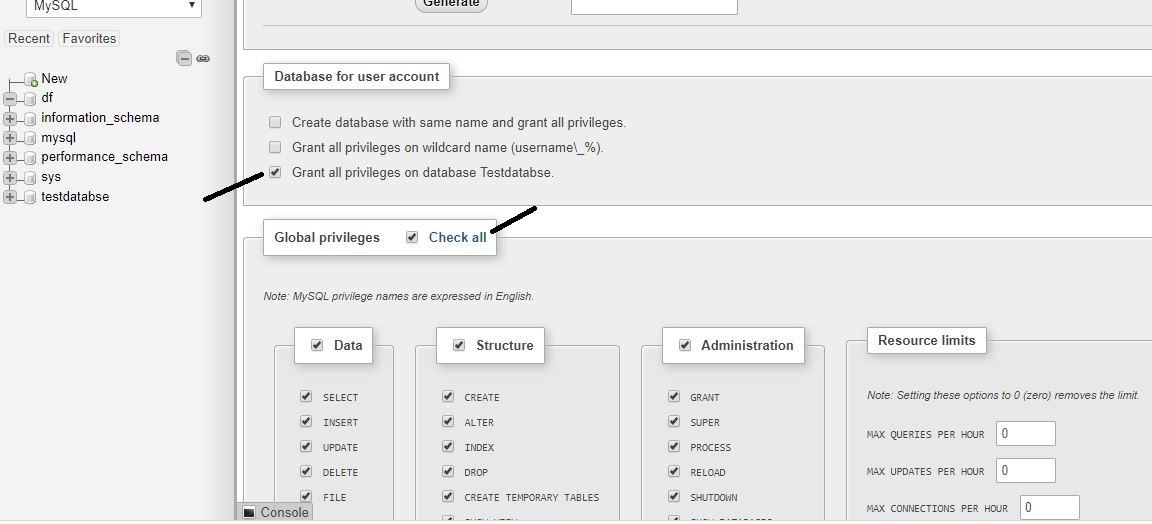
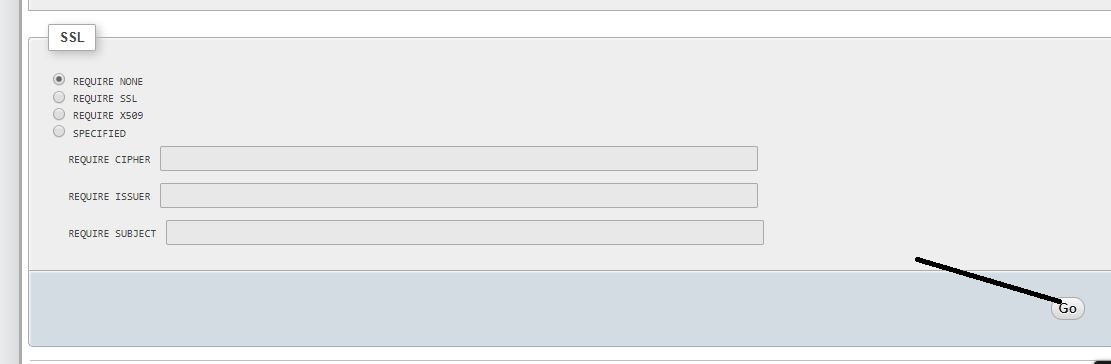
After giving the privileges, just scroll down and click on the Go button.
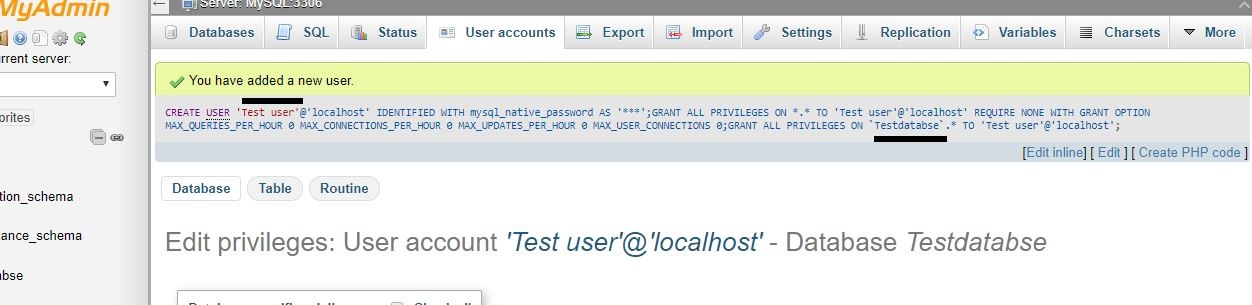
You will get the confirmation on the above of your screen that the Database user has been created successfully and assigned to the Database.
Below given like Message will flash:
CREATE USER ‘Test user‘@’localhost’ IDENTIFIED WITH mysql_native_password AS ‘***’;GRANT USAGE ON *.* TO ‘dsdsd’@’localhost’ REQUIRE NONE WITH MAX_QUERIES_PER_HOUR 0 MAX_CONNECTIONS_PER_HOUR 0 MAX_UPDATES_PER_HOUR 0 MAX_USER_CONNECTIONS 0;GRANT ALL PRIVILEGES ON `s`.* TO ‘testdatabse‘@’localhost’;
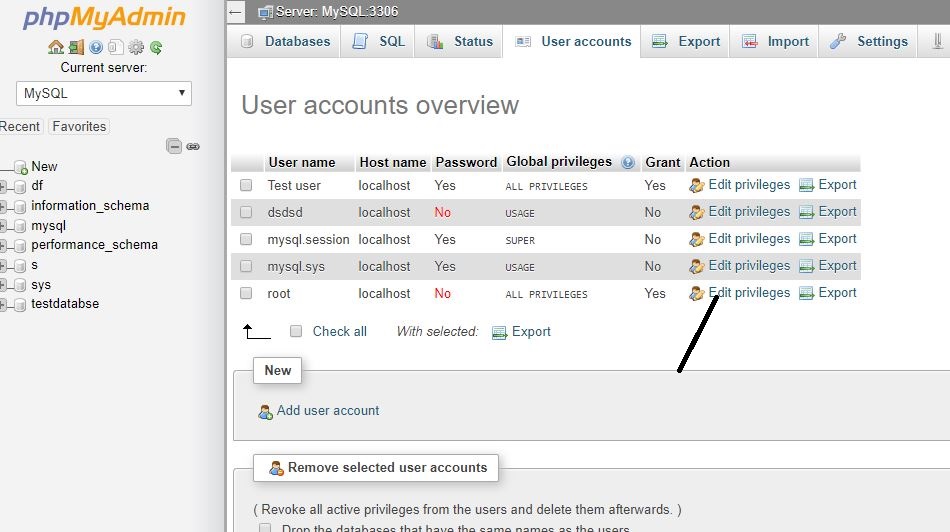
Now suppose you don’t want to create a new Database user and need to assign some old MySQL database user to your newly created DATABASE. For that follow the steps:
How to Assign an Old user to new Database in PHPMyAdmin
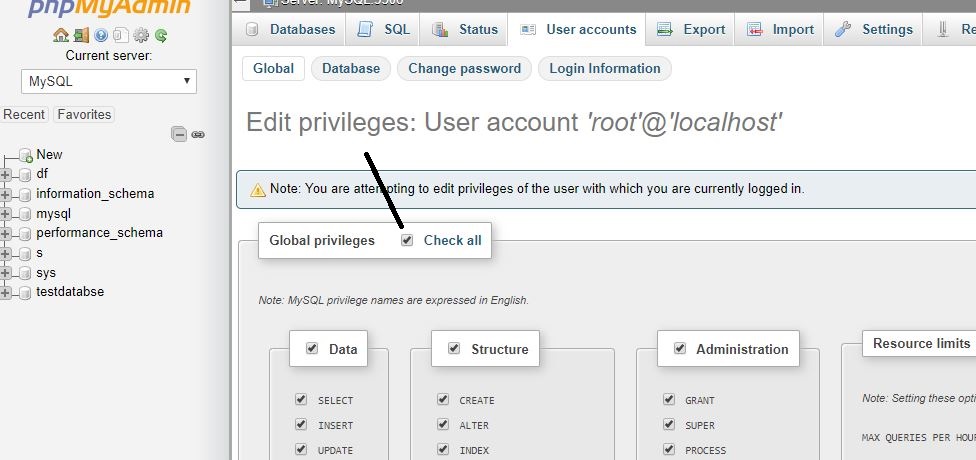
Go on User Accounts section from the Menu and then select the Database user which you want to assign your new Database. After that click on the Edit Privileges option. Here in this PHPMyAdmin tutorial, we are assigning the root user to our above created newly database.
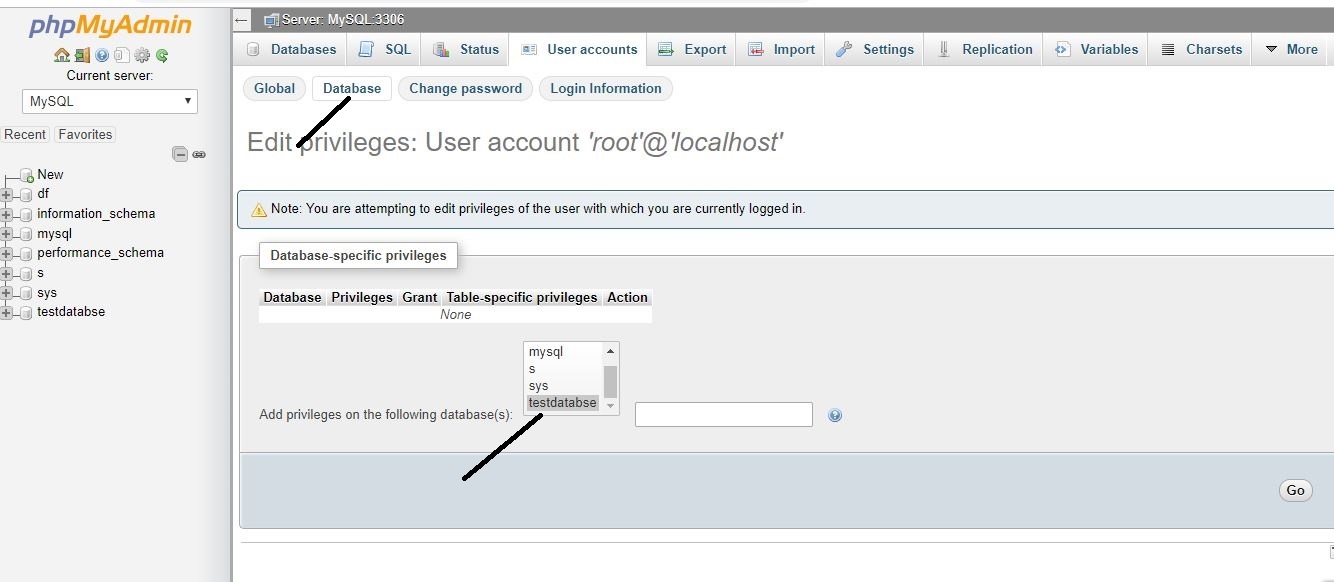
Inside the Edit Privileges, click on the box given in front of the Global privileges option and click on the Database option given under the User account section.
Select the Database you want to assign to the old user and then just click on the Go button given at the right bottom of the screen.
In this way, you can create the MySQL Databse in PHPMyAdmin.
Other Useful resources:
- Backup WordPress database with phpMyAdmin
- How to install phpMyAdmin on Centos 7 & Centos 6
- How to install & run WordPress CMS on Android web server using ksweb
- Tutorial to Install WordPress on Windows Computer Using WAMP
- How to Install WAMP server on windows 10
- How To install Second WordPress in a Subdirectory for creating Multisite
Related Posts
How to install Adminer on Windows 10 or 11?
How to install Apache, MySQL, PHP & PhpmyAdmin on Windows 10 WSL
How to Create a Database in PHPMyAdmin
How to install phpMyAdmin on Centos 7 & Centos 6
Backup WordPress database with phpMyAdmin