
Microsoft Word is undoubtedly one of the best word processing applications available out there and many people consider it as the one-stop solution for working with documents or other word processing needs. Apart from the most useful functionalities that are available on Microsoft Word, there are also a number of features, which can make it easier for you to deal with documents and save your time in the long run. Once you start mastering Microsoft word, you can get hands-on those additional features that are specially handcrafted for power users just to save time. One of the cool features that are available on Microsoft Word is the autocorrect feature, which can replace a word or phrase with another word or phrase.
This can actually be useful in a number of circumstances. For example, if you write your name in most documents from time to time, instead of writing your full name, you can just write the initials and let Microsoft Word autocomplete the same to your name. For instance, if I need to write my name, with auto-correct function, I can just write SB, and Microsoft Word will replace it with my name. On Microsoft Word, there are a number of grammatical errors and potential typos that are automatically corrected with the correct ones. However, you can also add new autocorrect entries depending upon you are own specific requirements. I will discuss, how you can do just that, here.
How you can add autocorrect entries on Microsoft Word
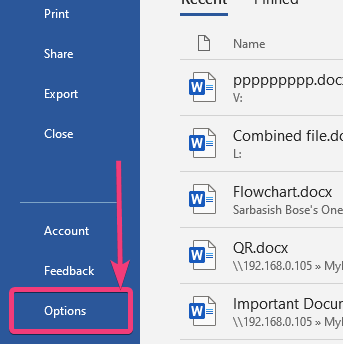
Step 1: To add a new autocorrect entry to Microsoft Word, open Microsoft Word on your computer. Click on the ‘File’ menu and then click on ‘Options’ in the File menu.
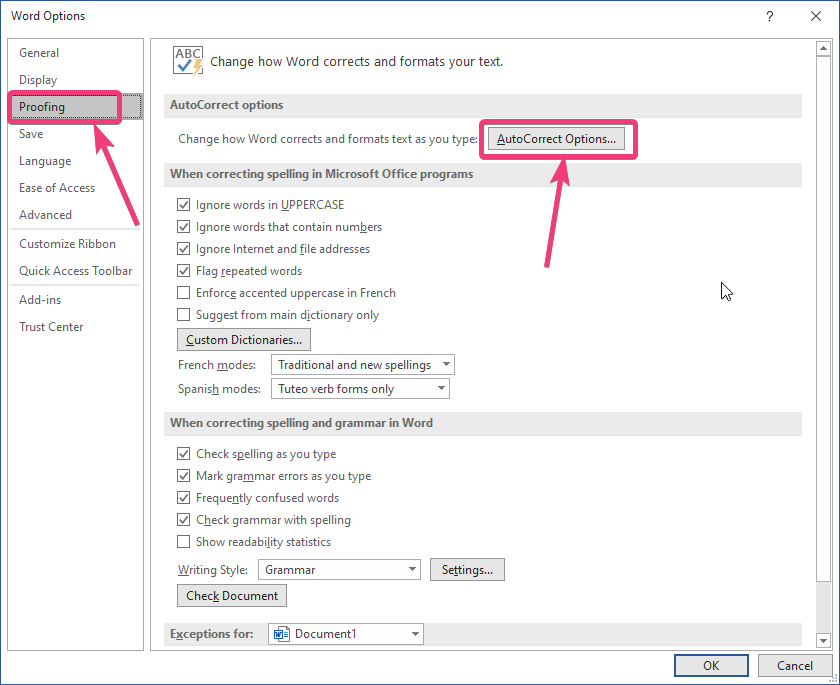
Step 2: In the ‘Word Options’, that opens up click on ‘Proofing’ on the left side, followed by the option that says ‘AutoCorrect Options…’.
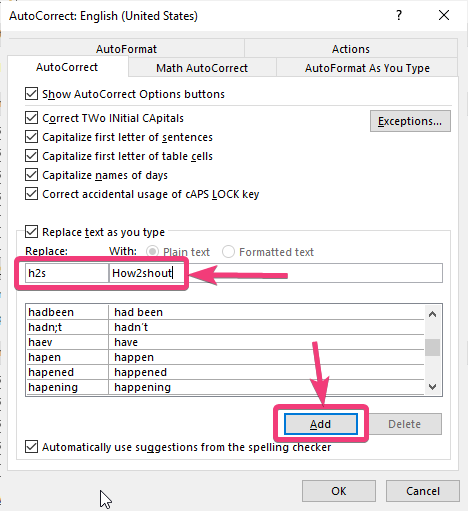
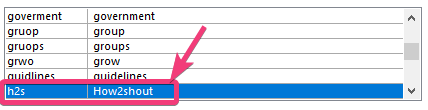
Step 3: Now, you can find two text boxes, and in the smaller textbox you have to enter the text that needs to be replaced, and in the bigger textbox, you will have to enter the text that will replace the text entered by you. Let’s make it clear to you. For example, I want to replace ‘h2s’ with ‘How2shout’. So, in the smaller textbox, I will write h2s, and in the bigger textbox I will write How2shout, and then click on ‘Add’.
Step 4: In the same way, you can keep adding multiple entries and after you are ready, click on ‘OK’.
Step 5: You can also edit or delete any of the entries that come with the installation of Microsoft Word, or those that are entered by you. Just choose any of the entries in the list, and click on ‘Delete’ to delete the entry, or you can change the entry, and click on ‘Replace’ to replace the existing entry with some new content.
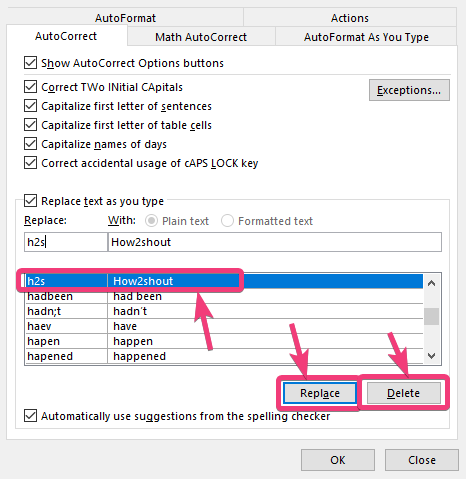
The autocorrect option on Microsoft Word is not case-sensitive, which is something that you should keep in mind. For example, I have added the autocorrect option that will replace ‘h2s’ with ‘How2shout’. But if I write ‘H2s’, ‘H2S’, or something different from the specific entry, the autocorrect feature will still work.
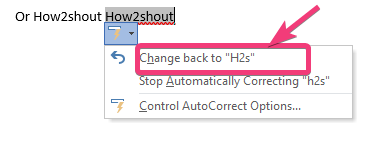
The autocorrect function will be carried out immediately after you type in space or hit the enter key after the word or phrase that needs to be replaced. However, if you do not want to use the autocorrect option in specific situations, just click on the small underline corresponding to the corrected entry, and click on ‘Change back to the previous entry’, and the autocorrect option will not work in that specific case. You can also open the ‘AutoCorrect Options…’ right from there, or prevent the specific autocorrect from working next time you type in the entry.
So, that was all about, how you can add autocorrect entries to Microsoft Word. I know that was really easy. Let me know, if you faced any problems, in the comments section below.
Related Posts
How to Reopen Closed Windows or Tabs in Firefox
How to Install Django on Windows 11 or 10
How to set Gemini by Google as the default Android assistant
How to create data bars in Microsoft Excel for numeric values
How to open HEIC images on Windows for free
How to install Server Manager Windows 11 or 10