Even though network-attached storage devices are used to store the files, you can even use it for a plethora of other purposes as long as you are having a network-attached storage device or NAS that comes with support for additional functionalities. When it comes to the Asustor network-attached storage devices, the devices are really powerful and you can even use it as a small computer, which can be accessed by all other users within the network. We all know about virtual machines, which can help us run a different operating system on our existing computer without dual boot.
What about creating a virtual machine, and you can access it by all the devices that is connected to the network or simply use the file system on that particular virtual machine so that it can be made accessible by all the users on the network. That said, you can run virtual machines on the Asustor AS6302T NAS. On the Asustor AS6302T NAS, you can run virtual machines which can’t, however, be accessed on a computer through the web interface, but you can see the virtual machine running, and get the output in a small area on the web interface. But, by connecting a USB mouse and keyboard and a display using the HDMI port to the network-attached storage, you can use it as a full-fledged virtual machine, as well. I will discuss how to do that here.
Running virtual machines on the Asustor AS6302T NAS
So, without any further delay, let’s get started with how you can run virtual machines on the Asustor AS6302T NAS.
1. Open Asustor ADM App central
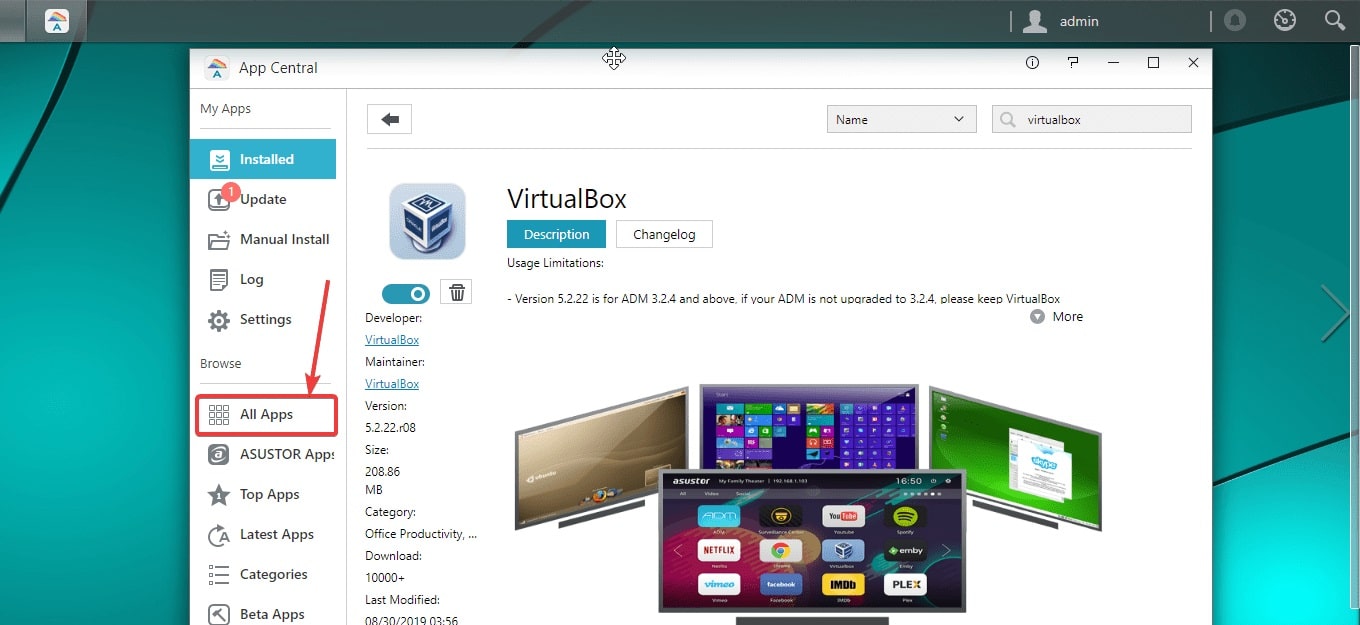
Open the web interface of the NAS, and click on ‘App Central’ where you can download your favourite apps on the NAS.

2. Access ADM All Apps
Now go to ‘All Apps’ on the left panel of the app Central and search for ‘VirtualBox’.
Next, you can download VirtualBox on your Asustor AS6302T NAS, by clicking on the ‘Install’ button right from your web browser on to your NAS.
3. Run VirtualBox on NAS
After your download VirtualBox on the NAS, you can find it in the apps section within the web interface, and you can even find the same on the monitor which is connected to the NAS. Just click on it to open VirtualBox.

4. Login to VirtualBox Web interface
Once you open VirtualBox on the NAS, from the web interface, you will have to enter the username and password. By default, both the username and password will be ‘admin’. After you enter the necessary information, click on ‘Log in’.

5. Create New VirtualBox Virtual Machine
Now you can find the almost familiar VirtualBox interface, but your ability, at least on the web interface will be limited to just initializing a virtual machine and start the installation of the guest operating system. Alternatively, you can even boot into the guest operating system from the web interface.
To do that, you will have to click on ‘New’, in the VirtualBox user interface on the NAS.

6. Type of operating system for VM on Asustor NAS
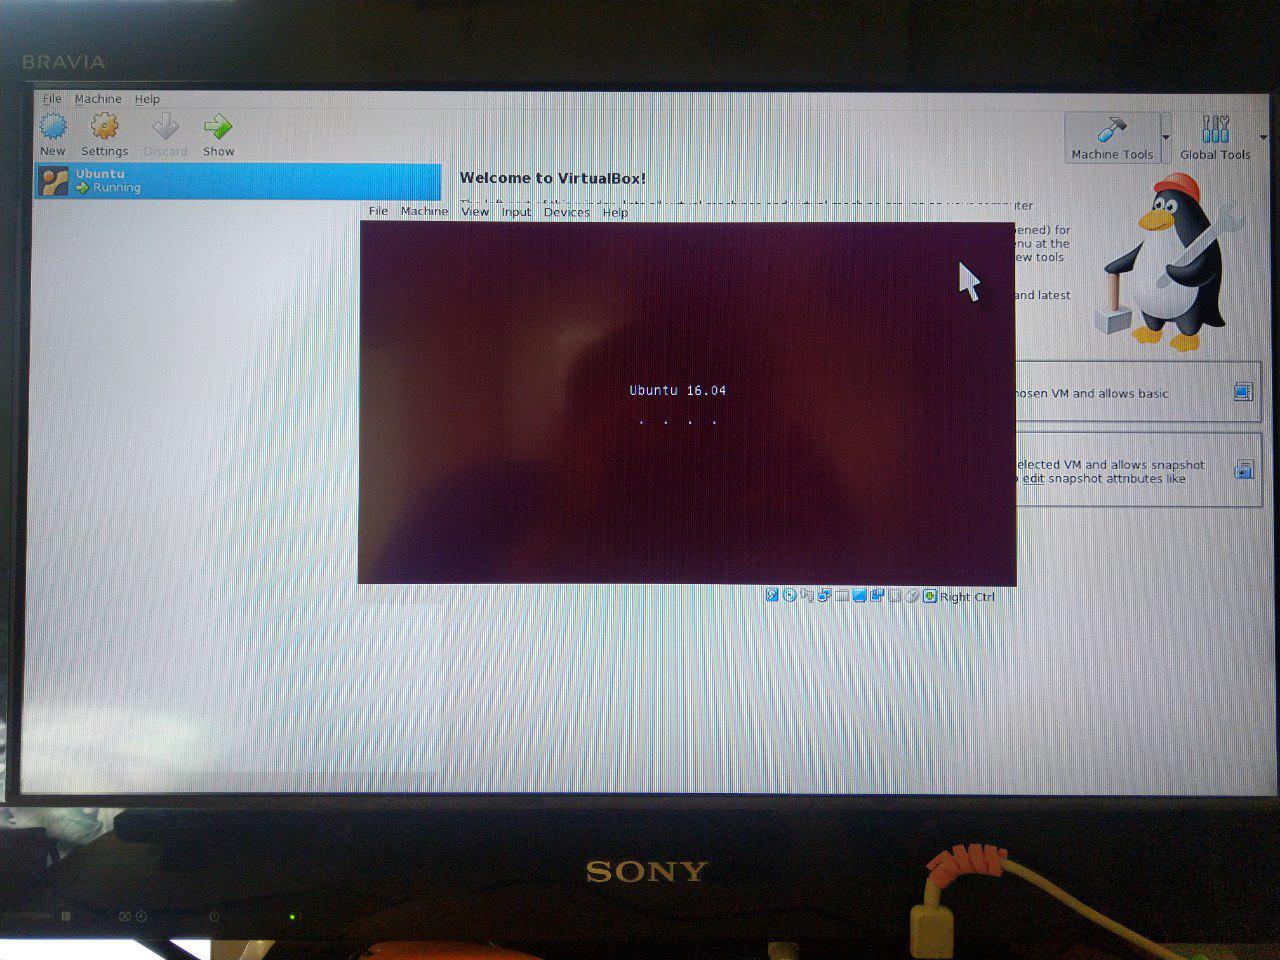
Next, you have to enter the name of the operating system that you want to install, followed by choosing the type of operating system from the drop-down menu. I am going to install Ubuntu 16.04 32 bit, and my selection will be as shown below. Now, click on ‘Next’.

7. Assign RAM
As usual, now, you will have to assign some RAM to the operating system. I will assign 1 GB of RAM. If you are using a different model by Asustor, you can assign more RAM, as well. As my model has 2 GB of system memory only, assigning more RAM might affect the performance of the NAS while carrying out other tasks. After you assign the RAM by using the slider, click on ‘Next’ again.

8. Create Virtual Drive
Next, you will have to add a hard drive. I will just let the default settings prevail, and will then click on ‘Create’.

For the hard disk file type, you can choose VDI, which will be the default option, and then click on ‘Next’.

For the storage on the physical drive, I will choose ‘Dynamically allocated’, as that will only use the space on the physical hard drive when it is necessary. After that, click on ‘Next’ again.

You have to now choose the amount of storage the virtual machine will have. As I am having a total of 4 TB on my NAS, the storage isn’t a big problem, and thus, I am assigning 120 GB. You can assign more or less, depending upon how much space you can spare, on your NAS. Finally, click on ‘Create’.

Now, the virtual machine is configured, and you can find it, in the list of virtual machines. Just select it, and click on ‘Start’ to boot into it.

After you boot into the virtual machine, click on the small ‘Browse’ button to choose the bootable ISO containing the operating system, and click on ‘Start’. Note that the bootable ISO or any other CD or DVD image should be on the NAS.

Next, you can find a preview of the NAS, running the virtual OS in the web UI, and you can even take a screenshot. But, you can’t send any input or maximize the size of the output that is being displayed.

To be able to send inputs, and get an output, you will have to connect the NAS to a display, using the HDMI port placed at the back of the NAS.
After the display is connected, you can see the user interface, and use the VM in the usual way.
So, this way, you can run virtual machines on your Asustor NAS. But, needless to say, you can’t expect the same level of performance that you can get by running the same virtual machine on your computer, which, typically will have better overall hardware to power a virtual machine. I have tried numerous operating systems, but I was unable to install Windows 7. But you can run most Linux operating systems without any hassles.
So, that was all about, how you can run virtual machines on the Asustor AS6302T NAS. Do you have any questions? Feel free to comment on the same below.
Other Articles:
- How to install RemoteBox VirtualBox Management tool on Windows 10
- Mount virtual hard drives on VirtualBox and VMware Workstation
- Tutorial to use hyper-v to install Linux Virtual machine on Windows 10
- How to use a virtual audio cable

Nice tutorial! Do you know how to autostart VM after reboot NAS?
Hi,
actually it is possible to access the console of the running guest OS even without HDMI. Just allow RDP on the NAS, that is, in VirtualBox, Display, Remote Display, enable server, server port, net address (IP of your NAS), and no authentication. Then you can access the remote display, even on an OS to be installed, from a RDP client.