In certain situations, using auto-login in Windows 11 makes sense such as Kiosk or production environment which are often operated via touch screen or hand scanner. It would be very annoying there if a password had to be entered when restarting. Also, if you have only access to your Windows 11 machine and don’t want to enter the password again and again, then setting login automatically will be handy to save some time.
Well for general usage, it is always recommended to use at least one password that a system must ask to let the user access machine.
If you have administrative rights on Windows 11, there are two ways you can use to activate auto login in Windows 11 without additional software. One is by using the User Accounts console and the other via the Windows registry, here we discuss both methods and show you how to use them.
Enable automatic login in Windows 11
Requirements
• Windows 11 or 10
• Administrator user access
You may want to know: How to automatic login Windows 10 without entering a password
#1st method using User accounts
Open Windows 11 Setting
Either in your Windows 11, search box type Settings and open it when the icon appears for the same, or simply press the Win+I key on your keyboard. After that Select Accounts and then “Sign-In with Options“.
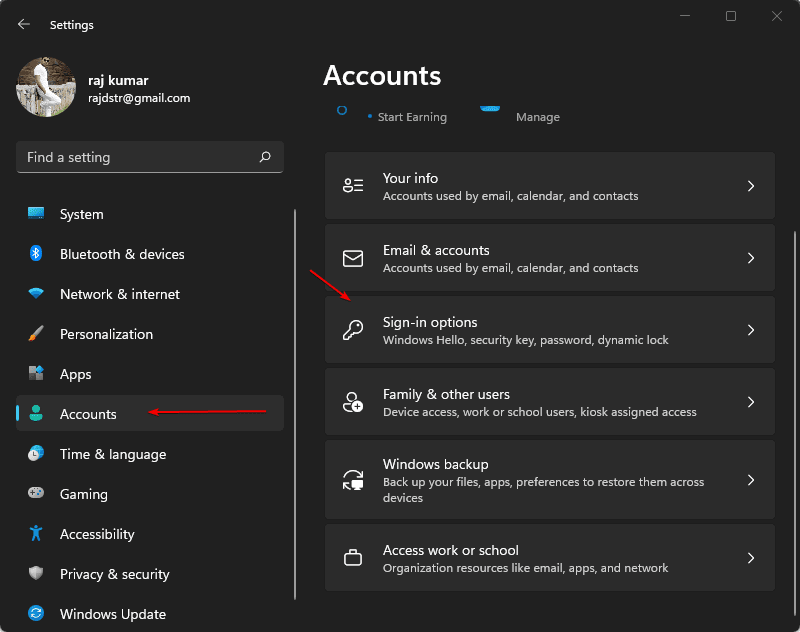
By default, if you have not set any PIN (Windows Hello), the toggle button given in front of – “For improved Security, only allow Windows Hello sign-in for Microsoft accounts on this device (Recommended)” will be greyed out. Hence, you won’t be able to turn it ON. Therefore, to enable it first we have to create a Hello Pin on our Windows 11 PC. Follow the next step for that.

Create PIN (Windows Hello) on Windows 11
On the same place, where the toggle button is, scroll upside and select option “Pin (Windows Hello) sing in with a pin recommended)“.
Click on the Setup button and then enter your Windows 11 password. After that create a PIN that you want to set up.
Once done close the Settings Window.

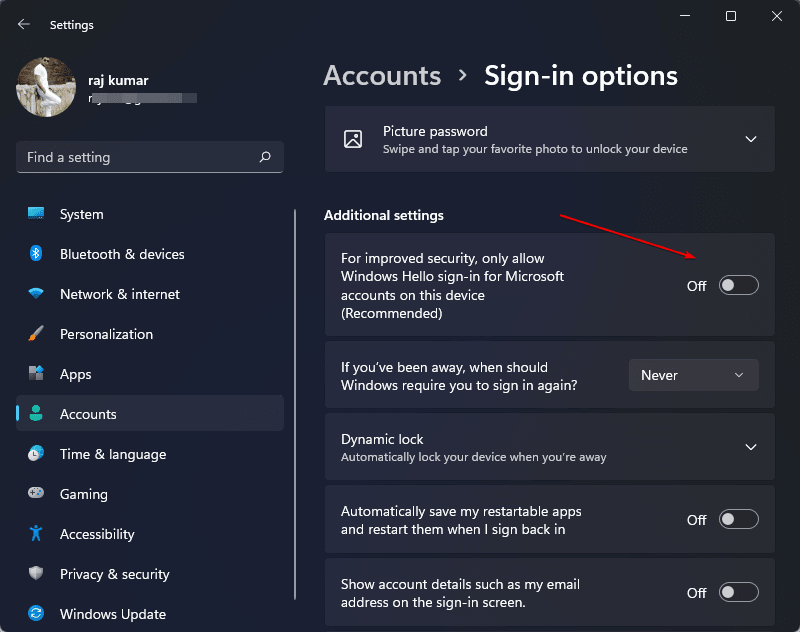
Turn Off Windows Hello Sign-in
Again open Windows 11 Settings- Win+I. Accounts ⇒ Sign-in option ⇒ Click on the Toggle button to turn it OFF.
Open User Accounts on Windows 11
In this method we can set the automatic login directly from the User accounts console, hence there is no need to mess with the Windows registry.
Simply press Win+R keys on your keyboard to open the RUN box.
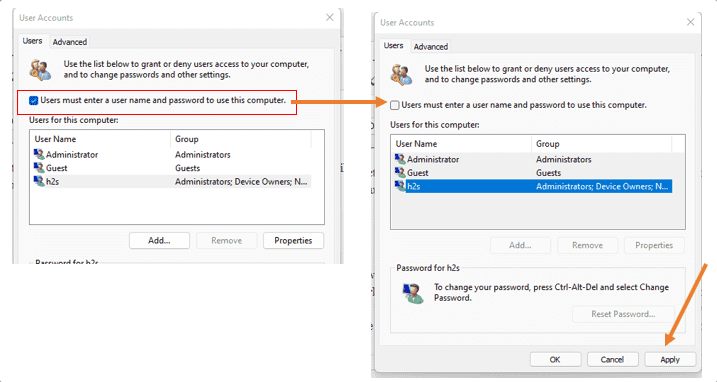
In the Run dialog enter the command “netplwiz“.

Allow users to log in without a password
All the created and activated “User Accounts” so far available on your Windows 11 will show there. Now, uncheck the box given for “User must enter a user name and password to use this computer.” and then click on the “Apply” button.
Remove Hello PIN
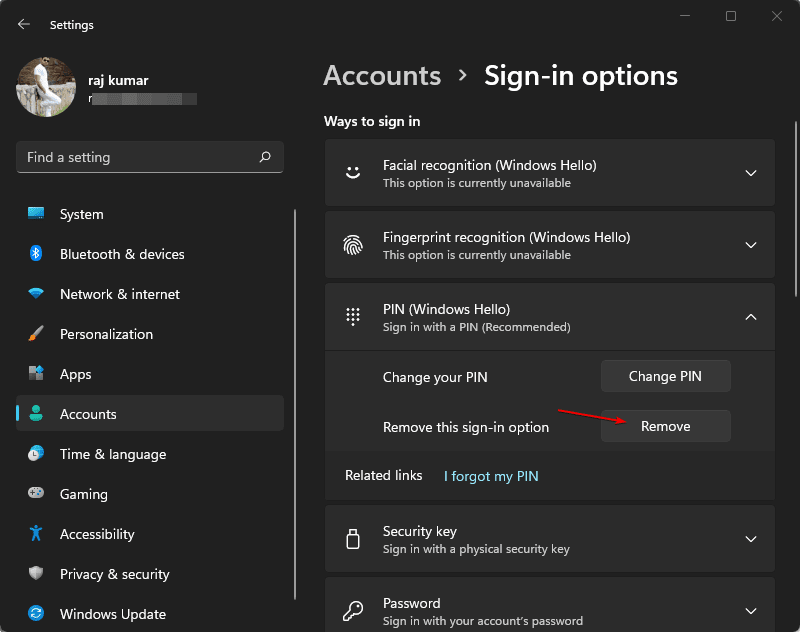
Also, remove the Hello Pin you have set for your system if you don’t want to use it. Go to Windows Setting- Win +I and then select “Account“, click the PIN (Windows Hello) and click on the Remove button.
At this point, you have now successfully set up the auto-login in Windows 11 for your user. Now, every time you restart your system, it will not ask for your system password to log in.
#2nd method using Registry
Configure Windows 11 auto login via registry
The method described above executes, in the background can also be done manually via the registry. The following method only has one “small” disadvantage: The user password is stored in plain text in the Windows registry database, so it can theoretically be viewed by everyone. If that is not a problem, then you only need to change or create the following values in the registry if they do not already exist.
Step 1: Press Win + R and enter the regedit command.
Step 2: Navigate or directory enter the given path:
Computer\HKEY_CURRENT_USER\Software\Microsoft\Windows NT\CurrentVersion\Winlogon
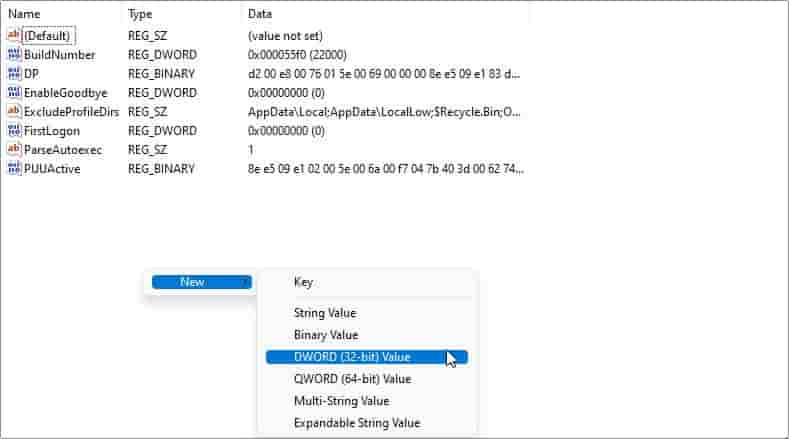
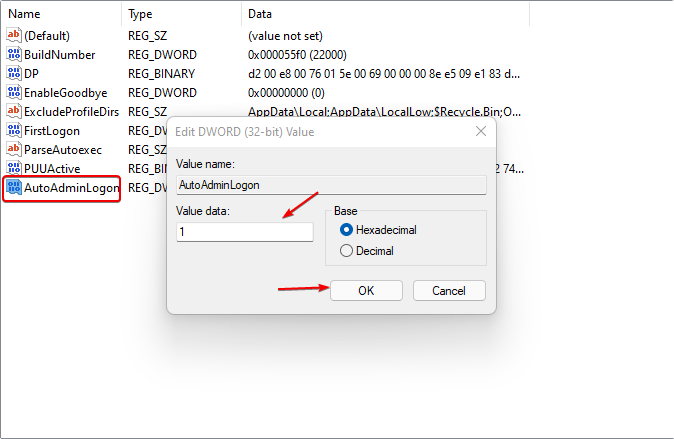
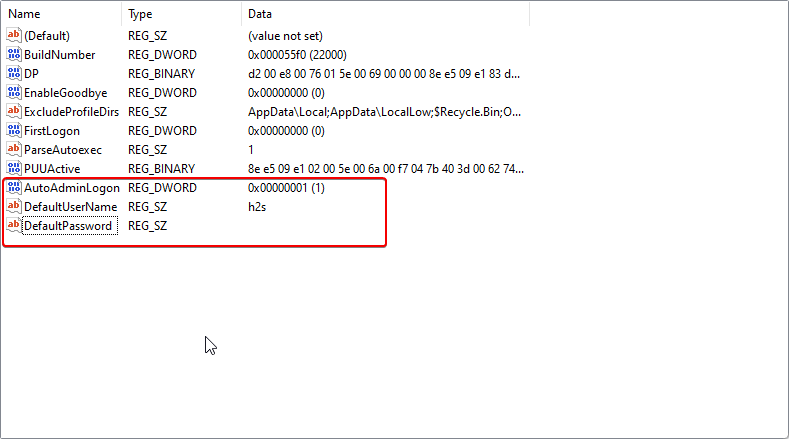
Step 3: Create a new entry. Right-click on somewhere on the white space, New, and select DWORD (32-bit) Value. Rename the value as AutoAdminLogon
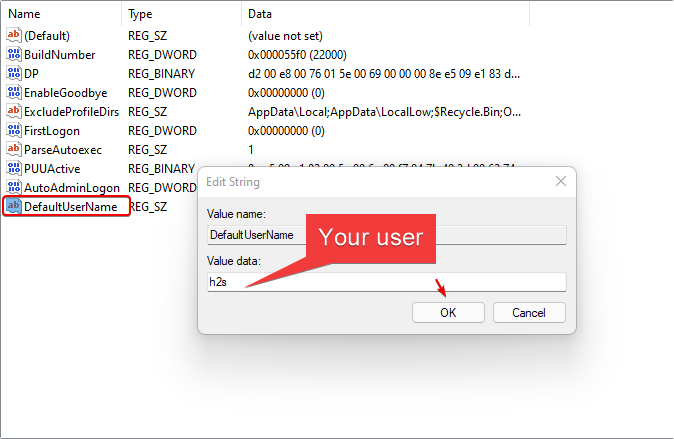
Step 4: In the same way, create another String Value entry. Right-click, select String Value. Change the name of the created value as given.
DefaultUserName
Double click it and enter your system user name.
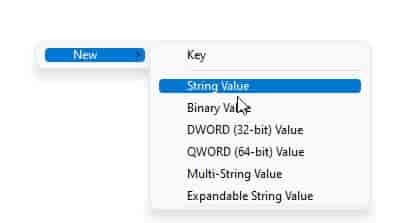
Step 5: Again create a String Value to save your current user’s password.
DefaultPassword
In the end, you have three new values. Close the registry and restart your computer to log in without a password on Windows 11.
Disable auto-login in Windows 11
In the future, if you want to again your system to ask for a System password then again open the user account management again via netplwiz and activate the field ” Users must enter user name and password ” again, or you set the above registry entry ” AutoAdminLogon ” to the value “0“. Immediately after the next start, a password is required again.
So these were two simple ways for turning ON or disabling the Windows 11 Auto login feature with the help of User accounts or Registry.
Related Posts
How to Reopen Closed Windows or Tabs in Firefox
How to Install Django on Windows 11 or 10
How to open HEIC images on Windows for free
How to install Server Manager Windows 11 or 10
Install Remote Server Administration (RSAT) Tools for Windows 11 or 10
Get back the Missing Show Desktop icon in Windows 11