We end up spending a lot of time searching for the best tools for different requirements. One of them is finding the best screen recording tool. Well, screen recording can be implemented for a number of reasons, and each of the screen recording tools come with some unique options suited for different purposes. But if you need some quick screen recording and don’t want to spend time searching for the most appropriate one, VLC Media Player can be used as a quick free and open source screen recording tool.
There is no doubt that you can’t get a number of options with screen recording with VLC Media Player, but it can be enough for some simple requirements. Most users use VLC Media Player just for the purpose of watching videos and for some music listening sessions. But VLC Media Player can be used for recording a tutorial, and send it to your friend or upload it to the YouTube. But if you need to annotate the recorded video, you should go for some freeware or some other premium tools for the purpose. But the screen recording on VLC Media Player works pretty fine.
So without further delay, let’s get started with the tutorial. I know you will thank me later.
Steps to use VLC Media Player free screen recording tool
Step 1: To capture the video along with audio in VLC, first of all, open VLC Media Player on your computer, and click on ‘Media’. Now click on ‘Open Capture Device…’ from the menu. You can even hit the shortcut key ‘Ctrl+C’.

Step 2: Now in the window that appears, choose ‘Desktop’ in the drop-down menu corresponding to the ‘Capture mode’. Set the frame rate to 30.00 f/s or any other value as per your requirements. 30 fps is the most suitable one, which most device can record and handle effortlessly. You can even click on ‘Show more options’ to configure some advanced settings for your screen recording.
Now click on the drop-down menu beside ‘Play’, and choose ‘Convert’.

Step 3: In this section, you will have to choose the output format for your converted video file. After that choose the output destination and filename by clicking on ‘Browse’. Now the next step is important. Not all the output formats worked correctly for me. I found some choppiness and frame drops.
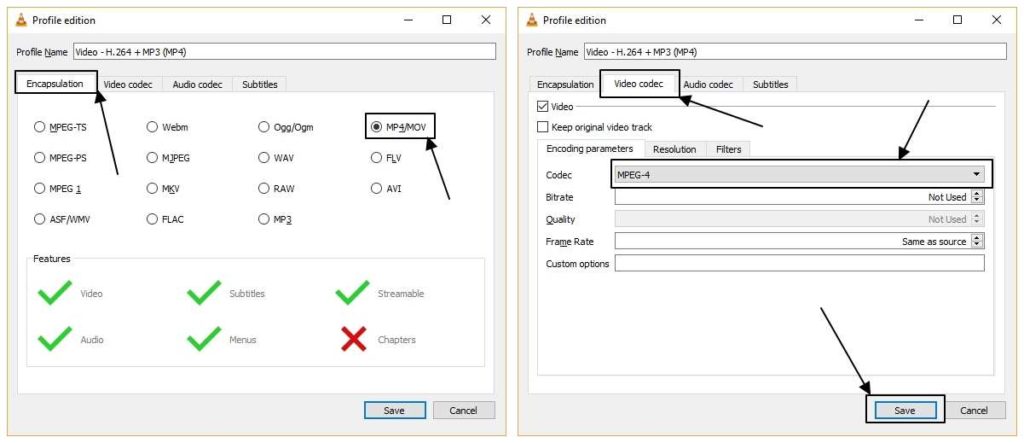
I will better recommend you to choose ‘Video – H.264 + MP3 (MP4)’. Now you will have to customize the format by clicking on the small gear icon.

Step 4: In the window that appears you will find Encapsulation, which should be set to ‘MP4/MOV’. Set the Video codec to ‘MPEG-4’ on the next tab and click on ‘Save’.

*You can even choose any other video codec and encapsulation for different various requirements. But if you do not have a lot of knowledge on video conversion formats and codecs, the above setting should work perfectly for you.
Step 5: Now you can click on the ‘Start’ button to start recording the video.
Step 6: VLC Media Player will not be automatically minimized like other screen recording tools after the recording starts. You will have to do that manually. Once the recording gets completed, you will again have to restore VLC Media Player and stop the recording by clicking on the ‘Stop’ button on the VLC Media Player interface.

Step 7: Now you can find the output file in the destination, which was previously set by you before recording.

You can use any other tool to chop the beginning and the end. The same can also be done with VLC Media Player with the record option. I will cover that in a new tutorial. This small tutorial can surely be helpful for your everyday screen recording requirements.
You may want to know about:
- How to convert media files with VLC Media Player to Mp4, Mp3, Mkv & more
- How to install Android Studio on Ubuntu or other Linux distributions
- How to send and receive text messages on pc without a cell phone
- How do I save a PDF without the password?
Hope the tutorial was helpful for you. Have questions? Feel free to comment your questions down below.

Related Posts
10 Best Screen Recorders for Windows 10 or 11
AverMedia Live Gamer portable 2 plus (LGP2+ GC513) review
Use Windows 10 Xbox Game bar to Record screen while browsing
How to change videos audio track to change the language on VLC for Fire TV Stick
How to record screen on a Windows computer using ShareX tool
How to route audio from VLC and Media Player Classic to specific audio device