Git LFS (Large File Storage) is an open-source Git extension developed by GitHub. It is created to handle files that are large and cannot be managed easily by Git itself. Git LFS replaces large files in your Git repository with small “pointer” files and stores the actual file contents on a separate server like GitHub.com or GitHub Enterprise.
This extension is quite helpful for teams working on projects with large binary files, such as images, videos, audio files, and datasets. And if you don’t save them on some remote server then these files can quickly become a burden on your Git repository, making it slow and unwieldy.
Hence, with Git LFS, developers can version control large files efficiently without impacting the performance of your Git repository. Git LFS is compatible with popular Git hosting services such as GitHub, GitLab, and Bitbucket.
Steps to install git LFS in Amazon Linux 2 using the command terminal
1. Update Amazon Linux 2
First, run the system update command to install the available security updates and refresh the added repositories’ YUM package index cache:
sudo yum update -y2. Install the amazon-Linux-extras package
To install git LFS we need to the EPEL repository and to add that first need to install an Amazon Linux 2 package called Amazon-Linux Extra which includes all the major repos or packages we are required to add to our Linux system including EPEL.
sudo yum install amazon-linux-extras3. Enable EPEL Repository
After adding the Amazon Linux extras package use it to install the third-party EPEL (Extra packages for Enterprise Linux) repo. On your command terminal, run the given command:
sudo amazon-linux-extras install epel -yAlso, run the update command once more:
sudo yum update4. Installing git LFS in Amazon Linux 2
After enabling the EPEL repository we can easily install the GIT LFS package on the Amazon Linux EC2 server using the YUM package manager. On your Terminal run:
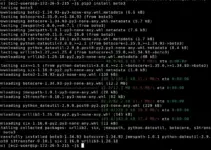
sudo yum install git-lfs
Once the installation is completed to check the Git LFS version we can run:
git lfs --version5. How to use Git LFS
After installing the Git LFS you can check out its man page to understand its commands on GitHub. To get a quick idea, users can also use the given command:
git lfs helpHowever, here is the overview of the steps involved in start using Git LFS.
1. Initialize Git LFS in your Git repository: For that switch to the root directory of your Git project and then run the given command to initialize Git LFS once for your Git repository.
git lfs installThis command will set up Git LFS in your repository and configure Git to use Git LFS for large files.
2. Configure Git LFS: We need to create a .gitattributes file in the root directory of the Git repository to configure Git LFS to track the specific types of files that we want to store in the remote server. Once the file is created add the file types that you want to track with LFS.
For example, if we want to track all files with the .mp4 extension, we can add the following line to your .gitattributes file:
*.mp4 filter=lfs diff=lfs merge=lfs -text3. Add and commit large files: After configuring the .gitattributes file with the types of files we want it to track, you can add and commit large files to your repository as you would with regular files. Git LFS will automatically replace these large files with pointer files and upload the actual file contents to the Git LFS server.
4. Push and pull changes: When you push or pull changes from your repository, Git LFS will handle the transfer of large files in the background. If you’re pushing changes to a remote repository, you’ll need to ensure that Git LFS is installed and configured on the remote server as well.
It is recommended that you should use Git LFS for files larger than 100MB because, for smaller files, it may be more efficient to store them directly in Git.
Other Articles: