scikit-learn is commonly known as sklearn, it is not only powerful but also widely used as a machine learning library in Python programming. It provides developers with various tools for data analysis, data preprocessing, classification, regression, clustering, and more. Here, in this article, if you are a beginner, we learn the process of installing scikit-learn using the pip package manager.
Step 1: Open a Terminal or Command Prompt:
Depending upon the operating system you are using, you can use Terminal (on macOS and Linux) or the command prompt (on Windows). Because to use Python’s PIP package manager we need to run commands.
Step 2: Set Up Your Python Environment:
To install sklearn we need Python and its package manager on our system pre-installed. I am assuming that you have both that’s why you are looking for a tutorial to install scikit-learn using PIP.
However, those who don’t have them already can see our article – Python & PIP install on Linux and Windows.
(optional) Also, it’s a good approach, if you use virtual environments to isolate your Python projects. You can create a virtual environment using tools like virtualenv or venv to install scikit-learn within that environment.
So, those who want to set up a virtual environment can follow these steps otherwise move to the next one:
Install the Virtualenv package:
sudo apt-get install python3-venvUse the given command and create a new Python virtual environment:
python3 -m venv testenvOnce the virtual environment is created, to activate it run:
source testenv/bin/activateNote: testenv is our environment name you can give something else if you want:
Step 3: Install scikit-learn using pip
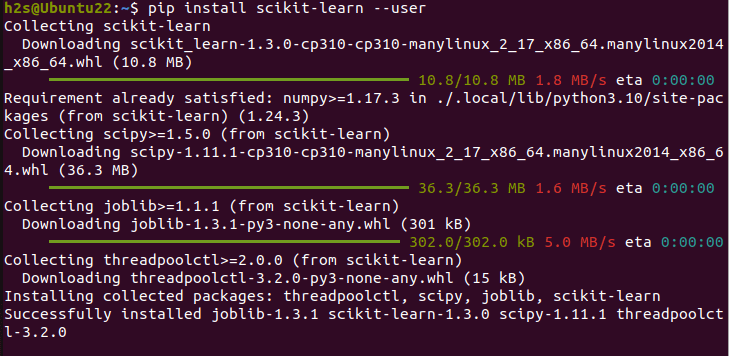
Once you have Python and PIP on your system we can easily, we can easily install scikit-learn it. Just execute the given command in your command terminal.
pip install scikit-learn --userPress Enter, and pip will start downloading and installing scikit-learn along with its dependencies. The same can be seen on the screen indicating the progress of the installation. Once the installation is complete, you’ll see a message confirming the same.

Step 4: Verify the Installation
When the installation is completed successfully, let’s verify Sklearn using a Python interpreter.
Open a Python interpreter by typing python in the terminal or command prompt and pressing Enter.
python3Once you’re in the Python interpreter, import scikit-learn and check its version:
import sklearnprint(sklearn._ _version_ _)
The output should display the version number of the installed scikit-learn library.
Upgrading sklearn
To upgrade scikit-learn to its latest version whenever a new one is available, use the given PIP command
pip install --upgrade scikit-learn
Conclusion:
By following this tutorial you wi have scikit-learn using pip quickly, it doesn’t matter which operating system you are using, however, Python & PIP must be on your system. With scikit-learn installed, you can explore various algorithms, build predictive models, and perform data analysis tasks with ease.


