Instagram has many features which users can use to play around with their clicked image to show more creative stuff to the world. A few months back the Instagram had introduced the Focus feature that gives a sufficient amount of Blur to your selfie pictures in order to give a touch of DLSR photography. However, this feature can only be used in the live camera. Means images those clicked using the Instagram app in a live mode but what about the other pictures? It is not possible everytime to click images within the Instagram app, so there is a solution called Tilt-Shift which is enough sufficient to blur out the part of the picture on Instagram. Hence, let’s see how to blur the background or create a bokeh effect in pictures on Instagram for both Android and iPhone.
The glance of the steps you need to follow:
- Go to Instagram.
- Tap on the plus sign (+) to create a new post.
- Select the Picture you want to upload on the Instagram.
- At the beside the Filter option, you will see EDIT, tap on that.
- Scroll the option towards the right side and you will see TILT SHIFT, tap on that.
- Two blur effects: Liner and Radical blur option will be there.
- Select one according to your image or scene requirement.
- Once the blur effect applied successfully.
- Tap on Done and share the Image on Instagram.
Comprehension of the above steps with screenshots:
Step 1: Open the Instagram app on your Android or iPhone smartphone from the menu. In case you are new to Instagram then you have to create an account and log in with the same credentials to work with it.
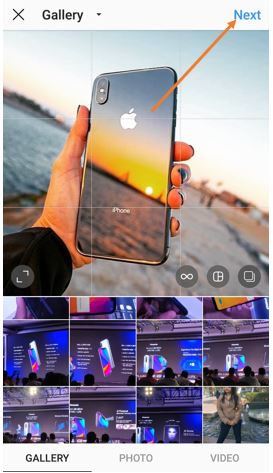
Step 2: Once you there, tap on the plus (+) sign given in the square box to at the bottom of the center to create a post for Instagram.

Step 3: Select the image you want to post on Instagram and tap on the NEXT button.
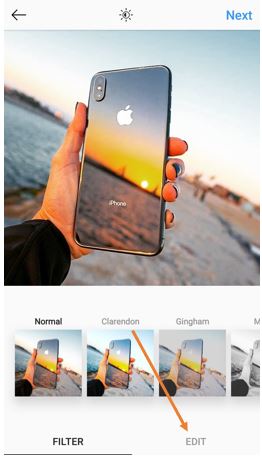
Step 4: Tap on the Edit button to perform some editing on the picture.
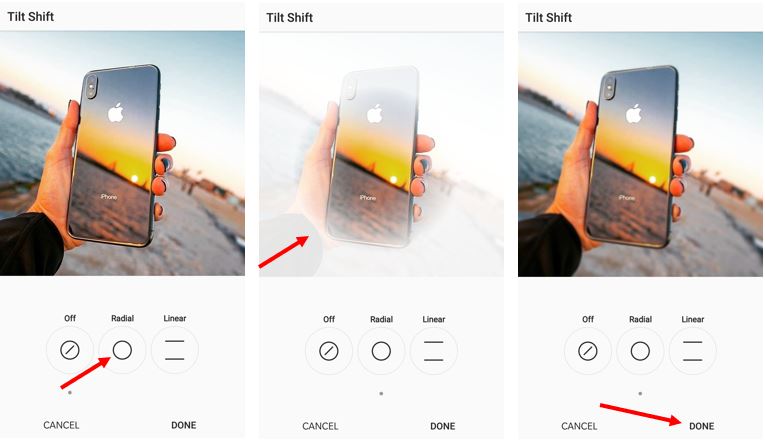
Step 5: Scroll the options to the left side and tap the Tilt-Shift option of the Instagram.

Step 6: Under the Tilt-Shift editing tool you will find two types of options one is Radical and the other one is Linear.
Radial: This option will allow you to blur out the parts of the image but in a circular pattern, means the center part of the circle will remain clean while the rest of will burred out from the photograph. To use this tool, just use the two fingers in or out to adjust the area of the picture to blur. For reference, how to do it, see the below screenshot.
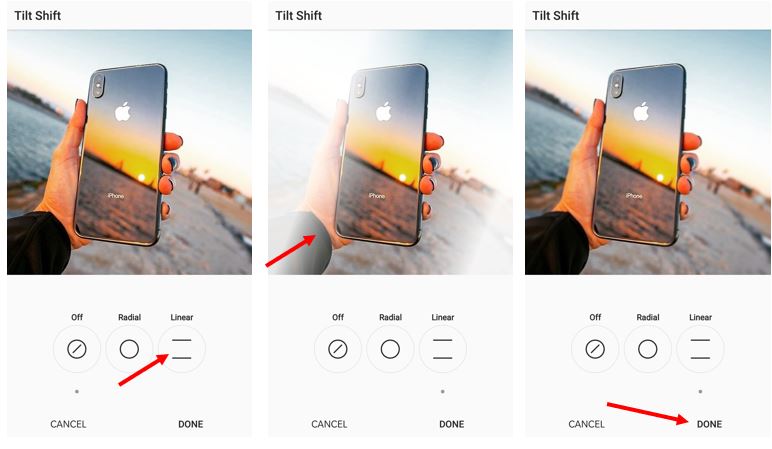
Linear: It is the second blur effect option in Tilt shift of the Instagram which allows a user to implement the blur effect on the images but in a linear contour. Just like the Radical blur we mentioned above, here you also have to use your finger in the same way you used to zoom in or out some photographs. Select the amount of area you want to cast under the blurry effect.
Once the effect added just Tap on the DONE option and post the picture on Instagram.
In this way, you can add some amount of blurriness in any picture you about to post on Instagram on the fly.
Other useful resource
- How to Use AfterFocus App to Blur the Photo Background in Android
- How do you get the blur effect on Snapseed?
- How to blur the background to get bokeh effect after capturing a photo
- How to use both front and back camera using the app on Android phone
- TikTok app review (musical.ly): Let’s find out its Pros and Cons?
- 10 Top Bokeh Effect Camera App for Android:
- How to hide Whatsapp chat without archive in GBwhatsApp: Android

If you does not purchase an expensive DSLR blur camera to capture/snap the auto blur image. But don’t worry we solve this problem freely