The OwnCloud server is an open-source cloud storage solution with multimedia playing and file-sharing capabilities. It can be installed on Linux platforms without any problem and has to be for proper performance and stability. However, users familiar with the Windows operating system install the Owncloud server using Windows’s IIS web server or third-party software like XAMMP or WAMP servers. But in this tutorial, we will not use any of them to install the Owncloud server on Windows 10 or any virtual machine software like Virtualbox/Vmware. Instead of the traditional method, we use the Windows Subsystem for Linux (WSL) for better stability and performance. The Linux environment app which we will use for it is Ubuntu. Let’s see how to do this. The latest version of the OwnCloud while this tutorial was Owncloud 10.1.0.
Install Owncloud Server on Windows 10 via Ubuntu
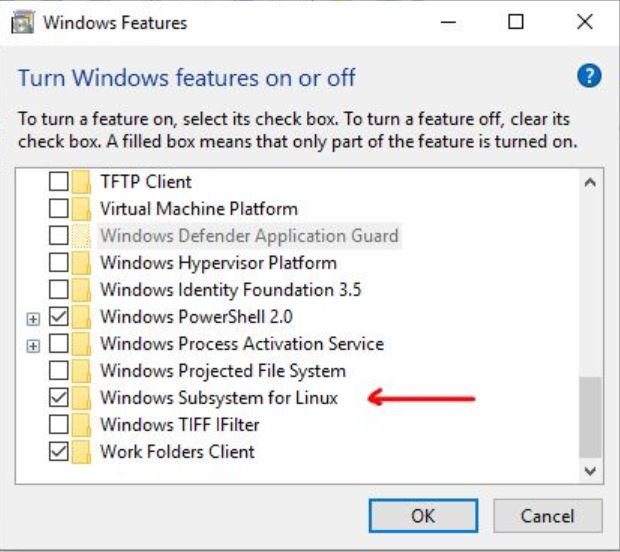
Step 1: Enable the Windows Subsystem for Linux (WSL)
To enable the Windows Subsystem for Linux feature on Windows 10, go to the Search box, type “Turn Windows feature on or off,” click on that as it appears, and enable the WSL (Windows Subsystem for Linux) feature: For more info on this, see: Enable the Windows Subsystem for Linux feature
Step 2: Install Ubuntu 20.04/22.04 Linux App
From Windows 10 search box or the program, list search for the Microsoft store. When the store opens, search for Ubuntu to download and install. After installing, click on the Launch button, which extends the Ubuntu bash or command screen from where we can use all Ubuntu commands except a few directly on Windows 10.
Step 3: Install Apache, MySql/ MariaDB plus PHP on Windows 10
Before installing the Owncloud 10.1.0. we need to set up a web server environment and a LAMP setup. Here is the command which we need to execute for installing Apache+PHP+MariaDB. Copy and paste the below one using the right mouse, click, and then hit the enter button.
sudo apt-get install apache2
sudo apt-get install mariadb-server
sudo apt-get install php libapache2-mod-php php-mysql php-gd php-json php-curl php-xml php-zip php.mb
sudo apt-get -y install libmcrypt-dev
Owncloud also needs one more PHP extension, i.e., the intl extension, so install that too.
sudo apt-get install php-intl
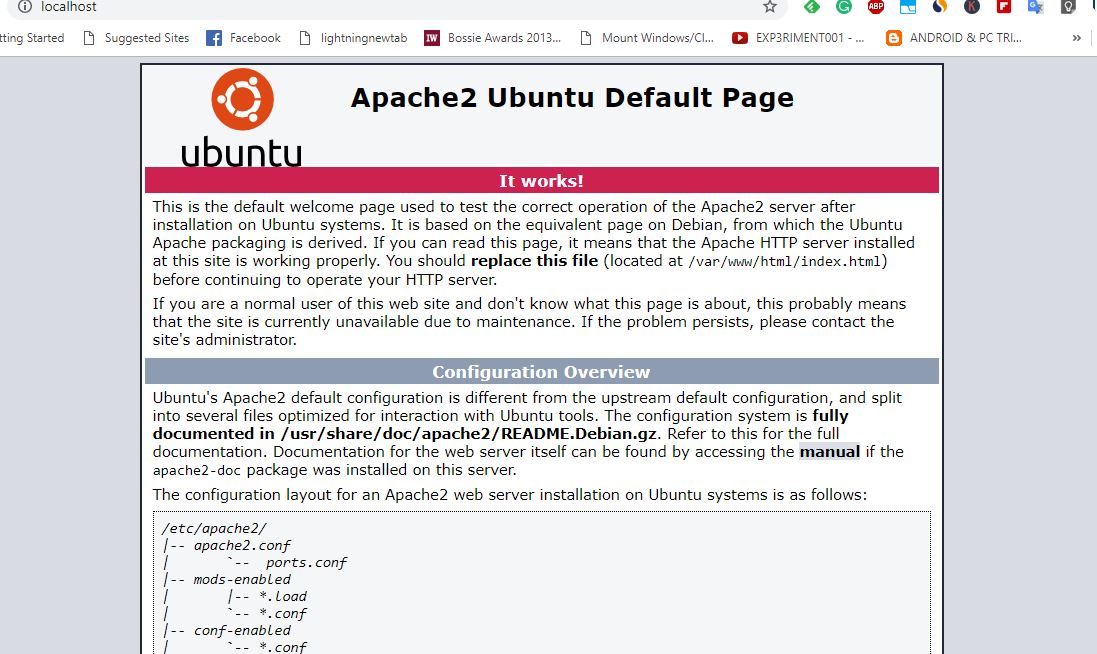
Step 4: Check your Windows 10 Apache installation
To check whether our Apache server is working, go to your Windows 10 browser and type http://localhost/ or http://127.0.0.1/ or the IP address of your Windows 10 local machine. You can find out the IP address by typing Ip a. As you enter the IP address, the Apache testing page will open, which means everything is fine and time to move to the next step.
Step 5: Download the Owncloud server
Here is the command to get the files required for setting up OwnCloud:
sudo apt install wget unzip
wget https://download.owncloud.com/server/stable/owncloud-complete-latest.zip
unzip owncloud-complete-latest.zip
sudo mv owncloud/ /var/www/
sudo chown -R www-data:www-data /var/www/owncloud/
The above commands automatically download and extract the Owncloud files under the Apache directory.
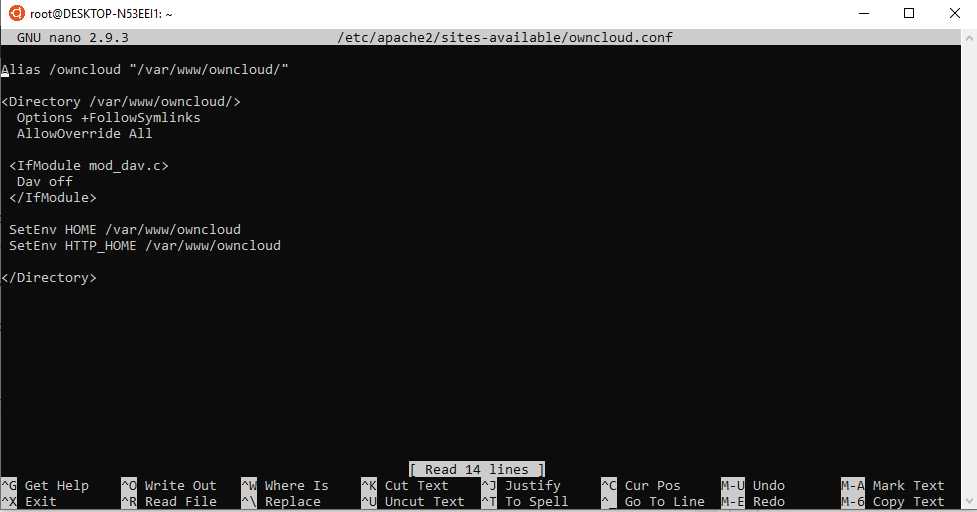
Step 6: Create an Owncloud configuration file for Apache
Now create an Owncloud configuration file using the below command:
sudo nano /etc/apache2/sites-available/owncloud.conf
And then, add the following lines to point the Apache root directory toward the Owncloud.
Alias /owncloud "/var/www/owncloud/"

<Directory /var/www/owncloud/>
Options +FollowSymlinks
AllowOverride All

<IfModule mod_dav.c>
Dav off
</IfModule>

SetEnv HOME /var/www/owncloud
SetEnv HTTP_HOME /var/www/owncloud

</Directory>
After adding the above lines, press Crtl +O to write the files and CTRL+X to save and exit.
Step 7: Create a symlink for Owncloud
To tell the Apache about the Owncloud configuration, we will create a reference or symlink using the below command:
ln -s /etc/apache2/sites-available/owncloud.conf /etc/apache2/sites-enabled/owncloud.conf
Step 8: Additional modules installation
Add these additional modules for proper Owncloud working.
sudo a2enmod headers env dir mime unique_id
After adding the modules, restart the Apache server using the command:
sudo service apache2 restart
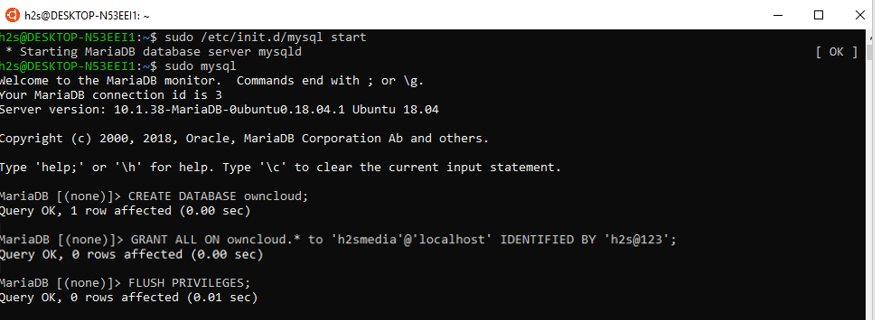
Step 9: Create a MySQL or MariaDB database for Owncloud
First of all, stop and restart the MySQL/MariaDB:
sudo /etc/init.d/mysql stop

sudo /etc/init.d/mysql start
Now let’s create a MySQL user and database for OwnCloud:
sudo mysql
We are building a database with the name owncloud you can use another name if you want.
CREATE DATABASE owncloud;
Now create a user with a password and, at the same time, assign all rights of the above-created database to that. Here we are creating a user with the name h2smedia and a password for the same. You can use your username and password:
CREATE USER 'h2smedia'@'localhost' IDENTIFIED WITH mysql_native_password BY 'my-strong-password-here';
GRANT SELECT, INSERT, UPDATE, DELETE, CREATE, INDEX, DROP, ALTER, CREATE TEMPORARY TABLES, LOCK TABLES ON owncloud.* TO 'h2smedia'@'localhost';
Flush privileges operations:
FLUSH PRIVILEGES;
Exit MySQL using the command:
exit
Step 4 –Install, Setup, and Configuring ownCloud server on Windows 10
After performing all the above steps again go to the browser and type http://localhost/owncloud/ or http://127.0.0.1/owncloud/ or the IP address of your Windows 10 local machine. Just like we did while checking whether the Apache works above in this article.
However, this time you will see the Owncloud server setup and configuration screen rather than the Apache one.
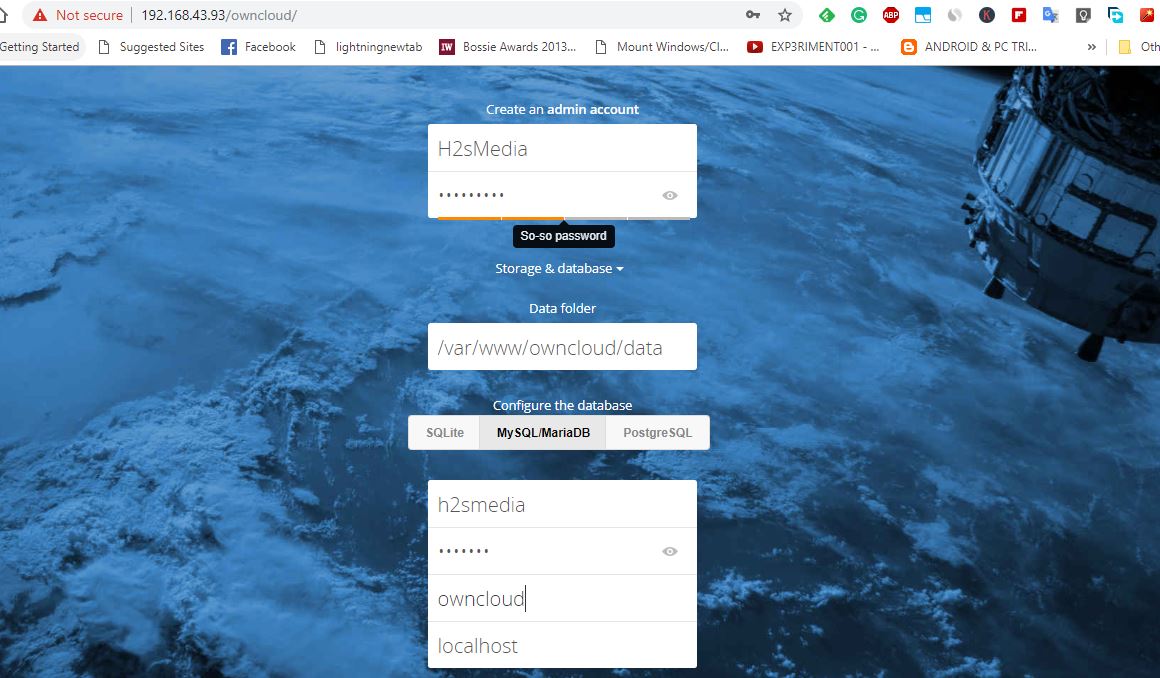
Create an admin account for Windows 10 installed Owncloud. Just enter whatever user name along with a password for the same you want to assign to the Admin account.
After the admin account, you will see a storage and database option; click on that and then MySQL/MariaDB tab. After that, add the MySQL database details we have created above, which means the database username, password, and database name, which is owncloud in our case.
Finally, once you have provided all the information to Owncloud, scroll down and click on the Finish Setup button.
Step 5: Login Owncloud server
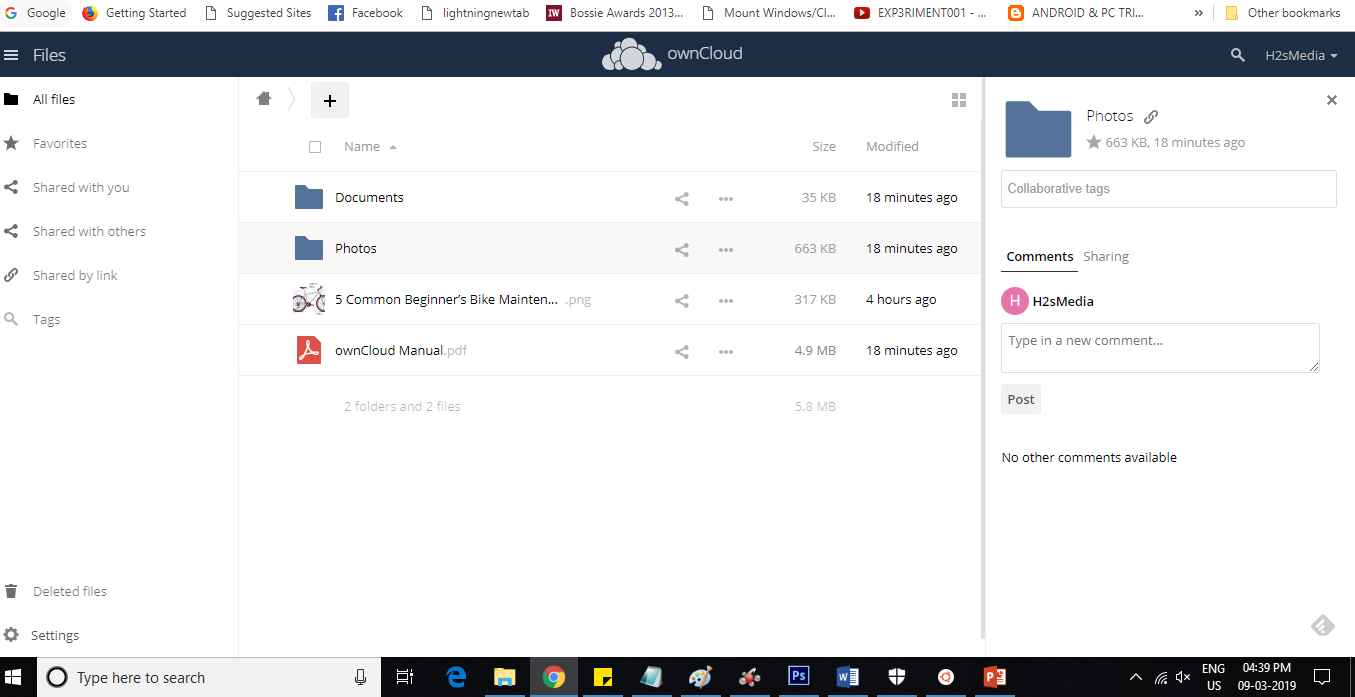
When you click the Finish setup button, the Owncloud will take a few seconds to authenticate all provided details and then offer you a login page.
Login with the admin account you have created above.
As we know, Owncloud also offers a client application that one can use on different operating systems to sync the files between a PC/smartphone and the Owncloud server.
The first screen that appears to you is dedicated to the same. Click on the one OS platform you want to download the Owncloud client.

This way, we can easily install the Owncloud server on Windows 10 for high performance and stability without using any XAMMP or WAMP-like software.
If you have difficulty installing Windows 10 OwnCloud server, let us know, and we will try to solve the same as soon as possible.
Other useful resources:
- How to Install Ansible on Windows 10
- Use Virtualbox drag and drop from Windows 10 to Ubuntu 18 VM
- Install OBS Studio 23.0.1 on Ubuntu 18.04
- How to bridge WiFi to Ethernet adapter to share internet
- How to install Owncloud 10 on Ubuntu 16.0.4 Server


Hi
I sent you email as this does not work
Thanks
Hi,
First of all thanks a lot for your article “How to install Owncloud server on Windows 10 (WSL)”. It is really appreciated.
However I am having difficulties on installing Apache, MySql/ MariaDB plus PHP. Everytime I run the command line in ubuntu I get the following errors:
Package php-imagick is not available, but is referred to by another package.
This may mean that the package is missing, has been obsoleted, or
is only available from another source
Package php-smbclient is not available, but is referred to by another package.
This may mean that the package is missing, has been obsoleted, or
is only available from another source
Package php-ssh2 is not available, but is referred to by another package.
This may mean that the package is missing, has been obsoleted, or
is only available from another source
Do you know how I can fix this and find these packaged?
Thank you.
Best Regards
We have updated the article now you can use the commands mentioned to install LAMP on Windows WSL for OWncloud…
Hey Rajkumar, thanks a LOT for this tutorial. I had to tell you this is one of the VERY few Linux howtos/tutorials that work exactly as described on the first try.
Cheers!
Thanks! We glad it helped you somehow…
Sorry man this does not work. I have used it step for step on Windows 10 Pro and for some reason I just can’t get it to work, I had tried it the first time, reinstalled windows and tried it again the second time and nothing works unfortunately. even get errors when running apache2
Thank you very much for the instructions. Tell me how to move the storage location to another local drive, for example D.
Thanks in advance for any reply!
I’m having a problem. I can’t access to the rootfs folder. Can’t grant full access to my WSL user either.
I think that is keeping from apache to read owncloud’s conf file and running the web gui.
Thank you
If you have sudo access then this should be a problem but as you said it is, so please try to reset the WSL distro you are using. And again install Owncloud.
Thank you for the reply!
Already did that. I did a reset and I unregistered it too. I’m doing it from windows server 2019 standard. I’m not using powershell. Done everything from the WSL shell.
Hi,
Would you concider making a part two of this tutorial on enabling self signed SSL and how to harden apache, basically make the rig more secure with port forwarding on the router for access from outside.
Thank you, it worked! Would you be so kind as to update this article. Had problems with php-zip and php.mb errors on opening owncloud.
Please use command – sudo apt install php-zip php.mb
hi thank you for the tutorial
i have a problem with the command line sudo apt-get install php-zip php.mb
every time i get the following lines
unable to locate package php-zip
unable to locate package php.mb
couldn t find any package by glob ‘php.mb’
couldn t find any package by regex ‘php.mb’
hi i had problems with sudo service apache2 restart
it keeps displaying this message
* Restarting Apache httpd web server apache2
[Tue Apr 18 18:50:52.618691 2017] [core:warn] [pid 546:tid 140453865195392] (92)Protocol not available:
AH00076: Failed to enable APR_TCP_DEFER_ACCEPT
Great tutorial 🙂 It certainly helped me to get the owncloud server up and running.
However, I did experience some issues during the installation, which I would like to share:
1) Instead of Ubuntu 18.04, I installed Ubuntu 20.04 on WSL 2. As the only consequence I had to replace the string “Ubuntu_18.04” by “Ubuntu_20.04” in the commands to be applied.
2) The installation of owncloud based on the box containing the folowing commands failed:
sudo -i
wget -nv https://download.owncloud.org/download/repositories/production/Ubuntu_20.04/Release.key -O Release.key
apt-key add – /etc/apt/sources.list.d/owncloud.list
apt-get update
apt-get install owncloud-files
More precisely, the command “apt-get update” failed, because the owncloud team has not signed the Ubuntu_20.04 release package. Luckily, the Debian_Unstable package has been signed, so as a workaround I replaced the string “Ubuntu_20.04” by “Debian_Unstable” in the commands above, and successfully managed to install owncloud.
3) It was not possible to create a MySQL user and grant all privileges by the single command:
GRANT ALL ON owncloud.* to ‘h2smedia’@’localhost’ IDENTIFIED BY ‘enter_your_password’;
I had to replace it by the two commands:
CREATE USER ‘h2smedia’@’localhost’ IDENTIFIED BY ‘enter_your_password’;
GRANT ALL PRIVILEGES ON * . * TO ‘h2smedia’@’localhost’;
4) I have created a powershell script startOwnCloud.ps1, which is started by the Task Scheduler when a user logs in. The action given in the Task Scheduler is:
powershell.exe -ExecutionPolicy Bypass -windowstyle hidden \path\to\startOwnCloud.ps1
Due to the use of WSL 2, Ubuntu is assigned its own IP at startup, and this IP is different from the one of the local machine. To gain access to owncloud based on the IP of the local machine, the owncloud ports 80 and 443 must be forwarded to the local machine (see https://dev.to/vishnumohanrk/wsl-port-forwarding-2e22).
The first part of startOwnCloud.ps1 performs this port forwarding, while the second part starts the MySQL server and the Apache server.
By having the script automatically started by the Task Scheduler when I log in, I ensure that the owncloud server is immediately available from the very beginning.
The script is shown below. The forwarding part has been taken from the script provided in https://dev.to/vishnumohanrk/wsl-port-forwarding-2e22.
startOwnCloud.ps1:
# Forward the ownCloud ports, 80 and 443, from the WSL 2 IP to the local
# machine and start the MySQL server and the Apache server.
If (-NOT ([Security.Principal.WindowsPrincipal][Security.Principal.WindowsIdentity]::GetCurrent()).IsInRole([Security.Principal.WindowsBuiltInRole] “Administrator”)) {
$arguments = “& ‘” + $myinvocation.mycommand.definition + “‘”
Start-Process powershell -Verb runAs -ArgumentList $arguments
Break
}
$remoteport = bash.exe -c “ifconfig eth0 | grep ‘inet ‘”
$found = $remoteport -match ‘\d{1,3}\.\d{1,3}\.\d{1,3}\.\d{1,3}’;
if ($found) {
$remoteport = $matches[0];
}
else {
Write-Output “IP address could not be found”;
exit;
}
$ports = @(80, 443);
Invoke-Expression “netsh interface portproxy reset”;
for ($i = 0; $i -lt $ports.length; $i++) {
$port = $ports[$i];
Invoke-Expression “netsh interface portproxy add v4tov4 listenport=$port connectport=$port connectaddress=$remoteport”;
Invoke-Expression “netsh advfirewall firewall add rule name=$port dir=in action=allow protocol=TCP localport=$port”;
}
bash.exe -c “echo | sudo -S /etc/init.d/mysql restart”
bash.exe -c “echo | sudo -S service apache2 restart”
Just noticed that parts of the text that I provided in my comment have disappeared when I submitted the comment???
my instagram is : nasos_m_2021 if you can help me send dm
Hello, I am having problems with Step 5. Please help me!
I enter:
sudo -i
then i do:
wget -nv https://download.owncloud.org/download/repositories/production/Ubuntu_18.04/
Release.key -O Release.key
After this, it says, “Release.key: No such file or directory”
I continue to add the script. WHen I put:
apt-key add – /etc/apt/sources.list.d/owncloud.list
Nothing happens. Then I put:
apt-get update
And it says: “E: Malformed entry 1 in list file /etc/apt/sources.list.d/owncloud.list (Suite)
E: The list of sources could not be read.”
If I add the last line of code, it says the same thing. I don’t know what is wrong. I followed all the other steps exactly and everything went ok. Why isn’t it working?? And you say it’s possible to download the owncloud from the site directly, but you don’t say how. Would that be easier than using the code to install it since it’s not working for me? I tried to go on the Owncloud site and I downloaded the .deb file, but I can’t figure out how to install it. Ugh. this is really hard.
Please help. Thank you
The repository method is not applicable anymore, hence to get the latest release we have to manually download the Owncloud files. We have updated the tutorial please follow it again.
I’m stuck with MySQL – Ubuntu 20.04
zvrk@EG-Laptop:~$ sudo service apache2 restart
* Restarting Apache httpd web server apache2 [ OK ]
zvrk@EG-Laptop:~$ sudo /etc/init.d/mysql stop
* Stopping MySQL database server mysqld [ OK ]
zvrk@EG-Laptop:~$ sudo /etc/init.d/mysql start
* Starting MySQL database server mysqld su: warning: cannot change directory to /nonexistent: No such file or directory
[ OK ]
zvrk@EG-Laptop:~$ sudo mysql
Welcome to the MySQL monitor. Commands end with ; or \g.
Your MySQL connection id is 10
Server version: 8.0.28-0ubuntu0.20.04.3 (Ubuntu)
Copyright (c) 2000, 2022, Oracle and/or its affiliates.
Oracle is a registered trademark of Oracle Corporation and/or its
affiliates. Other names may be trademarks of their respective
owners.
Type ‘help;’ or ‘\h’ for help. Type ‘\c’ to clear the current input statement.
mysql> CREATE DATABASE owncloud;
Query OK, 1 row affected (0.02 sec)
mysql> GRANT ALL ON owncloud.* to ‘h2smedia’@’localhost’ IDENTIFIED BY ‘A4rt+-9oid’;
ERROR 1064 (42000): You have an error in your SQL syntax; check the manual that corresponds to your MySQL server version for the right syntax to use near ‘IDENTIFIED BY ‘A4rt+-9oid” at line 1
mysql>
Best Regards!
Use these steps:
CREATE DATABASE owncloud;
CREATE USER ‘h2smedia’@’localhost’ IDENTIFIED WITH mysql_native_password BY ‘my-strong-password-here’;
GRANT SELECT, INSERT, UPDATE, DELETE, CREATE, INDEX, DROP, ALTER, CREATE TEMPORARY TABLES, LOCK TABLES ON owncloud.* TO ‘h2smedia’@’localhost’;
1/22/23
New link for the zip file below
https://download.owncloud.com/server/stable/owncloud-complete-latest.zip
I cannot get the apache page to load. I have tried several things such as localhost, comp IP, external IP, etc.
Is there a prerequisite to this guide? Could it be a certain port that needs to be open like 80 or 443?
Everything ran and Installed fine during the first step. Odd that I am stuck here. I have installed this several times, but there were all on virtual machines though.
Check whether the apache running on WSL or not.
sudo service apache2 status
If not then.
sudo service apache2 start
Note: By default there is no active firewall on WSL, hence both 80 and 443 ports are opened.
Error while trying to create admin user: The table with name ‘owncloud.oc_persistent_locks’ already exists.
what should i do
Hi, I got some problem when owncloud is installed and I boot for the first time. I tried to chage my saved directory on other drive and owncloud ask me to change permission of the folder to 0770. I tried to change it with this command : chmod -R 0770 /myrdirectory but in wsl it seem that the chmod command dosn’t work (surely because the format of windows block it?). So, my other option is to change the file where owncloud check the permission of folder to bypass it. After hours of search, I can’t find this file…. Someone know where can I find this or what is others issues? Thanks.
Help please. Received the following error when trying to set up owncloud on step 4: Error while trying to create admin user: An exception occurred while executing ‘ALTER TABLE oc_persistent_locks ADD CONSTRAINT FK_F0C3D55B93CB796C FOREIGN KEY (file_id) REFERENCES oc_filecache (fileid) ON DELETE CASCADE’: SQLSTATE[42000]: Syntax error or access violation: 1142 REFERENCES command denied to user ‘h2smedia’@’localhost’ for table ‘owncloud.oc_filecache’